About this blog

My photo
Wales, United Kingdom
Documenting one couple's attempts to live a more self-sufficient life.
Showing posts with label Storage. Show all posts

Tuesday, 10 September 2013

Potato harvest part one

I've written more about wild foods than cultivated ones this year, but the garden has been ticking over. In spite of an encouraging start, my seed-grown potatoes came to nothing, sadly. The young plants just weren't tough enough at the time I planted them out and either died in the cold, dry weather or got eaten by slugs. It was probably slugs - they're usually to blame.

However, my conventional tuber-grown crop has done very well. I've been harvesting them for some time, and noticed last week that some of the leaves are yellowing, meaning there's no point leaving them in the ground any longer as they've done all the growing they're going to do this year. Time to dig!

I tried a few different varieties this year, so I have...


King Edwards - a reliable old favourite


I think these are Charlottes...


... and these Sharpes Express, but they might be the other way round


I've left most of the Desiree, but dug up a few by mistake...


... and a few more

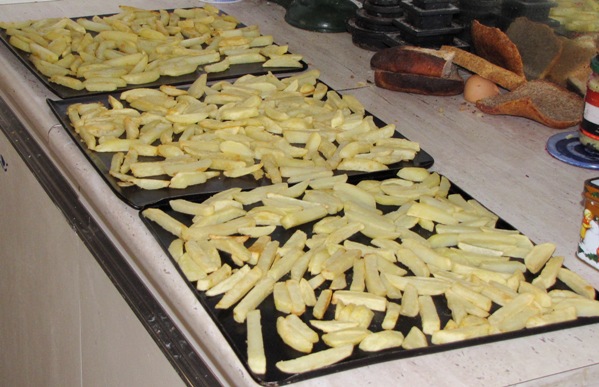
The rest of the Desiree plants are still looking green and healthy, so I'll leave them to grow a little longer before digging those up. Most of the spuds are going into storage the traditional way (I even found the sacks!) but I used up a jar of tallow to make...


Chips!

Three trays of chips are as many as I can make at one time, because that's how many trays I have. I actually made five trays-full altogether, and these are now in the freezer.

Sunday, 25 August 2013

On the rack

Currently drying, I have...

At the top, bilberries. These are too small for even the smaller mesh shelves at the bottom, so I made a screen from a picture frame and what I thought was net curtain fabric. It wasn't, it was something stretchy, which made the job somewhat more difficult, but I got there in the end. I picked the bilberries nine days ago, and they're drying nicely.

In the paper bag on the next shelf, I have a couple of hogweed seedheads.

On the third shelf, I have small mushrooms. I had to move the bilberries up so I could use the finer mesh shelf. These are fairy ring champignon, which I picked today. Apparently they dry and rehydrate very well. Some specimens are younger and paler than others.

The bottom shelf is mostly full of laundry equipment. This is meant for drying woolly jersies so they don't get out of shape, but is currently occupied with black currants. These have been there for ages (I hadn't made the picture-frame screen when I picked the currants) and are now nicely dried.

Under and around the net thing, I have another paper bag with umbellifer seeds in; in this case parsnip seeds. I must remember which way round these two are, because I don't particularly want to grow hogweed in my garden. I also have a few pea seeds and potato fruit. I didn't have much luck growing potatoes from seed this year (the slugs ate all the seedlings when I planted them out) but I might give it another go next year.

Thursday, 26 July 2012

Solar dehydrator - Mark 1

I picked a second harvest of blackcurrants the other day. I got three and half pounds and my neighbour got a couple of pounds as well, and there are still more ripening on the bush - it's a good year for blackcurrants. I stewed mine with a little water and strained the juice overnight to make cordial (with sugar added to taste, made about a litre). I then squeezed the bag to get more juice out - the murkier pressing - and made sorbet out of that (dilute and add sugar to taste. Freeze, but take out and stir at intervals. It still needs warming a bit before it's soft enough to serve, but if you don't stir it you just get an ice lolly, which is another option).

Finally, I pressed the remaining sludge through a sieve, leaving behind just the pips and skins, and sludge that I hadn't the energy to push through (this is very hard work). Again adding sugar to taste, this thick sludge can be dried to make fruit leather. As blackcurrants have a very strong flavour, I would have preferred to mix them with something bland like haws, but they're not ripe yet. I think I can live with intensely flavoured fruity snacks. Thick sludge was duly spread out in thin layers on baking sheets.

When I've made fruit leather before, I've dried it in the oven. As we have the novelty of actual sunshine here at the moment - and it's hot! Getting on for 30°C! (OK I know that's pretty cool by American standards, but it's unheard of in Wales) - I thought I'd try the sun dried approach. I started by laying the trays out on the garden table, which is perforated metal, so good for warm air flow around the trays. To increase the chances of actual drying happening, and because I've been thinking about solar dehydrators recently, I decided to construct such a device to help things along.

So... solar dehydrator step 1: Choose something dark coloured and non-insulating to serve as a collector. This is the bit that heats up when it sits in the sun. I picked roof slates as we have lots sitting around. The rigidity is handy, as they need propping up at a suitable angle to face the sun. I used bits of old brick for this, as we also have a lot of these sitting around.


Slates propped up on bits of brick. High tech stuff, this.

The next step is to set up a sheet of glass or plastic over the collector to make a little greenhouse. There should be a gap between the two to allow air to flow from the bottom to the top. I had a broken piece of greenhouse glass to hand, and found a bit of car in the garage (it wasn't attached to a car at the time, I promise!) that looked good for a spacer/ seal for the sides.


Glass resting on piece of rubber. This also keeps the glass off the ground, allowing air to get in at the bottom.

Once I'd set up my collector, I just needed some way of directing the air from the top of it towards the table with the trays of fruit sludge. I also thought that protecting the fruit from flies might be a good idea. I took the fabric part of a tent (yes, that was just lying around, too) and draped it round the table and collector, with the insect net supported by some garden wire (which was tidily put away in the greenhouse). I'm not sure I did a very good job of this.


There are three trays of fruit pulp in there somewhere

The idea was to catch the hot air emerging from the top of the collector and send it in the direction of the table. I did want to take the temperature of various parts of the set-up but the only thermometer I could find (pinched from the central heating system) was very slow to react, and we were going out, so I just left it.

Several hours later...


Tada!

We have actual, dried fruit leather. I didn't really believe it would work. Of course, if I was being scientific about it, I'd have left one tray out in the open as a control condition, to see whether my roof-slate-and-tent setup made any difference at all, but I didn't. I just wanted to give my fruit the best chance of drying, so now I have no idea whether this works as a dehydrator, but I do have a tin full of blackcurrant fruit leather stashed away for the winter.

Monday, 16 July 2012

Things that go bump in the night

We were woken up at 3:30 this morning by an explosion. One of the bottles of elderflower champagne had gone off with a bang. Ian kicked me out of bed to go and depressurise the rest. Unfortunately, there was one bottle that I couldn't do anything about - the glass cider bottle. That one went bang at 8:00 this morning.


As you see, home brew is taking over my kitchen.
I really need the store room back in action.

You'd think the cap would have blown off before the bottle exploded, wouldn't you? Well, I did. Here's the windowsill on the other side of the room, about ten feet away:


Little bits of glass on the windowsill

There were tiny fragments like that all over the kitchen. I haven't finished cleaning up yet - I felt the need for a cup of tea.

Lesson: Don't put elderflower champagne in glass bottles, even if they did contain fizzy drinks before. You'd think I'd have learnt that by now, wouldn't you?

Friday, 17 February 2012

Cleaning tallow for storage

I use tallow (beef fat*) for chips, because I think it gives the best flavour. The first time I made a big batch of chips I bought some fatty offcuts of beef from the butcher specifically for that purpose (and got some good stock and meat for pies out of the process, too). However, I'd rather use leftovers if I can.

We recently had some beef brisket, and very tasty it was too. It also produced a good quantity of tallow, which I saved. Unfortunately, I've now made as many chips as I'm going to with this year's potatoes, so I don't have a use for that much tallow in the foreseeable future. Fortunately, tallow keeps very well, provided it's clean. I don't mind dirty tallow, i.e. with a little meat juice mixed in, for cooking, it just adds to the flavour, but that won't store well.

I looked up how to clean tallow, and it's not complicated. The fat should be melted in water, then the whole lot allowed to cool. The fat rises to the top, leaving everything else to sink to the bottom in the water. If necessary, this process can be repeated several times.


Tallow melting in a pan of water

As soon as it was all melted I poured it into the Pyrex pudding basin that I usually use for stock (transparent, so easy to see how thick the layer of fat is at the top, should you be interested). I had intended to let it cool and set before separating fat from water, but it occurred to me that this wasn't necessary. The two liquids separate out well before the fat sets, so I could scoop out the tallow while it was still liquid.

I wanted to store it in a jar with as little surface area exposed to the air as possible. This required the fat to be liquid when it went in, so it made sense to transfer it while still liquid rather than let it set, separate from the water, then melt it again to pour into the jar. I took a small ladle (yes, it could be said that having a choice of ladles indicates too many kitchen implements, but it was handy on this occasion) and scooped out most of the fat into a jar. The last bit was too difficult to get out without mixing it up with the water, so I left that to set. Once set, I lifted the solid layer off, scraped the underside of anything that wasn't clean yellow fat, and broke it into a (clean, dry) pan to melt again, so I could pour into the jar.


Jar of tallow

I now have a jar full of beautiful clean tallow, which I hope will keep for most of the year until I need it for chip-making again.

Oh, and the coating of fat left in the pan after pouring? I used that to fry onions for making bolognaise sauce.

---

*Fat from lamb and mutton is also called tallow, whereas fat from pork and bacon is lard, and I don't know about poultry or game. Come to think of it, there's probably not enough fat on game to warrant a name for it.

Monday, 26 September 2011

Fruit leather

Even when we can't grow fruit and veg ourselves, we still try to buy local, seasonal food, which isn't great for fruit in winter. Last winter I got pretty fed up of apples. In the interests of more variety this year, I've been thinking about preserving fruit by drying. I did try straightforward drying for a handful of blackcurrants, just by spreading them out in a basket in the conservatory. That worked, but took quite a while, and I'm not sure it would be so easy with larger fruit (and most fruits are larger than blackcurrants).

As an alternative to drying fruit whole, they can be pulped first and spread out to make fruit leather. I tried this for the first time last year using a mixture of rosehips and haws, and it was delicious, so I'm repeating that as well as extending the range this year. Haws (fruit of the hawthorn tree) are invaluable for providing pectin, which is essential for fruit leather. My first batch was made with blackberries and haws picked when foraging in Wiltshire. I stewed the fruit in a pan together, roughly equal quantities of the two kinds, and kept stewing it until most of the water had evaporated.

Once I had a thick, stodgy mess in the pan, I pushed it through a seive to remove the pips and stones. This is hard work and takes ages, but can be done whilst watching telly, so it's not too bad. When I got fed up of trying to separate pulp from pips and had a suitably thick paste in the bowl, I tasted it and added a bit of honey to sweeten. You could use sugar, but I fancied honey - not the runny kind, though, because I didn't want to add too much liquid. Once it tasted about right* I spread it thinly on a non-stick baking tray.


Spreading fruit pulp on a baking tray. This one's damson. I did have a better picture of an earlier batch, but deleted it by mistake. Sorry.

This then needs drying. In warmer weather I could probably do this in the conservatory, but it would need protection from flies. As it's pretty cold and damp here at the moment, I'm using the oven for drying. This means putting the tray in the oven on a very low temperature for an hour or two, then turning the oven off and leaving overnight. If it's still sticky in the morning, put the oven on again for a bit. I think opening the door periodically would probably help, too.

I did try being economical by putting one batch of leather on a low shelf while cooking cakes on a higher shelf. They don't need the oven very hot, so I thought that would be OK. It was OK, but the resulting leather had a strong taste of caramel, which might not be what you're aiming for.

When dry, fruit leather looks like this:


Fruit leather (damson again) being peeled off the baking tray.

As these were stickier on the tray side than the air side (unsurprisingly) I decided to fold them over so they stuck to themselves and made double thickness leather, which I then cut into snack bar sized pieces.

As you'll have picked up from the rest of this post, I've made several batches of this. The first was blackberry and haw, using the Wiltshire hedgerow fruit - most delicious. The second was bilberry and haw using local fruit. The bilberries were right at the end of their season and the haws were barely at the start of theirs, so neither fruit was at its best. This was OK, but not as good at the blackberry one. The next batch was damson (no haws in this one as damsons are high pectin themselves), using a pound of windfalls that next door's tree had dropped onto our driveway. I couldn't bear to see them sitting there going rotten! That one was very tasty but possibly a bit too sharp. I probably should have added a bit more honey.

I have another batch of damsons on the go now (I got permission from the neighbours to actually pick their fruit). This time I've left the stewed pulp fairly wet and hung to drip for cordial first, then I'll make leather with the remaining pulp. I'm assuming the flavour will be less intense as I'll have taken some off for cordial, but damsons have a lot of flavour to start with, so there should be plenty to go round. I'm also planning a rosehip one, as that was so nice last year... in fact, as the haws are now a bit riper, I might just go and do that right now!

---

*One advantage of fruit leather is that it needs much less sugar (or honey) than other methods of preserving fruit, such as jam,

Friday, 9 September 2011

Chips

I decided that the best way of preserving my blighted potatoes would be to turn them into frozen chips. We used to buy chips ready frozen, so making them from scratch is something I've learnt to do in the past year. I had some trouble finding instructions for how to do so, and eventually found what I was looking for in Jane Grigson's Vegetable Book.

She starts by saying that deep frying has no place in a domestic kitchen, especially with children around: I know we should not over-protect them, but I draw the line at boiling oil. Having said this, I admit the book would be incomplete without instructions for making these delicious kinds of potato. I tried making chips according to her recipe, which involves cooking them in small batches. They're crispy enough when they first come out of the oil, but by the time enough small batches have been cooked for a meal (and there are only two of us), most of the chips have gone soggy.

I started experimenting with an alternative method. We used to cook oven chips, so could I replicate those? The final stage of cooking is obviously in the oven, but they're coated in fat before we buy them, so I'd need a first stage of cooking to apply that coating. I tried deep frying, but that still led to sogginess - probably too much oil absorbed. Then I tried shallow frying, again in fairly small batches, which was much more successful. I experimented with different fats, including sunflower oil and various meat fats, before settling on beef tallow as my favourite, closely followed by lamb tallow. Lard is no good as it burns too easily.

The recipe is pretty simple:
  • Cut potatoes into chip shapes, thickness according to preference.
  • Heat fat in frying pan to a medium heat.
  • Add chips to pan, in small enough quantity to make a single layer with a bit of room to move about.
  • Stir constantly while cooking, to coat chips all over in fat and keep them from sticking to the pan and each other. Any bits that do stick to the pan should be scraped off so they don't burn.
  • When chips are just starting to colour, transfer to a baking sheet.
    --- Chips can be frozen at this stage, if storing ---
  • Cook in oven preheated to gas mark 6/200°C/400°F for 10 min (longer if thick, or if frozen. Even longer if both thick and frozen).


Chips after first stage of cooking, ready to freeze or finish cooking in the oven

We think of chips as being high in fat, and the deep fried kind certainly do absorb a lot of oil. However, when I look at how much fat is absorbed when cooking a portion of chips this way, and consider how much butter I'd add to boiled or baked potatoes, I find it's about the same. For me, then, chips are no more fatty than any other way of eating potatoes, but that probably says more about how much butter I put on my spuds than the healthiness of this chip recipe!

Tuesday, 2 August 2011

Things I have learnt about blight

Since my potatoes got blight, I have learnt a few things about this condition.
  1. DO NOT dig the potatoes up immediately. Oops. The reason for this is that the fungus spores will fall off the infected leaves straight onto the tubers, given half a chance.
  2. Instead, cut the tops (haulms) off and remove them, preferably burning them. If you're being really fussy, cover the ground at this stage to stop any spores from washing into the soil when it rains. Leave spuds in the ground for a couple of weeks and then dig them up.
  3. A minor infection on a tuber is no big deal. It may show as a brown patch on the skin, which can be cut off easily and the rest of the spud is fine.

  4. Blight on potatoes, slightly more serious on the right hand one, but both possible to cut out and use the rest of the potato.
  5. If caught early, blight is essentially a storage issue. Blight spores on the tubers will make themselves at home, more quickly if the skin is damaged, and gradually ruin the crop. If the spuds can be used quickly enough, it really isn't a problem.
I lifted about half of my potatoes straight away, so they're no goood for storing. This meant that either we had to eat 45 lb of spuds in a few weeks... or I had to think of some other way of preserving them. The answer could only be chips!

Tuesday, 19 July 2011

Store room catastrophe... and more mushrooms

I was next door having a nice cup of tea with the neighbours when Ian turned up, saying, We have a problem in the store room. The shelves have collapsed. I rushed home and this was the scene that greeted me:


Aftermath of shelving collapse

Actually, that's not quite true. The first thing I did was pick up the demijohns - thankfully not broken, in spite of having been on the top shelf - to see if anything could be salvaged of the contents, and ditto the air-locked bottles of blackcurrant wine. Ian also refused to let me mess around taking photos until I'd dealt with anything potentially explosive. If you look at the right hand edge of the above photo, you can just about see the escaped stopper of the one glass bottle of pink elderflower champagne. I also had two glass bottles of not-pink elderflower champagne, presumably equally pressurised. These were carefully removed and depressurised outdoors - they didn't seem all that explosive, actually.

So... these had been salvaged by the time I took a photo of the chaos.


Almost a demijohn-full of oak leaf wine, just over a pop bottle-full of blackcurrant wine, and two intact bottles of elderflower champagne

It could have been worse. I'm putting off dealing with the rest of the mess until I have somewhere to put things. We now have no shelves in the store room at all.

At the same time, elsewhere in the store room, I spotted these:


More mushrooms growing in the store room

This morning I went down and picked one, so I could take some better photos:


I've looked at a few websites, but I can't identify it. Any ideas?