About this blog

My photo
Wales, United Kingdom
Documenting one couple's attempts to live a more self-sufficient life.

Monday, 30 December 2013

Foraged Food Friday: Oak leaves

Now edited, with corrected recipe and photos!

Some people use brown, fallen oak leaves to make wine but I don't fancy that. Trees put toxins they've built up into their leaves in the autumn before dropping them. Fallen leaves are tree poo. I'd much rather use vibrant, young leaves that have just burst forth in spring.


Fresh, young oak leaves (Quercus petraea)

There are plenty of oak trees around where we live, including three in our garden. I do pick from those but by far the easiest trees to pick from are the ones growing horizontally nearby.


This tree may have blown over, but it's still growing


Pebble helped with harvesting from the more vertical trees

As usual, I ignored any recipes and kept it simple. I picked six pints of leaves, boiled them for an hour or so, put them in a bucket with two kilos of sugar and topped up to two gallons of water then added yeast and left the whole lot for four or five days before straining into demijohns.

Although it's not really ready yet - I spent ages defizzing it - I wanted to drink oak leaf wine on Christmas day so decanted a bottle. The first time I tried this, I thought it tasted quite a lot like grape wine, but now I'm not so sure. I guess it's a matter of context. Either way, it's a crisp, pleasant wine that could probably do with maturing rather longer than the seven months I gave it. I'll try to keep some long enough to find out!

Also harvesting this week:
Sorrel
Parsnips
Leeks

Also eating
Blackberry and bilberry jam
Rowan jelly
Tomatoes (Gill was right about still eating them at Christmas)

Also drinking
Blackberry wine
Dandelion flower tea

Foraged food challenge summary page here.

Monday, 23 December 2013

How to de-fizz homebrew

Some drinks are meant to be fizzy - beer, or elderflower champagne, for example - but if I make red wine, I don't usually want it fizzy. You'd think not-fizzy wine would be easy enough to achieve, but I find that mine often ends up with a slight sparkle. This is because some of the carbon dioxide produced during fermentation remains dissolved in the wine.

Happily, I've found a solution to this problem. I have a simple vacuum pump that is used for preserving half-bottles of wine. It came with a couple of rubber stoppers that include valves, so air can be pumped out of the bottle and won't get back in. Reducing the air pressure inside the bottle reduces how much oxygen will react with the wine and so reduces souring. However, if you use this on a fizzy drink, it also has another effect.

With reduced air pressure on the surface, the carbon dioxide comes out of solution and evaporates, effectively de-fizzing the wine. I've shown less than thirty seconds of this in the video, but it takes a lot longer than that to remove all the fizz. It's more effective if the bottle's less full, so there's a greater surface area to work on, and swirling the wine around helps bring more fizzy wine to the surface. I do this repeatedly until... I get fed up. The wine is generally a good deal smoother by this stage.

Foraged Food Friday: Rosebay willowherb leaves

My foraging post got a bit derailed this (last) week. On Friday, whilst gathering dead bracken to feed the terrace, a piece of bracken hit back. It splintered off the stalk and hit back so hard that it went right through my thumb. Ian was out at the time, so I went next door and asked my friend Gill for help. She was wonderfully calm, sat me down, asked if I had any great attachment to my gloves (no, luckily) and cut the glove thumb off to inspect the damage. We agreed that this was not a first aid job, and she took to me to A&E, where they have anaesthetic. Several hours later we returned, my splinter replaced with a couple of stitches and a large bandage. I was in no state to cook dinner, so Ian and I ate at the pub that evening. On Saturday I went to a party (having replaced the large bandage with a rather smaller dressing) and on Sunday we went to another neighbour's for dinner, and I drank far too much wine.

So, here we are on Monday and I have no desire at all to drink the beer I was planning to tell you about. I'm going to cheat and tell you about it anyway, even though I didn't drink it in the relevant week.


Bay herb ale

Following my success with the heather ale, I wanted to experiment with other flavourings. When I ate rosebay willowherb stalks, I found it necessary to discard the growing tips as their flavour is far too strong for me to enjoy as a salad. I wondered whether they might be just the things for bittering ale. Having learnt that ale needs both bitter and aromatic flavours, I cast around for something to complement the taste, and settled on bay leaves, and not just because they also have bay in the name.

Following a similar recipe to the heather ale, I used two 370g jars of malt extract and 350g white sugar to make two (imperial) gallons of ale. I gathered about a saucepanful of rosebay willowherb tips (young leaves with some stalk) and supplemented these with a handful of bay leaves from a tree I've had since I was a teenager. Since neither herb has delicate flavours that might be ruined with excessive boiling, I put them all in a pan together, covered with water and boiled for half an hour or so. The liquid was strained onto the sugars, topped up to two gallons with cooler water, and yeast (probably from oak leaf wine) added. As usual, I left it to ferment in the bucket for 4-5 days (it might have been a week - my note-taking isn't very good) before bottling with a little more sugar in each bottle.

The resulting ale has a nice reddish colour (well, it does in good light) and is surprisingly frothy. It tastes pretty good, too, though not as much like beer as the heather one. One friend said it was more like cider - I'd say it's distinctly herbal. I suppose it's fairly acidic, and a refreshing sort of a drink. I'll definitely make this again, even if it isn't really beer.

Also harvesting this week
Parsnips
Leek
Rosemary
Speedwell

Also eating
Pumpkin, including roasted seeds (not mine)
Mint sauce
Rowan jelly

Also drinking
Blackberry wine

Foraged food challenge summary page here.

Tuesday, 17 December 2013

Christmas sweets

Christmas means different things to different people - personally I'm celebrating the return of daylight - but apart from the deeper meaning, it does seem to consist largely of traditions. Sometimes the value of tradition outweighs all other considerations - I don't care if none of us like sprouts, it's Christmas! Mostly, I'm not a fan of tradition (no sprouts in this house), but there is one Christmas tradition that I keep, and it would upset me not to do it. Even if I don't send a single card or don't put up one strand of tinsel, I will make Christmas sweets.

My mum started this tradition. Every year for as long as I can remember, the weeks before Christmas were filled with melting chocolate, marzipan and icing sugar. Tasks were carefully selected so that little girls could join in (rolling marzipan to stuff dates, not cutting dates with a sharp knife) and as my sister and I got older, we shared the sweet-making as equals. Then, after Mum died, we carried on the tradition, through our teens and as we grew up, left home, and started families of our own (my sister taking on this latter task more wholeheartedly than I).

I wasn't sure whether to write about Christmas sweets here - perhaps it would be nice to keep them our, Secret family recipe. I talked to my sister about this and she pointed out that most of the sweets are made to well-known recipes. The only ones that are unique to our family (as far as we know) are the peppermint mice. Even those are made from a standard recipe; it's the construction that might be considered a secret and that probably has more to do with our years of practice than any secret tips I could share online. We agreed that I could share our family tradition, with just a few hints about how to make mice. If that's enough for you to make them too, good for you!

Mum varied the repertoire a bit from year to year, but four types were constant: Chocolate truffles, brandy cherries, stuffed dates, and peppermint mice. Since I'm married to someone who doesn't like dried fruit, alcohol, or peppermint (It tastes like toothpaste - it's just wrong!), I've added chocolate caramels (for which I am indebted to Susie for inspiration - see link for how to make these).

Chocolate truffles
The standard recipe for chocolate truffles consists of heating cream gently and melting dark chocolate into it, then (optionally) beating a little alcohol into the mixture after it's cooled. Ratios of chocolate:cream vary from 2:1 to 1:1, so it's not terribly critical. Mum always padded the mixture out with crumbled stale sponge cake. Stale cake? I hear you ask. Well, no, not in this house either. I make a very plain cake specially, just for the crumbs. Not only does it make more truffles, but I prefer the firmer texture, too.

Brandy cherries
Buy glace cherries, soak in brandy, drain (keep the boozy syrup!), coat in dark chocolate. Simple.

Stuffed dates
Buy dates, remove stones, replace with marzipan, roll in sugar. Also pretty simple. Mum used to add food colouring to some of the marzipan, so we had a selection of colours. I don't find food colouring so appealing these days, though I do still buy yellow marzipan as opposed to white, which I presume is uncoloured.

Peppermint mice
Mix egg white and icing sugar and a little peppermint essence (I have an ancient bottle of pure peppermint oil, so very little is required) to make peppermint cream mixture. Add a little glycerin, which stops it setting hard, then add more icing sugar. More than that. No... more still. You're aiming for the consistency of modelling clay. When you think you've added enough sugar, add a little more. In the unlikely even that you've added too much and the mixture cracks when you mould it, a drop more glycerin will solve the problem.

Some of these take quite a bit of forward planning, and there's some sense in doing some things before others. Cherries need soaking in brandy - a few days is probably enough, but we often give them weeks - and a cake needs crumbling for the truffles. If the cherries are coated before the truffle mixture is made, extra chocolate can be melted, which makes dunking cherries easier, and then leftover chocolate can go into the truffles. It's just as well the ratio for truffles is a bit vague. Currently I have...


Cake crumbs


Chocolate-coated cherries


Leftover chocolate and syrup

... and what else is that in the second picture? Oh, yes. Mouse ears. You have to make the ears first and leave them to dry for a few days before making the rest of the mice. Do not be tempted to put them in a warm place to speed this process, as they tend to go yellow.

By Christmas - hopefully by the end of this week - I should have:


Christmas sweet selection.
I still haven't figured out a way of stopping the colour running on the mouse faces.

Friday, 13 December 2013

Foraged Food Friday: Blackberries

I was going to tell you about my next beer experiment this week, but I have a cold and fruit-based drinks are more appealing.


Blackberries (Rubus fruticosus)

I don't have to go very far to find blackberries, as there are plenty of brambles in my garden. Indeed, there's a part of my garden that's inaccessible for this reason. The one pictured above grows on the boundary between my garden and my neighbours' and feeds off my compost heap. The fruit are luscious indeed.

This late summer* bounty has many uses, but the first thing I do with blackberries is to make wine. I also tried Atomic Shrimp's recipe for balsamic-like blackberry vinegar, which is pretty good, but right now I'm drinking blackberry wine.

The recipe I used was:-

  • 4 lb blackberries
  • 1 kg sugar
  • Add water up to 1 gallon
  • Sprinkle with yeast from sachet (remaining half from kit lager)**

The first kettleful of water onto the berries was boiling, to kill off whatever moulds were living there (blackberries always go mouldy very quickly. If you pick a batch and leave them at room temperature until the next day, they will be mouldy). I then mashed the berries with a potato masher before adding sugar, the rest of the water (cold, to bring the temperature down), and the yeast. I let this ferment in a bucket for a week, then transferred to a demijohn (using a jug to scoop and pour - I find this method easiest), leaving the yeasty sediment behind for use in the next brew.

My note-taking seems to have fallen down when it came to dates, but I think that was the end of August. As wines go, this one's pretty quick, so not much more than three months later it's ready to drink.


Blackberry wine

I'm not sure whether you can tell from that picture, but it's a nice clear, ruby colour. It's still slightly fizzy but I have a trick for dealing with that (separate post - remind me if I don't get round to it) but once flattened, it's a very pleasant, light red wine. The thing with these country wines is not to expect them to taste the same as grape wines. Mostly, you can tell what fruit they come from. This is not a bad thing, but if you're not expecting it, your first reaction may be, This doesn't taste like wine. I'm rather partial to blackberry wine, myself. In fact, I think I may have another glass. Cheers!

Also harvesting this week
Celery (this is pathetically small this year but better to have tiny celery than none at all. It doesn't add much bulk to stews, but it still adds plenty of flavour, especially if I use the leaves as well as the stalks)
Nettles, bittercress and sorrel (there's not much of any of these, but I folded a little of each into pastry. They failed to disguise the fact that the lard I used was past its best.)
Leeks
Parsnip
Evening primrose roots

Also eating
Potatoes
Pumpkins, including roasted seeds (not mine)
Birch bolete (from dried)
Knotweed chutney
Green laver
Rowan jelly

Aso drinking
Blackcurrant wine
Honeysuckle and dandelion ale
Sloe and elderberry wine (this year's, though it's not quite ready yet)

Foraged food challenge summary page here.

---

* Late August, early September
** I had been keeping yeast going from one brew to the next for several months, but the live yeast got infected after the previous brew - dandelion and honeysuckle ale - so I started again with a half-sachet of yeast I'd kept back from the kit lager.

Saturday, 7 December 2013

Foraged Food Friday: Heather

This was my first attempt at making non-kit beer and the hardest part about writing this post has been keeping the beer this long. I wrote about the recipe when I made it, back in April, so I won't go over it all again. After that I left it in the bucket for about a week, then bottled with a small teaspoonful of sugar to each bottle, and it was ready to drink a couple of weeks after that. I could have written about it sooner, but it made sense to save anything that could be saved for the last months of the challenge, and then I thought it might be fun to finish the foraging challenge with a run of alcoholic drinks so here goes - booze for the next two months!


Ale flavoured with heather (Calluna vulgaris). It did clear in the bottles and I usually manage to pour it clear, but not this time.

For a first attempt, this was remarkably successful. The only commercial heather ale I know of also includes bogmyrtle (otherwise known as sweet gale), but as I didn't have any of that, I just used heather on its own. The result wasn't even, "Well, it's pretty good if you don't expect it to taste like beer." It actually does taste like beer, and a pretty good one at that. It's light - not exactly lager but a nice summery sort of a beer. Well, it was.

Sadly, the flavour started to deteriorate after about about three months. It's still fine, but a bit sharper and not quite as good as it was before. I believe that the popularity of hops is partly due to their preservative qualities, so I shouldn't really be surprised if heather ale doesn't keep quite so well. Never mind - excellent for a few months and OK after that is quite good enough for me. I made two batches (two gallons each) this year, and I'll definitely be making more next year.

Also harvesting this week
Hairy bittercress
Mustard leaves
Oyster mushrooms
Evening primrose roots

Also eating
Potatoes
Tomatoes (it's only small ones left now, still ripening in their bowl in the kitchen. I just pick at them in passing)
Pickled samphire
Rowan jelly
Pumpkin (not mine)
Green laver (toasted, crumbled and sprinkled on pumpkin stew)

Also drinking
Hopped ale

Foraged food challenge summary page here.

Friday, 29 November 2013

Foraged Food Friday: Sloes

Like blackberries, sloes are often picked by people who don't otherwise scour the hedgerows in search of forageable goodies.


Sloes, fruit of the blackthorn tree (Prunus spinosa)

When sloes are someone's only foraged food, they tend to get made into sloe gin. I have a bit of a problem with the concept of sloe gin, in that if I'm buying alcohol to start with, why not just drink it as it is? For my foraged and home-made drinks, I'd rather use sugar and let yeast make the alcohol for me. The sugar still has to be bought, but it's closer to self-sufficient booze than buying booze to start with, I feel. With this in mind, I experimented with sloe and elderberry wine a couple of years ago. This was hugely successful, and I have a batch on the go this year, which I'll file under elderberries and tell you about when it's ready.

The usual advice on picking sloes is to wait until after the first frost. This advice is given for various other things, including parsnips, and I'd heard that it's just an indicator of season, and when they're likely to be ripe. In other words, the frost itself has no effect on the fruit. I had the opportunity to test this theory when I was visiting my sister. I'd picked a few sloes near her house, then a couple of days later we had the first frost of the year, so I went back and picked a few more (not from exactly the same place, but somewhere a little closer, as we were leaving that morning and I didn't have very much time), so I had two samples of sloes to take home with me, picked just a couple of days apart, but before and after the first frost. Once home, I split the earlier sample and put half of it in the freezer overnight, which some people do to mimic the effect of frost.

I did my best to set up a blind taste test. I put my samples in three ramekin dishes and stuck labels to the bottom of the dishes. Over the course of a few hours, I then shuffled the dishes every time I went past them, so that I wouldn't remember which one was which. Unfortunately, it was quite easy to tell them apart. The sloes in the second sample were slightly larger than those in the first, and those that had been in the freezer were considerably messier than those that hadn't. Still, I did my best to ignore these features when I tasted them.


Three samples of sloes: Pre-frost, freezer, and post-frost

The first one I tried had the familiar astringency - you know, the kind that instantly removes all moisture from your mouth and turns your face inside out. Yep, definitely a sloe. The second one... Oh! Where has all the flavour gone? On further testing, there was some flavour - mostly of plums - but no face-turning-inside-out astringency. The third one was somewhere between the two - sharp, but quite palatable. These differences were huge - I felt that my precautions to disguise the samples were entirely unnecessary, but then I didn't know there'd be big differences before I did the test. On looking at the labels, sure enough, the first sample was pre-frost, the second freezer, and the third post-frost. Conclusion: Freezing sloes does indeed reduce the astringency and more freezing (overnight in the freezer) reduces it more.

That said, milder tasting sloes are not necessarily a good thing. Especially in wine making, I value that tannin and balance it with sugar. I'm glad I picked mine early. The sloes I've been eating this week were picked even earlier...

I'd read on the self sufficientish website that unripe sloes can be used as an alternative to olives, if soaked in brine followed by vinegar. Back in early September I spotted a great abundance of unripe sloes growing a long way from where I live, making it impractical to go back for them later in the year. I remembered the olive-substitution, and thought I might as well pick a few and give it a try, seeing as there were so many there. At about the same time, I was starting to experiment with lacto-fermentation and noted the similarity of the salt then acid sequence. How about trying lacto-fermented sloes?

I started with a fairly strong brine - about a tablespoonful of salt in a smallish jarful of sloes in water.


Jar of fermenting sloes. It was fuller to start with - I've eaten some.

After a couple of weeks, I diluted the brine a bit (can't remember whether I took some out or just added water) and added a blackcurrant leaf to introduce the right kind of bacteria, then put an airlock on the jar, as in the photo above. I'm not sure I needed to bother with the airlock, as it fermented so slowly. But... it did ferment. Every day or so I looked at it and saw tiny little bubbles making their way to the top of the jar. I usually gave it a little shake to help them on their way.

A few weeks ago I tasted one of the sloes... Ewww! Way too salty! I removed about half of the liquid (using it later as seasoning in a stew) and topped up with water (tap water left to stand for a bit to let chlorine evaporate. I've come to accept that too much chlorine is not going to be good for lactobacilli. I've no idea whether the chlorine in tap water is too much but it's easy enough to let it evaporate.) After a couple more weeks of slow fermentation I tried again, and... these are really good! They don't taste exactly like olives, of course, but they're similar enough to be an alternative. If I really wanted some olives and only had these in the house, I'd be happy to eat these instead.

Also harvesting this week:
Leeks
Sorrel

Also eating:
Potatoes
Tomatoes
Laver
Blusher mushrooms
Dandelion flower tea
Rowan jelly
Knotweed chutney
Chestnut biscuits (Previous post edited to correct the recipe for these.)
Pickled samphire
Courgette and mint soup (from freezer) with added fresh sorrel

Also drinking:
Hopped ale
Blackcurrant wine
Dandelion and honeysuckle ale

Foraged food challenge summary page here.

Friday, 22 November 2013

Foraged Food Friday: Chestnuts

Whilst staying with my sister in Sussex a few weeks ago, we went out for several walks and on one of these I spotted a chestnut tree. To be more accurate, I spotted chestnuts on the ground.


Spiky shells of the sweet chestnut (Castanea sativa)

I used to live in a house that had a chestnut tree in the garden. Every autumn I'd get plenty of these shells, but much injury to fingers later, there were usually only a few that actually had full-sized nuts in. This Sussex tree, on the other hand...


Actual nuts!

... contained chestnuts in almost every shell. I have read that chestnut trees need others nearby to fertilize them, which might have been the problem with the one in my garden. This one presumably had some friends about the place somewhere.

I should probably point out the difference between sweet chestnuts, which are what I'm talking about here, and horse chestnuts, otherwise known as conkers. The nuts look fairly similar, though conkers tend to be bigger and rounder, but the shells are quite easy to distinguish - the sweet chestnuts have longer, more densely packed spikes on them. Horse chestnuts are not good to eat, due to the saponins they contain, and probably not even very good for horses in large quantities. Sweet chestnuts, on the other hand, are absolutely delicious!

The traditional way of preparing chestnuts is to roast them on an open fire, but having gathered a fairly large quantity, I decided to try something different. Following the River Cottage Hedgerow Handbook, I made chestnut flour. I say, Following - it was a bit approximate, partly due to a delivery of firewood that arrived and needed stacking in the middle of the process.

I boiled the nuts for, um, some time, then left them in the hot water for quite a while longer, so they were well and truly cooked (and cold) by the time I go to the next bit. It wasn't so much a matter of peeling them, as cutting the skins and squeezing out the soft innards. This was pretty effective, combined with scraping out the last bits with a small knife. That gave me a heap of chestnut mush, which I mashed up a bit more with a fork, then spread out on a baking tray and put in the oven on very low to dry out, taking it out at intervals to stir and mash it a bit more. After a few hours it was properly dry and, while not exactly flour, could reasonably be described as chestnut meal.

The dried meal took up a tiny fraction of the space the original nuts had occupied and I stored it in a jam jar. When I came to use it, I ground it in a pestle and mortar to make it finer, but there were some nutty bits that were too hard for me, so they remained. My first recipe also came from the River Cottage book, though I did modify it (don't I always?) so as to stretch the chestnut flour out a bit. The recipe was chestnut pancakes, which I decided called for rosehip syrup, so I tried making some for the first time (rosehip blog post edited to include syrup), which was a great success. My modification was to replace half of the chestnut flour with ordinary white wheat flour, which I thought would be better for holding the pancakes together, as well as not using up so much of the chestnut flour.


Chestnut pancake with a puddle of rather thin rosehip syrup

The pancakes were nice, though the first one I made was rather heavy. I added a little more water to the mix and the second one was better. I'm not sure this is the best use of my precious chestnut flour, though. I prefer...

Chestnut biscuits

Chestnut biscuits
2 oz chestnut flour soaked in
2 tablespoonfuls of milk (or it might have been more than that)
6 oz white flour
3 oz butter
3 oz sugar - I think I used caster, but I'm sure granulated would do just as well.
Yolk of one egg
I don't think I used any baking powder - I can't remember for sure

Edit: I forgot the egg yolk when I wrote this - I knew there were something I'd used to stick it together, and I didn't think it was milk. Recipe now amended.

Mix together the flour and sugar, then rub in the butter and finally mix in the egg yolk and soaked chestnut flour (it doesn't take very long to absorb the liquid, and it increases in size quite a lot when it does). Press it all together, roll out and cut, then bake at gas mark 4 for... I can't remember... 20 minutes? When they smell cooked, take them out of the oven!

These biscuits are really good! You don't have to dry the flour and rehydrate, that was just for storage, you could use fresh, cooked chestnuts. I wish I had more - I only have about a teaspoonful of flour left. I'll have to think of a suitably worthy use for it.

Another edit: These biscuits, topped with mascarpone cheese and pickled samphire, are sublime. Sadly they're all gone now, and I used the last of the flour in porridge, which was nice, though there wasn't really enough of it to make a big impact on the flavour.

This did prompt me to buy three baby chestnut trees for my garden, which I've been meaning to do for ages. Two are now planted and the third is in a pot waiting for its spot to be cleared of leylandii. Some time in the future, I'll have my own supply of chestnuts.


Also harvesting this week
Scarletina boletes
Meadow waxcaps
Leek (those three all went into one meal - cooked up with pork stock and served with a baked potato - I'm not harvesting much at the moment, am I?)

Also eating
Tomatoes
Pickled samphire (on pizza and ommelette - good in both)
Potatoes
Sloe and apple 'plum sauce' (a bit left over that went in sauce for pork)
Lacto-fermented marrow
Blackberry jam

Also drinking
Blackcurrant wine (this year's. It's a bit rough as yet - probably needs to mature a bit longer)
Fizzy blackberry wine (this one was better younger, when it was still sweet and fruity)
Hopped ale
Bay herb ale
Dandelion flower tea
Dandelion root coffee (but only because we'd run out of tea. I'm not really much of a coffee drinker)

Foraged food challenge summary page here.

Sunday, 17 November 2013

Lacto-fermentation: An upgrade and an experiment

In my last post about lacto-fermentation, I mentioned an improved method for keeping carbon dioxide on top of the vegetables. Here's the blog post where I read about it. Just like wine fermentation, an airlock is used to allow carbon dioxide to escape (pushing the air out ahead of it) without letting oxygen in.

I bought a couple more airlocks (I have a dozen or so, but they're all in use) for 50p each from the health food shop where I buy my home brew stuff then went to the hardware shop in search of rubber seals. I wandered around the shop looking at various bits of rubber that weren't quite what I wanted, but might do, then approached the lady at the counter. I presented an airlock and explained, I'm looking for something that'll seal that into a jar lid. A rubber grommet would be ideal... I don't suppose you have anything suitable? She reached behind her and took a small box marked Grommets from the shelf, and tried several until she was sure she had the right size, then sold them to me for 15p each. I bought four.

With a bit of trial and error, I found the best way of gripping a jar lid for drilling. Trying to grip the edge doesn't work very well, as the edge slips easily if gripped loosely and the lid is flimsy and bends if you grip it more tightly. However, a lid is designed to grip to something - the jar itself - and the jar can be gripped more easily.


I drilled a pilot hole first, then used the flat drill bit to make the correct sized hole.

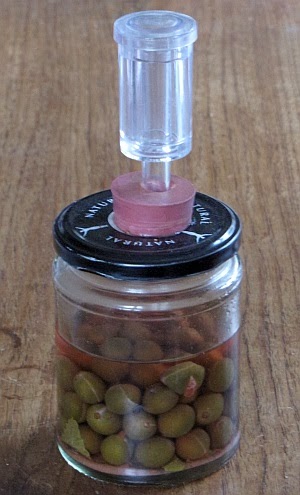
It wasn't easy getting the grommets into the holes as I'd drilled the holes to be a very tight fit, and also smeared Vaseline into the groove to stop the cut lid going rusty. I did manage to get them in without too much swearing, though, and then the air lock fitted in quite easily.

My next two vegetables for lacto-fermentation - samphire and sloes, of which more in a future post - both had a much higher salt content than the courgettes and beans I'd started with. They both showed signs of fermentation but very, very slowly. I suspected that the bacteria were not thriving in this very salty environment. I decided that the next time I had a suitable opportunity, I'd compare different levels of salt to see whether it made a difference to the speed of fermentation.

The opportunity presented itself when a neighbour gave me a couple of marrows (the same neighbour who'd given me courgettes earlier in the year - he now has a great many marrows). I modified the lids of a couple of large jars that a friend had given me (thanks, Steve!) to make two similar fermenting vessels.

To keep the two jars as similar as possible apart from the salt content, I filled them at the same time: From the heap of marrow pieces, one handful in this jar, one handful in that jar. After each layer of marrow, I sprinkled in salt: One pinch per layer in one jar, three pinches per layer in the other jar. This is still quite a lot less salty than the samphire and sloes, but I don't want my marrows that salty. Comparing three pinches with one pinch should give a clear difference in salt content, even allowing for variations in pinch size (which shouldn't be systematic, in any case). I pressed down the veg as I went and plenty of water was drawn out, so I didn't need to add any to either jar. Instead of blackcurrant leaves, I inoculated the jars with liquid from the fermented courgettes to get the right bacteria in there*.


Two jars of marrow pieces, matched (reasonably) carefully on everything except salt content

I had imagined these air locks bubbling as they do with wine, so that I'd be able to count bubbles per minute or some equivalent. Unfortunately it didn't quite happen like that. The bubbles certainly formed in the jars but with the jars so packed full of marrow, they couldn't rise to the top so they just stayed there. Eventually, of course, enough pressure built up that something had to give. What gave was not gas but liquid, which got a little messy.


More salt is currently in the lead

At this stage the 'three pinch' jar was looking distinctly more active than the lower salt jar. I started to worry that I hadn't matched them adequately and had overfilled the 'three pinch' jar, which was why it was overflowing. Although I was reluctant to break the air locks, I opened both jars to push the veg down. There was no sign that I'd overfilled the higher salt jar; in fact, having overflowed, it now had less liquid than the other one. I spooned a little liquid out of the 'one pinch' jar to compensate, and resealed the lids.

After that nothing much happened for a few days because the temperature's quite a bit cooler than it was in the summer. I put both jars on top of the cooker for a bit to encourage some action and again, it was the 'three pinch' jar that lifted its cap. Things continued in this vein for a couple more weeks, until I decided that it must be time to open the jars and taste the results of my experiment. At this point another difference became apparent.


More salt still winning

I had noticed some mould forming at the top of the jars (or is it yeast? Either way, it doesn't smell very nice), and it's not very surprising that there's more in the lower-salt jar. I scooped out all of the mouldy marrow pieces (rather more from the lower-salt jar) and tasted the fermented marrow. Both jars tasted OK - the only difference was that the more-salt one was... saltier. A bit too salty for my taste, actually, so I'm glad I didn't try a higher concentration of salt for the experiment - I would have ended up with a whole jar full that I didn't want to eat. I couldn't detect any difference in acidity, which surprised me, given the apparent differences in fermentation activity, but perhaps I just couldn't tell over the saltiness.

The presence of mould indicates that the upgrade wasn't entirely successful. That space at the top was supposed to fill up with carbon dioxide so the mould wouldn't grow there (unless of course it's yeast, which can grow anaerobically, in which case pushing out the oxygen wouldn't help). The fact that the bubbles were getting stuck was a sign that things weren't going entirely to plan. I wonder if I need a little more liquid per vegetable solid, or maybe I just need to cut the pieces smaller so it's easier for the bubbles to find a way through. Either way, I don't want a stack of solid pieces that trap the bubbles when they form. Probably.

Conclusion: Three pinches of salt per layer appear to provide a better environment for fermentation than one pinch per layer, though there was no obvious difference in flavour apart from the salt itself, which favoured the less-salt jar.

You'll notice that I don't generalise to 'more salt is better for fermentation' which you might think is a cop-out just because the results didn't go the way I predicted, but there is a reason: From some reading I did at the same time as running this experiment, I learnt that whilst salt is generally bad for bacteria (which is why salting is an effective method of preserving food) lacto-bacili are more resistant to salt than most. The reason for adding salt here is to kill off the bacteria that we don't want, leaving no competition for the ones we do want. If we add too much salt we'll kill off our friendly bacteria as well.

There is an optimum level of salt and it appears to be closer to three pinches per layer than one pinch per layer of marrow. It's still possible that my samphire and sloes had too much salt, but this experiment didn't really address that question because I didn't include such high levels of salt. You could legitimately say that this is a weakness of my experimental design.

---

* Some people believe that this method gives an inferior result, as what you really want is the progression of microbes that occur naturally, to give the full complexity of flavour, not just the one that comes in at the end and makes the acid. Others say it's hard to tell the difference. I don't think I'm that fussy, at least not at this stage.

Saturday, 16 November 2013

Foraged Food Friday: Chanterelles

I was going to tell you about chestnuts this week, but then I found chanterelles and while chestnuts will keep (especially as I've made them into chestnut flour), chanterelles won't. If you've been reading the Also harvesting sections of these posts, you'll know that I've been gathering quite a variety of mushrooms over the past few months. I've really got the mushroom-hunting bug!

One of the most prized mushrooms is the highly distinctive chanterelle. The yellow-orange funnels with the wrinkles (as opposed to gills) running a long way down the stem are easy to recognise even the first time you see them (though there is a false chanterelle, but luckily it isn't poisonous). Yesterday I went out to see if I could find any mushrooms to go in some pasties and struck lucky with a ring of chanterelles. They weren't at their best, a bit old, and half buried under wet leaves so quite a bit had gone slimy, but still chanterelles. These are substantial enough that even after cutting off the damaged parts, there's still a worthwhile amount left.

I may have got slightly carried away with picking, as I ended up with more than I needed for the pasties. Here's what I had left today:


A few past-it chanterelles (Cantharellus cibarius)

I also had a bit of pastry left over from the pasties, so I fried up the chanterelles with onion and garlic plus a bit of beef-in-ale stock (left over from... I forget) and lots of cornflour to make it gloopy, then went for a jam tart type arrangement:


Mushroom and onion tarts, with red sauerkraut on the side

Oddly, the pasties had a stronger chanterelle flavour than the tarts - maybe I used too much onion. Never mind, both were delicious, and excellent ways of using free food.

Also harvesting
Leeks
Parsnips
Rosehips (for syrup, or possibly fizzy wine)
Rosemary

Also eating
Rowan and crab apple jelly
Knotweed chutney
Courgette puree (from freezer)
Chestnut flour pancakes
Rosehip syrup (both on pancakes and diluted as a drink)

Also drinking

Blackcurrant wine (this year's)
Dandelion flower tea
Hopped ale
Bay herb ale

Foraged food challenge summary page here.