About this blog

My photo
Wales, United Kingdom
Documenting one couple's attempts to live a more self-sufficient life.
Showing posts with label knooking. Show all posts

Sunday, 4 November 2012

A nice cardie

I live in Ceredigion, also known as Cardiganshire, so most of the locals could accurately be described as nice Cardies, but they are not the subject of this post. What I'm talking about is a woolly jacket.

When I went to a spinning class last year, I browsed other stalls at the festival and spotted some pure Shetland wool priced at £1.50 per 50g ball. What a bargain! I asked the advice of the more experienced knitters around me as to how much I'd need for a jumper (that's sweater to those of you living across the pond. I tried looking up transatlantic translations for cardigan, too, but it got very confusing. You'll see what I mean by the end of the post). No-one was keen to commit on quantity of wool required, but the best guess was twelve balls, so that's what I bought.

Then followed a long period of doing nothing much, but pondering design. I definitely wanted a cardigan rather than an over-the-head jumper, I want it as long as possible with the wool available, and I want it nice. I have smart office clothes left over from my old life, but those are rarely suitable these days, and I have scruffy clothes for working around the house and garden, but I don't have much in between. This isn't too much to ask from my first big knooking project, is it?

I started by making up a sample piece, trying out different knit stitches and practising buttonholes. I fancied a chunky knit but the wool was fairly thin, so I wasn't getting what I wanted. After a while it occurred to me that crochet would give a thicker fabric, so I tried a few crochet stitches and settled for counterpane stitch, taking just one loop from the previous row (as opposed to both sides of the loop. The difference is that the half-loops left behind make a line along the fabric.) Experiments with decorative stitches revealed them to be not very visible, so I abandoned those. I used up the whole ball of wool in my sample to give me an idea of how much fabric a ball would make. Ah. Not very much.


Knit stitches to the left, crochet to the right. The extra bit bottom right is crochet buttonholes.

As I was working with the wool it struck me that it's not very soft. I didn't think I'd want that against my neck, so I'd make the neck wide and add a collar in a softer yarn at the end. On the other hand, Pebble liked this little bit of woolliness very much.


Mine now.

A bit of investigation with holding this piece against my back and wrapping it round my arms indicated that twelve balls of wool would be enough, but only just. That was going to influence the design quite a lot. Firstly, this cardie would have to be quite tight, with fairly short, tight sleeves. I decided to knook the sleeves, as I'm quite happy to have them thinner than the rest, and stocking stitch will use less wool than counterpane stitch. I wondered if I could save some wool by adding some decoration in a different colour. I have some white that I bought for socks... stars! It has to be stars!

Once I'd had that thought, I then had to find out how to crochet stars. I found this tutorial which was good, but not quite what I was after. I took that as a basis and played around until I'd figured out a way of making individual stars. It's very fiddly and involves two stitch holders (twist ties). I'm sure there's a better way, but this works well enough for this project.


Test stars. Yes, Pebble sat on it again as I was taking the picture.

That was about as far as I could go with my test piece, it was now time to move on to the real thing. Since I wanted the cardigan to be as long as possible, that meant starting at the top. I also wanted to avoid sewing it together at the end, so each piece would be joined as I went along. I did have a look at patterns, but didn't see anything that particularly grabbed me and in any case, I can't read patterns. Making it up as I went along went like this:

Step 1. Make a foundation chain (I read about this somewhere, but can't remember where. You end up with the first row of stitches already in the chain and it's easier to carry on from there) for the neckline. This included a double row (there and back) along the top of each shoulder, where the seam would be if you were making it in pieces. I judged the length by draping it around my neck.

Step... um, I can't remember what order I did the next bits in. The front two pieces and the back were worked in turn, each starting from the top seam, with the front pieces increasing from the shoulders across the front. For simplicity, I decided on square-set sleeves.

Step 5. Continue those three pieces until they're long enough to join up under the arms. Rather than shaping round the sleeves, I decided to make the body pieces straight then add a gusset between waist and armpit. This meant the body pieces had to get all the way to the waist before they could be joined up. Since the stitch I'm using looks different on alternate rows, I had to be careful to make sure I was on an even row (or an odd row. It didn't matter so long as they were all the same) for all three pieces.

Step 6. Once I'd done a few rows of the joined-up section, I turned my attention to the gussets and sleeves. For these I switched from crochet to knooking, and chose a fairly loose stocking stitch for the gusset, then tighter stocking stitch for the sleeves. The first attempt at a sleeve went a bit wrong. I was reducing the number of stitches at a rate of one per round, which resulted in a pointed shape at the join, making a bulge in the armpit. I unravelled and started again, this time working back and forth round almost all of the sleeve, picking up an extra stitch from the gusset at the end of each row until there were none left and I could switch to working in the round. I'm not sure whether that makes sense or not - it's basically the same technique that I used for the heels when I made socks. The end result looked like this:


Armpit of the cardigan with sleeve at the top.
What looks like a seam is where I reduced the stitches.

Step 7. Shaping the sleeves involved much trying-on to determine how much I needed to reduce the rows as I went. Once I got past the elbow I did a couple of rows of stars, which was even more fiddly in knooking than in crochet. I then finished with a few rows of crochet for the cuff, for consistency with the body of the cardigan.

Step 8. After a few rows at the waist, I needed to start increasing the stitches. I measured, I calculated, I calculated some more, I largely ignored the results of the calculations, I forgot where I measured from, then the whole thing got messed up by the stars anyway. One way or another, stitches got increased by a couple per row, and stars were introduced shortly after that.

Step... ah, there's a bit I did earlier, but forgot to mention. I wanted an edging added for the buttons and buttonholes, but couldn't do this until the very end, when I'd have something to add it to. This somewhat disrupted my plan to keep going until I ran out of wool. I solved this by making up a section of buttonhole edging, unravelling it, and measuring out suitable multiples of that length of wool, which I then put aside.

Step 9. Once I'd got fed up of making stars, I put the white wool aside and carried on in blue until I ran out. This wasn't quite at the end of a row, but near enough that I felt safe pinching a bit of the reserved wool to finish it off. Front edging was then completed, leaving just this little bit of wool:


I felt quite smug to have used up my wool so precisely

Step 10. I raided Grandma's button collection for a suitable selection of buttons...


... and sewed them on.

At this point, I should have had just the collar left to do. Then I tried it on... it was way too tight. I'd known it was going to be tight, but thought the extra panels I added at the end would be enough for a comfortable fit. They weren't. I also discovered a flaw in the way I'd done the buttonholes, which was simply a row of triples. Effectively, I had a buttonhole between each two stitches and I just had to pick one that lined up with each button. That proved more difficult than I'd anticipated.

At this point it would have been very easy to get demoralised and give up. To avoid this, I quickly sought out my next door neighbour and showed her the (un)finished cardigan. She said all the right things about it being not that bad, and she was sure it wouldn't take much extra on the front edges to fix the problem, and how nice it would look when it was finished.

Thus encouraged, I went off to one of the wool shops in town to seek extra yarn. I wanted something soft for the collar, and thought it would be best to have the same yarn for the extra strips down the front, even though soft isn't ideal for buttonholes. I found some nice yarn (50/50 wool/acrylic) and asked the shopkeeper's advice on how much to get. I had in mind that two balls would probably be enough; she said four; I bought three. I actually used one and a half. I intend to take the last ball back for a refund, as a matter of principle.

Although the new yarn was thicker than what I had been using, I stuck with the same small crochet hook for the front panels, as I thought tighter stitching would probably be stronger for the buttons. I also changed the way I did the buttonholes so I wouldn't have the lining up problems that had emerged in the first attempt (which I'd unravelled and redone in plain stitch to match the other side).

For the collar I'd decided on double rib stitch and actually used knitting needles for this (larger, to suit the yarn). With knooking, rib stitch either comes out very loose, or is a right pain to do. Knooking turns out to be not such a great technique when you're switching between knit and purl stitches within the row. I found I didn't mind actual knitting as much as I'd expected. In fact, I might even go as far as to say I enjoyed it, though I did switch back to a crochet hook for the cast off.

Trying on the finished garment, I found that my neighbour was quite right - the fairly small strips I'd added made all the difference between not fitting and an excellent fit. Here I am modelling my creation in classic catalogue pose:


And here is a closer view:


I have to say, I'm absolutely delighted with how this has turned out. Not bad for a first big project, making it up as I go along, eh?

Tuesday, 28 June 2011

The second sock

It's possible that the weeding may have been neglected this week, and the runner beans may be desperately searching for support, and the tomatoes may have been begging for new pots, but I did get my second sock knooked.


My first pair of hand knooked socks

I think the left one may be slightly shorter than the right, but never mind. Because there is a left and a right, I added little blobs of purple to the outside of the ankles, to make it easier to tell them apart.


Another picture of first socks

They are very nice and snuggly. Pebble agrees.


Out of interest, I weighed my pair of socks to see how much yarn I'd used: It was 40 g. I could get ten pairs* out of that cone of wool. That's 50p a pair, which isn't bad at all.

---

* Yes, I know 40 goes into 452 eleven and a bit times, but I'm allowing for maybe making some slightly longer socks, or perhaps a more complicated pattern. I may get bored of plain stocking stitch after a few pairs.

Wednesday, 22 June 2011

Obsessively knooking sox

I finished my last post on the subject of trying to make socks with, unless I come across some unexpectedly cheap sock yarn... Well, whaddya know, that's exactly what happened!

I happened to be in a haberdasher's in a different part of Wales - that is, we happened to be in a different part of Wales and I thought I'd check out any haberdashers in the area...

Ian: Why are you googling cardigans?
Me: I'm not. I'm looking up haberdashers in Cardigan
Ian: Ah. Google's going to struggle with that


- when I spotted a bin full of cones of yarn. The handwritten note above the bin said 100% wool. £5 each. Most were cream in colour and each cone had a slip of paper indicating thickness and weight. I found one that said 2 ply 452 g. That's a whole pound of pure wool for a fiver!


One pound of two-ply

Now, onto the socks. Well, not quite. The first thing I did was to knit a test swatch with my new, tiny hook. This task suffered a minor setback when the phone rang and Pebble jumped off my lap, taking the cone of wool with her, which broke. Then it suffered a major setback when the knooking hook snapped.


This knooking hook was too thin

So, what to do next? Make another tiny hook and risk the same thing happening again, or use a bigger hook? I used a bigger hook, which was easier to work with anyway. I think it might be the first one I made, which was about 3.5 mm thick [edit: Oh no it's not! I just found that one in the bottom of my handbag. This one's a little thinner - 3 mm now I bother to measure it]. Another test swatch was knooked.


This stuff rolls up something rotten.

I measured the swatch and my leg, did some calculations and decided I need 60 stitches, then promptly forgot how I arrived at that. I started with a ribbed cuff, and tried that on my leg to make sure it was roughly the right size. It wouldn't be too much to unravel if it wasn't.


Ian: I don't think that's finished yet. Nothing gets past him.

I then switched to stocking stitch (i.e. all knit stitch, going round and round) and found that the stiches were tighter with the simpler stitch. I may find my ribbed cuff is looser than the rest of the sock. Oops.

I continued knooking throughout the evening. Ian went to bed, but I wasn't very tired, so I carried on knooking. I got very absorbed in it and carried on some more, until I noticed it was past 2 am. At that point I remembered that it was the solstice. If I stay up a few more hours, I thought, I could see the sun rise on the longest day. That would be cool. So I carried on knooking. I didn't do quite the length I'd planned (as in photo above) but I was impatient to get onto the heel.

I'd read Silver's sock class, which is excellent, but for my purposes needed translating for knooking. This is not terribly easy when the tutorial is written so much in terms of which needle to use. I'm never one to stick to a pattern anyway, so I decided that instead of following the instructions, I'd study them until I understood what was going on, then make it up as I went along.

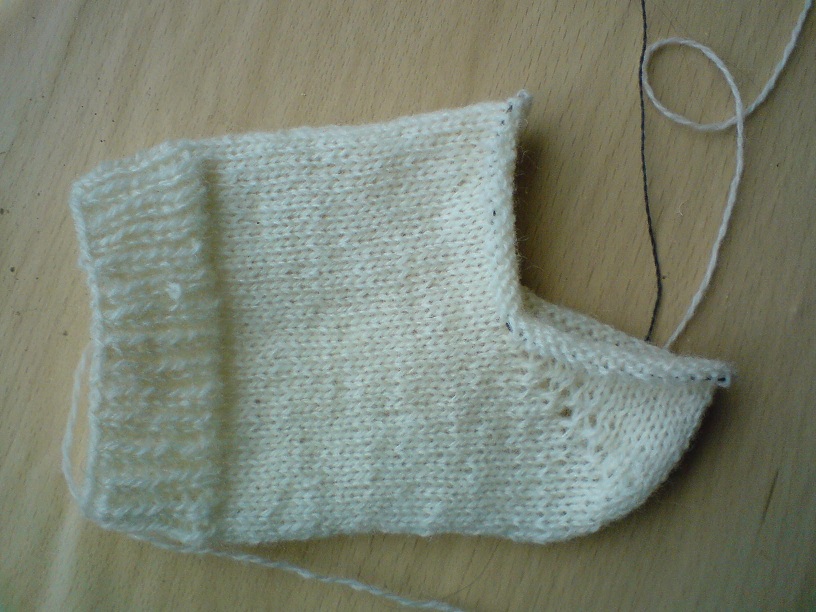
For the heel, you essentially make a sort-of triangular flap (OK, a trapezium - that shape does have a name) then continue on to another one the same shape but the other way up. These need to be joined together at the sides. To do this in knooking, I divided the sock tube in two and put one set of stitches on a holding cord while keeping the other set of stitches on the working cord. I decided that the heel would be half of the sock, because that seemed about right. It might or might not be what was in the tutorial - I didn't check.

To shape the heel, I knooked a row, then transferred a stitch from each end of that row from the working cord onto the holding cord. Rather than carry on knooking in the round, I then turned back and knooked another row of the flap. In this way, the piece I was working on got two stitches shorter with each row. When it got down to a shortish bit in the middle (I think it was about ten stitches), I did the opposite. The first and last stitches of each row were knooked from the holding cord (not forgetting to remove the holding cord from those stitches afterwards, to avoid horrendous confusion). So it was that as the year was turning, I was turning my first heel. It wasn't as easy as the plain part of the sock because the edge stitches tended to get stretched and awkward to pick up, but it was pretty straightforward and I suspect a darn sight easier than doing battle with a handful of pointy sticks.

Now call me heretical, but I didn't see the need for a gusset. I'd studied my mass produced socks, and could see no sign of any gussets there, and I've been wearing those for years without any problem.


Gusset-free mass produced sock

So, when I finished the heel I went straight back to knooking a tube in the round. I did a few rounds of this in the small hours of the morning, then looked at it and thought, Oh no, that looks terrible, I'll have to unravel that bit and figure out how to do gussets. I put it down and fell asleep at about 6 am.*

Waking up at something approaching midday, I looked at my half-sock again and decided that it really didn't look too bad, and nothing needed unravelling at all.


Half-sock in daylight looking fine, actually. Note heel but no gusset.

I carried on knooking throughout the day, and in due course reached the bit where I'd have to start shaping the toes.


It's a good idea to leave the hook in when trying on half a sock, otherwise the stitches tighten around the cord. I learnt this by trial and error.

I'd looked at the toe shaping in the tutorial and thought that my toes aren't that shape. On the other hand, my toes are really quite an odd shape. I decided to make the sock fit my feet, with frequent fittings, reducing by a stitch here and a stitch there as needed. I should say to fit my right foot as an asymmetrical sock will be foot-specific. Hmm, am I really going to want that when putting on my socks in the half-light of the morning? Oh, what the hell! I may add some embroidery to the ankle to make them easier to tell apart.

Ian insisted that I went to bed at a sensible time last night, so I didn't get the sock finished yesterday and picked it up again this morning. Eventually I decided I'd done enough toe shaping and could move on to the magic Kitchener stitch, which I was quite excited about. This is a really neat trick to join up two pieces of knitting without a seam, so the end result looks like continuous knitting.

For the Kitchener stitch I did follow the instructions closely. To adapt for knooking, I just had to substitute, Draw out the cord for Slip stitch off the knitting needle. This procedure is just as cool as I'd been led to believe, and I was very pleased with the result.


Kitchener'd toe

Here is the finished sock from the side...


... and from the top:


If you think this is a funny shape, have another look at the picture of my toes

I'm feeling very proud of my first sock. It may be a little shorter than I'd intended and the cuff's a bit loose, but it's a fully functional sock. Except... one sock on its own can't really be described as fully functional. Socks come in pairs, and that generally means matching pairs. The trouble with making it up as I go along is that I now have to make another sock to match and I have no record of exactly what I did. I think I'll just take the same approach of fitting it to my foot as I go along. They may not match exactly, but then I don't suppose my feet match exactly, either.

---

* The sunrise was completely obscured by clouds, by the way.

The biggest and smallest knooking hooks

Thinking that socks should be as finely knit as possible, in preparation for making socks I first made myself the smallest knooking hook that I could. I used oak, reasoning that stronger wood would be suitable for something so thin.

That was a few weeks ago. More recently, I had an idea for a project that needs a very thick hook (of which more in due course), so made myself another knooking hook. Again I used oak, this time because I didn't fancy burrowing into a holly bush far enough to find a thick twig.

A thick piece of oak has quite a lot of thinner pieces attached to it, as well as lots of leaves. Not wanting to waste them, I boiled up the leaves to make cordial and kept the smaller twigs for future use.


Bits of oak

Here are the two new knooking hooks:


Biggest and smallest knooking hooks

The little one is about 2.5 mm thick and the big one is, oh, um, I didn't measure it. Quite a lot thicker!

Saturday, 18 June 2011

Try something new challenge: Making socks from an old cardigan

Susie has posted a challenge, for herself and whoever feels like joining in, to try something new. This may sound like a pointless challenge for me, as I'm trying new things all the time, but the idea is to pick something that's not, I'm really looking forward to trying that, but, I'd love to try that, but...

I promised enthusiastically to try something for this challenge, and came up with a list of projects including making a solar panel and converting my sewing machine to run on treadle-power, both of which I've been meaning to do for ages but not getting round to because they sound difficult, so exactly what this challenge is about. However, time ticked past and I didn't get round to the first stages of either of these, so I turned to my fall-back project of making socks.

I understand that socks are very difficult to knit...


I won't pinch the entire cartoon, but click the picture to see the rest of it on Gingerbread Lady's blog. It's very funny.

... but even knowing that, I had to add another element to challenge. I specifically wanted to knit socks out of wool salvaged from from an old cardigan. Whatever Susie might think, I'm not convinced it's worth spending £15 on yarn for a pair of socks, especially when I don't even know whether I'll succeed in making them. So... old jumper desctruction was in order.

I identified a sacrificial cardigan...


Rather frumpy cardigan. I quite like it, but Ian hates it, so I never wear it. Pebble doesn't think much of it, either

... and set to work with the quick-unpick dismantling the seams. When I eventually got a corner unfolded I made a discovery.


Cut edges of fabric

It turns out that this isn't a knitted garment as such, but a garment made out of knitted fabric. I should have guessed from the way it was stitched together, I suppose. That means that the yarn will be cut at each edge of piece, so I won't get a continuous thread. I unravelled a few pieces anyway, as I might as well, having got so far.


Pieces of cardigan-yarn. Not only short, but very crinkly

I had a go at knooking with one piece, and it was a @*&! not very nice thing to work with.


Attempting to knook with very crinkly yarn

That means I've ruined a perfectly good frumpy, old, slightly tea-stained cardigan for nothing. It also means that I haven't even got to the starting line in the challenge of making socks. I'm not sure I want to learn this skill enough to fork out on expensive yarn, so unless I come across some unexpectedly cheap sock yarn, I'll be leaving this challenge unmet.

Wednesday, 13 April 2011

What's the point of knooking?

I started drafting this post a while back. It was a rather waffly discussion of the various reasons people might want to spend time on crafts. Then Susie said it much more concisely: I am not really a process knitter. I do like the process but I only really do it for the finished result. That's what I was trying to say! It's not about the process, it's all about the finished product.

Then nagging doubts started to creep in. The disappointment when I had to put the knooking hook aside at the end of the baby blanket to start a sewing project... my delight at finding a really good excuse for a knooking project... the fact that I was making dishcloths for goodness sake!

I wouldn't be able to look myself in the eye if I caught myself making knitted flowers...


... but I might quite easily be tempted by Killer Easter Bunny egg cosies.


I may have to face up to the fact that I am a process knooker.

However, that wasn't where I started from. The point of making things, for me, has to be to save money. I need to know something about the costs involved here. I had planned to make up the whole ball of dishcloth cotton into cloths, but I ended up swapping the rest of the ball for some butter, so I don't know how many it would have made. I suspect that at £2.30 for the ball, it's quite an expensive way of buying dishcloths.

I tried to work out the cost of yarn for a jumper - I looked up patterns I liked the look of, tried to find yarn that matched the description of what was needed (and looked nice), and worked out how many balls would be needed from the quoted yardage. I thought I must be getting it wrong, because I was ending up with at least £40 per jumper. It's true I was completely out of my depth, knowing nothing about yarn, so maybe I was just looking at very expensive yarns. I tried to find some that were cheaper, but couldn't get the cost down to much less than £20 for a jumper's worth of yarn.

Then before I got round to writing this post (and I was looking this up yesterday morning), Susie beat me to it again! She wrote a blog post all about the cost of craft materials. Reading this was reassuring in some ways, because it confirmed that it wasn't just me not knowing what I'm doing - yarn really is that expensive - but it was disheartening for the same reason - yarn really is that expensive.

The conclusion seems to be that I've found a hobby I love doing, but can't afford to indulge in it. Unless...

When I started learning to knit, it was meant to be one part of a bigger project. A friend has promised to lend me her spinning wheel, but there didn't seem much point learning to spin if it turned out that I hated knitting. What if I went one step back in the process, and bought ready-to-spin wool? The first place I looked was the shop of someone whose blog I follow, Colour it Green. Here I found carded wool for sale at 90g for almost £9. Eek! I'd been looking at 50g balls of wool for around £2 each. I've no doubt this is the highest quality wool, but there's no way I can afford that!

A little googling revealed that, whilst this price isn't unusual, it is possible to buy spinning wool more cheaply - I found some for £2.10 per 100 g at Handmade Presents. This has come down to less than the cost of spun, dyed wool, but not vastly less, and I have no idea of the quality. If I find that I enjoy spinning as much as knooking, then this might be worth doing, as it brings the cost down to something reasonable for the jumper and I'd get a lot of entertainment thrown in.

On the other hand, perhaps what I actually need is a sheep.

Sheep behind tree

Tuesday, 12 April 2011

Urgent knooking project: Baby hat

We'd been invited to the first birthday party of a friend's baby, and about a week before the party I suddenly realised we hadn't given any thought to a present! I should point out that our friend was very organised and gave us plenty of notice - it was just me not paying attention that gave this problem its urgency.

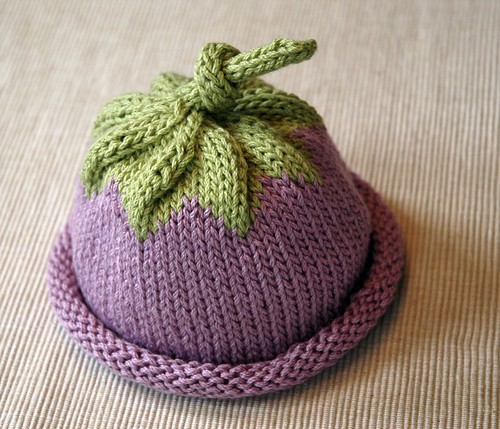
A little nervously, as I wasn't entirely confident in my knooking skills, I decided that making some item of clothing would be a good idea. I went over to Ravelry to look for patterns, and found this very cute berry baby hat, with a free pattern. Even better, the pattern looked fairly easy and was written in a very beginner-friendly style. Even I might be able to follow it!


Cute knitted baby hat (photo from pattern)

Two sizes of needles were called for, so I grabbed a holly stem that I'd saved from putting holly leaves on the peas and set to work whittling. Because the long stem tapered, it wasn't difficult to find two sections of different thicknesses, and thus I added two new knooking hooks to my set.

I then went shopping for yarn. Although it sometimes seems that every other shop in Aberystwyth has a few balls of wool lurking in a corner, and there are two shops with what looked to me like a huge range of yarns, it turned out to be quite difficult to get exactly what I needed. The pattern called for Worsted weight yarn, cotton with a bit of acrylic to give it some spring. I find the displays of yarn completely overwhelming, so I asked for help finding what I needed. The first attempt at help was less than helpful; the lady in the shop reeled off all the cotton mix yarns she had available. I asked a second time, in a tone intended to convey complete cluelessness, and she pointed me towards some 60% cotton, 40% acrylic yarns. That sounded a bit high on the acrylic to me, but by this time I was in no position to argue. They weren't worsted weight, either, but double knit, but I thought I could cope with 22 stitches to 10 cm instead of the pattern 20 stitches.

Having thinner yarn meant thinner knooking hooks were required, so I made a couple more, then realised I already had one of the smaller size needed, which was no bad thing as the smaller new one wasn't very good. I now have a pretty good set of hooks, though I don't suppose that will stop me making more.

With everything slightly smaller, it was quite likely that the hat would come out slightly smaller, too. I then tried calculating how many stitches I'd need to make a hat the right size, which led to looking up how big baby's heads are at different ages, which confused me greatly as the stitches per 10 cm in the original pattern would come out nowhere near big enough... and then I realised that knitted fabric stretches. At this point I also realised that I hadn't a hope in hell of calculating it, and it might be a good idea to just make up a test piece and see what I'd got. It turned out that with my lighter yarn and smaller hook, I ended up with exactly the right number of stitches per 10 cm anyway (well, 19.5, which I thought was pretty close!)

After a couple of false starts - running out of tail in a long-tail cast-on then forgetting to add the eight stitches to make it toddler-size instead of baby-size - I made the hat very quickly. As I'd expected, knooking lends itself to working in the round. There was no need to switch to a set of double pointed needles towards the end, as would be necessary for knitting (though I was dropping the stitches onto the cord very frequently, which tended to make them too tight). I started on Friday evening, then started again on Saturday morning after undoing the false starts, and finished on Sunday morning. It was a pretty quiet weekend - Ian's sister was staying, and we did a lot of sitting around chatting and doing very little, which was lovely - and I think I spent about 6 hours on the hat, not counting the false starts.

It looked a lot like the photo on the pattern - I'd even used the same colours - but it was very small! It did stretch a bit, but I couldn't believe even a one-year-old's head would be that small. Tip: If you want a hat to be stretchy, don't weave in the long end of the wool by running it all around the edge of the hat. I pulled it all out and wove it in a different way, and the hat was a lot more stretchy after that. Still, I was worried it would be too small.

At the party, I was a bit insistent about the present being opened and tried on, even though the birthday girl was a bit tired by then, because I really didn't believe it would fit, and if it was too small I could always make a bigger one.


Tired, but still very cute.
Of course, she liked the wrapping paper much more than the present!

I was very pleased, and a bit surprised, that it fits. Let's hope it still does in the autumn, when she might actually need it.

Friday, 25 March 2011

Knooked baby blanket: Finished!

In spite of the title, I'm going to backtrack a little to start with. Last time I wrote about knooking, I was just about to try combining crochet with knitting. So how do did I get on?

This was my first attempt:


First attempt at combining knitting/knooking with crochet

Ian looked at this and said, You're not going to use that are you? I looked at it and I had to agree with him. Still, it demonstrated the principle that crochet can be incorporated into knooking work. I was really taken with the crocheted shell shapes that I'd just learnt, so I had another go:


Second attempt

I have to admit it's still a bit wibbly, but I wasn't about to scrap (frog?) another one, so I kept it. After that, I thought maybe I should try learning from someone with a bit more experience, rather than making it up as I went along. Taking inspiration from Ronda's All Twisted Up design, I tried alternating rows of knit and crochet, with some twists on the crochet rows. I've no idea how close it is to the orignal pattern - Ronda's working in 21st century American whereas my terminology, such as it is, is 19th century European. Anyway, I was very pleased with the result:


Twisty knit/crochet knooked square

Finally, I decided to add some crochet decoration to a knitted square, which I suspect is quite common practice amongst people who've never even heard of knooking, but I used the knooking hook throughout.


Balloons, or are they weeds?

My original idea was for a bunch of balloons, but when I showed it to Ian, he said, "Oh, I thought they were weeds." Weeds? OK, maybe they don't look very balloon-y. I'll settle for flowers, then.

I made other squares, too, and ended up with:


Set of knooked squares for baby blanket

You may notice that many, if not all, of these squares are not actually square. In fact, it's possible that no two are exactly the same shape. Fitting them together could be a challenge. But never fear - I had a plan!


Tapestry wool from the bottom of the sewing drawer

Using funky coloured tapestry wools found under sundry embroidery, darning, and other threads (mostly inherited), I would construct small sections of fabric to fill the awkward gaps.

The putting together of this blanket involved much rearrangement of squares, ponderous looking at it and going, "Hmmm." Pebble helped.


Pebble helping with the construction of the baby blanket.

Eventually, I got this (with apologies for the fuzzy photo):


Wonky knooked baby blanket

It was all going so well, right up to the end, which is where the yellow square with weeds meets the pink one at the edge - as if you couldn't tell where the problem is! I really should have unpicked the last bit and done it again. I nearly did. The only thing that stopped me was the nagging feeling that I'd probably introduce another problem, just as bad. Instead, I put it in the washing machine - mainly to check that it is indeed machine washable, as it's pretty useless to my sister if it's not - and tried to persuade it to be a bit flatter as it dried. That didn't make a huge amount of difference, so the finished baby blanket is not entirely blanket shaped.

I'm more worried that the tapestry wool sections will be too scratchy for the baby. The rest is lovely soft fluffy baby wool (most of which is not wool at all) but those bits are actual wool and the contrast in textures is striking.

I do hope it's usable and the baby likes it, but if not, I don't suppose my sister will be too disappointed. I don't think she really expected me to finish it anyway.

Sunday, 27 February 2011

Easier knooking

I never set out to write a crafting blog, with tutorials and patterns, WIPs and finished products, but I've learnt so much from other people's blogs that when I have something that might be useful to fellow knookers and would-be knoookers, I feel almost duty bound to share it. So here's a little tutorial on a new and improved method for knooking.

I mentioned recently that I'd come across an easier way of doing the purl stitch, kindly provided by Ronda. After using this for a while I noticed that I was getting twisty stitches.

[Edit: Ronda's method does not produce twisty stitches. She's now posted a video, from which I can see that I'd misunderstood her instructions for the purl stitch, so that's why I was getting twisty stitches. Anyway, my adapted version of misunderstood instructions ends up with a method that also works, so this is a third knooking method.]

Twisty stitches don't bother me greatly, but having noticed them I started thinking about why they were happening, and thinking, and thinking...

It gets a bit technical here, but only a bit. Each stitch leaves a loop on the needle/cord that either has the leading edge at the front and the trailing edge at the back, or vice versa. Also, each stitch needs the one on the previous row to be a particular way round, either leading edge or trailing edge at the front. If you do a stitch that needs the leading edge at the front, but the previous row left trailing edges at the front, then you end up with twisty stitches.

[My misunderstanding of] Ronda's new purl stitch needs a leading edge at the front and also leaves a leading edge at the front. She changed the knit stitch as well, to leave a leading edge at the front so that it would be well set up for the new-style purl stitches. This only solved half of the problem, though, because [my... etc.] her new knit stitch needs a trailing edge at the front, so it still twists stitches when following the new purl.

I've developed the new knit stitch so that it now both needs and leaves a leading edge at the front, the same as the purl stitch. This means they work together with no twisting. So here are some brief instructions, with photos, of the two stitches:

Knit stitch

With the working yarn at the back of the work, push the hook from the left of the stitch, straight through the stitch from front to back.


Hook going through the stitch to start a knit stitch

Take the yarn under the hook and up across the front of it, then pull the hook back through to the front of the work.


Yarn across the hook for the knit stitch

Purl

Bring the working yarn to the front of the work and take the hook behind it, through the front edge of the stitch, from right to left (or the other way if you're left handed).


Hook through the front of the stitch, ready to purl

Take the working yarn up across the front of the hook before taking it over behind and right round the hook. As you pull the hook back through the loop, move it slightly to the back, so that the old stitch falls off the front. It is possible to drop the stitch off the back, but that way lies much twistiness and confusion.


Winding the yarn round for the purl stitch

I hope the words and pictures here are clear enough to explain this. Let me know if not and I'll have another go.

Looking at these photos, my hands look pretty horrible. This is because I've been doing a lot of gardening recently and they are horrible!

Saturday, 19 February 2011

Learning to crochet

I said that I'd be sticking to basic stiches until I finished knooking the baby blanket. I also said that I wouldn't talk about knooking again until then. I lied. Twice. Notice how the title of this post is about crochet, not knooking? It's still really the same subject. I cheated as well as lied. I am a very bad person. I'm sorry.

First, I found another blog devoted to knooking. As luck would have it Ronda, the author of this one, has just worked out an easier way of doing the purl stitches, for which I am very grateful. She has also been working on projects that mix knooking with crochet, something I'd been pondering as a possibility.

Seeing Ronda's designs made me want to have a go at incorporating some crochet, but also made me realise that I don't know the first thing about this craft. Time to learn how to crochet.

Rather than searching this internet I decided to consult a book, for a change. I have a rather lovely old book called, "Encyclopedia of Needlework" by Thérèse de Dillmont*, which I inherited from my grandmother. There's no sympathy for the struggling reader here: At first sight some of the designs may appear rather difficult to execute, but when the directions are accurately followed all difficulty will disappear. If you're having trouble it's because you're not following the instructions properly!


Encyclopedia of Needlework

I haven't tried using this book before, but I gave it a go and sure enough, if I followed the instructions very carefully, my work looked pretty much like the illustrations. A little more consistency would have been nice. As far as I can tell, the following two descriptions refer to the same stitchwork:
Throw the thread round the hook, pass the hook under the two halves of a stich and catch hold of the thread, draw the thread through the stitch...
Bring the thread from behind round the front of the hook, put the hook in between the stitches of the row before, make an over, bring the hook forward again with the thread...

Here's my first attempt:


First attempt at crochet.
I used an offcut of yarn that Pebble the cat had helpfully detached from the rest of the ball. This is why the piece finishes halfway through a row.

Having managed several of the stitches described in the book, I decided that the next square in the baby blanket would have to be crochet. Here it is:


Crocheted 'square' for baby blanket

It's not very clear in the picture, but there's a pattern in bobbles (pine-apple stitches) in there somewhere. There are also two types of background stitch; close to the bobbles are half trebles and around the outside is counterpane stitch. How could I resist counterpane stitch?!

As you can see, I'm not terribly good at counting the lengths of rows, mainly because I don't bother. I get to the end and think, This is about it. It turns out that this isn't a very good way of ending up with a tidy square. Never mind. I'm really quite pleased with this, overall.

Next step: Can I combine knooking with crochet without getting long threads trailing across the blanket?

---
*If you thought commercialism was a new phenomenon, think again. This book is full of recommendations for D.M.C yarns, having been published in 1884! I had to google that because there's no date printed in it, and found that the entire text is available online, complete with engravings.

Wednesday, 9 February 2011

Knooking hook developments

I had a go at making another hook out of the second piece of twig, but that turned out to have a soft centre, and when I cut the hook it just broke, so that wasn't terribly successful.


Unsuccessful hook-making with twig from unidentified shrub

Returning to the holly wood hook, I continued my search for the ideal cord to go with it. I has some heavy duty linen thread in the sewing drawer, and I took a length of this and twisted it into four-ply cord. I'd never tried this before, but seen my mum do it many years ago. It involves tying the thread to a door handle and standing the other side of the room holding the other end. It probably goes more smoothly if the cat doesn't notice what's going on. After a couple of attempts I got a cord I was quite pleased with and threaded it through the eye of the hook.

I knitted a square of ribbing with the latest incarnation of the knooking hook and cord. With the exception of a couple of minor catastrophes it went very well. I pulled the cord too far and dropped half a row of stitches at one point, then had to use a knitting needle to pick them all up again and actually knit the second half of that row. I also managed to break the eye, but this was my own stupid fault for stretching the fabric against the hook. Having retrieved the craft knife, I trimmed the broken end and cut a new eye, then continued with a slightly shorter hook. I'd better not do this too often or I'll have nothing left!


Knooked ribbing

I'm happy with this combination of hook and cord. Until I break the hook again, this is what I'll use. As for knooking vs. knitting, knooking is so much easier for ribbing. Moving the yarn from front to back of the work is just a matter of a slight movement of the left index finger, as there's no second needle to go round. I finished this piece much more quickly than the knit one.

I'll stop talking about knooking for a while now. I like it, I have a hook and cord I'm happy with, and I'll be sticking with basic stitches until I finish the baby blanket. Maybe I'll try something more interesting after that, or maybe not. It will probably depend on how busy I am in the garden/how much it's raining.