About this blog

My photo
Wales, United Kingdom
Documenting one couple's attempts to live a more self-sufficient life.

Thursday, 25 June 2015

When life hands you very sweet wine...

Trying to get away from navel-gazing and back to writing about growing things and making things, here's a post that turns a saccharine-sweet motto on its head.

Last year I used bread yeast to make all my wines, with varying success. Some of them came out just fine, but several of them were far too sweet. The yeast just gave up and died before it had turned very much of the sugar into alcohol. I'm thinking of just adding some wine yeast and hoping it'll get started again, but in the meantime, it occurred to me that I could do with some decent vinegar for pickling samphire.

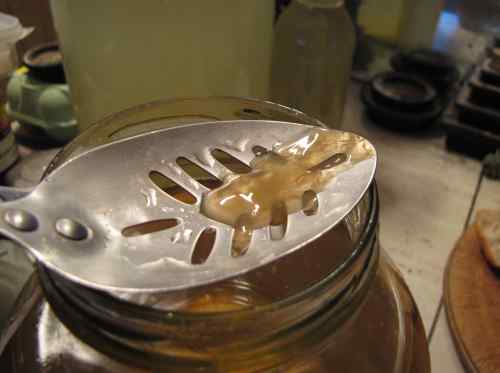
The cider vinegar that I made last year developed a quite convincing-looking vinegar mother. I poured all the vinegar into a jug so I could scoop out the mother before returning the liquid to its bottle.


I believe that this blob of jelly is a vinegar mother

I've chosen to use about half a gallon (that's a British gallon, so about two litres) of sweet beech leaf wine. I poured this into a large jar, plopped the vinegar mother in on top, covered it with a bit of old net curtain (it's important to allow air in, but not bugs and breadcrumbs and other things that might find their way in there in my kitchen), and added it to the general clutter on my kitchen worktop.


A couple of litres of very sweet wine, with vinegar mother added

At about this point in writing the blog post, I looked up instructions for how to make vinegar. The first useful tip I found was that vinegar can only be made in the dark, so I added a newspaper sleeve to my jar. I then got a bit concerned by the fact that all the instructions described a two-stage process, adding yeast first to make wine, and only then adding the mother to convert it into vinegar. I was sure I remembered methods involving putting apple peels in a jar of water and leaving them... I found them again and even these seemed to assume that the yeast would get to work first and the bacteria would move in later.

Hmm, maybe all that sugar wouldn't get converted. I sought advice on the 'ish forum, and the suggestion was that a vinegar mother would probably eat just about anything, so I left it alone to see what would happen. After a few days I couldn't see anything happening, so I bottled out and added a bit of yeast (wild, probably still alive). About a day later, I saw a film forming on the surface, which is a good sign for vinegar. Whether the yeast had anything to do with this or not, I don't know, but I'm happy that something is happening.

I can expect this to take a few weeks, at least, to make vinegar. I won't ignore it completely, though, I'll keep sniffing it from time to time because after the vinegar's made, with continued access to oxygen, the vinegar mother will eat right through the acid, leaving only water. I think that's happened to a batch I tried before, which was very disappointing. Now at least, I know to watch out for it, and seal my vinegar into bottles before it goes over.

A note on using homemade vinegar for pickling: Most guides advise not to. This seems over-cautious to me. With the quantity of sugar I had in here, I was aiming for about 12% alcohol. Converting the alcohol to acid actually increases its concentration (oxygen is added to each molecule, making it relatively heavier), and the minimum required for pickling is 5%, so surely this vinegar is going to be plenty strong enough, even if it does go over and lose a bit.

Sunday, 14 June 2015

More uses for ground elder

I recently learned that the larger, tougher leaves of ground elder can be good to eat if you cook them the right way, and that some people consider the stalk to be the useful part.

I wrote a blog post about it for Selfsufficientish.com.

We have been eating a lot of ground elder recently.

Wednesday, 10 June 2015

What am I?

This isn't a riddle, it's a question I've genuinely been grappling with recently. Let me back up a little. I've been suffering from depression over the last month or so. I've found this quite hard to accept - I get seasonal depression, I can't be depressed in the summer! - or even recognise. When the sun is shining, spring flowers are out and the birds are singing, it can be quite hard to see that underneath my appreciation of all this, there are still some serious problems. However, it got bad enough to force me to face up to it when I just couldn't face going to an event that I'd usually enjoy a lot. I've been talking to my dear friend Sarah, who is a counsellor and has been helping me figure out what's going on in my head.

There are a couple of obvious things, like money worries and the general election result, but we've turned up some less obvious things too. One of these is loss of identity. I used to be a scientist, but I don't do science any more. It's been very hard to let go of; to accept that I no longer know what's going on in my field of research (or anyone else's, for that matter), that I'm no longer in a position to conduct experiments. If I'm not doing science any more, I'm not really a scientist, am I? I talked to Sarah about the difference between human being and human doing and, although I've come across the conceptual distinction before and it has intuitive appeal, if I'm honest, I just don't get it.

I am wedded to the idea that what one is is defined by what one does simply because I can't envisage a human who is not doing anything. If you take away all activity, what is left? If anything is left, I can't see that it differentiates between one human and another. I'll try another tack. Suppose we take a quality such as, kindness. It might be true to say that someone is a kind person even when they're not doing very much at the time. But isn't kindness just a disposition to act kindly? I can't find any meaningful qualities that don't come back to action in the end. I am a human doing.

So, what do I do? This a question that is often asked in social situations, when meeting new people. It's one I have trouble with; I don't really know what the answer is. It's not a bad question, and the person asking it is simply trying to find out a bit more about me. When I had a job that I felt reflected my personal identity (even, formed a big part of my identity), I had no problem with this question. Answering it would be a very concise way of conveying a lot of information about myself. Now, I don't have that kind of job. The occupation I've chosen is unpaid, but that's not the main problem. I'm not sure that self-sufficient is a very good representation of who I am, not least because I'm not very good at it. Competence is a big deal for me, but I'll leave that for another time.

I now have a disconnect. I accept the identification of a person with what they do, yet what I've chosen to do with my life doesn't feel like who I really am. What am I, then? I think I've found an answer that might work for me. I used to think of myself as a scientist, but if I go back a little further, to my undergraduate days, I had a dual identity. I studied both philosophy and psychology and at the time, was equally happy identifying with either. I pursued psychology as a career mainly because it seemed like a more realistic option. Now I've stopped doing that, perhaps I can re-identify with the other branch of my studies? I never really left philosophy behind. Look at this blog post: It's all about picking ideas apart. Human being vs human doing? What does that really mean? What's the point of asking, What do you do?


Rodin's The Thinker

This is what I do: I think about things. I am a philosopher. That's not an answer I'll give when people ask, What do you do? It sounds pretentious and is also misleading. I'm not doing philosophy at the highest level, and I'm not getting paid to do it. However, it is an answer that gives me an identity I'm comfortable with. An intellectual life has value, at least in my world view. I need no longer feel that I'm trying and failing to be self sufficient. This answer is for me. I still need to find an answer for other people, for use in casual social situations, but I hope that now the question won't be poking at an open wound. If I'm happy with my own view of myself, I don't mind too much what other people think of me.

Friday, 15 May 2015

Introducing George

Oh dear, I've left my blog unattended for almost a month with a rat marauding around the kitchen. Well, the rat is no more. We bought an old fashioned spring trap and after ten days of moving it around and trying different baits, the rat succumbed to the temptation of flaked almonds perched tantalizingly close to the edge of the bait tray. It was a swift end. We've heard nothing since, and no food has been taken from the kitchen counters, so we're pretty sure that rat didn't have a family. Step 2 is to discourage further marauding by* getting another cat :-)

Allow me to present George:

He hadn't been outdoors before moving here, so it's taking a bit of getting used to. I think he's getting the hang of it, though he's not really relaxed out there, yet.

We spent ages thinking about names for him. The lady looking after him for the Cats' Protection League had called him Frodo, but we didn't think that suited him, as the hobbit was a dutiful, stoical sort of character, and the cat shows no sign of being either of those things. We nearly settled on 'Du' (Welsh for black, pronounced 'Dee') but it's just too short. I'm not sure where George came from, but it's the first name we thought of that we're both happy with.

He arrived yesterday, and has spent a lot of time exploring, checking things out, and falling off things that are too slippery for a large black cat to land safely on (e.g. edge of the kitchen sink).

He's met the neighbours, both feline and human, and was surprisingly friendly towards the latter. In fact, I'm generally surprised by how friendly he is towards us, though it takes him a few moments to recognize me if I've gone out of sight and reappear. Hopefully he'll remember who I am before too long.

---

* Also by moving the compost heap further away from the house. I won't change what I put on the heap because by the time you've excluded everything that might be tempting to a rat, you hardly anything left to make compost from, and you also have the problem of storing rotting food waste in the house until it's time to send it to landfill.

Saturday, 18 April 2015

There's a rat in the kitchen, what am I gonna do?

We borrowed our neighbour's trail camera to catch photographic evidence of the little blighters who've been keeping us awake at night. Most of the pictures were greatly over exposed because I'd set the camera too close to the hole where I thought they were coming in, but we did get a few clear images.


Not a mouse

That step behind him is three inches high, for scale.

If we get a cat now, it had better be a battle-hardened bruiser. I'm certainly not getting a kitten (I wouldn't anyway, when there are so many cats needing homes) - I've read The Tale of Samuel Whiskers!

Monday, 13 April 2015

Playing with willow

I recently started helping out at the gardening club of the local primary school. It's a lovely little rural school with a lovely garden that includes, as well as raised beds for veg and a herb garden, a living willow structure for children to play in. This is a dome tall enough for an adult to stand up in, with two tunnel entrances, one of which is certainly NOT tall enough for an adult. When I saw this structure just before Easter, it also wore a crown of shoots, about twelve feet tall. I commented on this to Charlotte, who runs the gardening club, and she said, Yes, that really needs attention. We'll probably have to get Sam in to deal with it. Noooooo! Sorry for taking your business, Sam, but I have my eye on that willow. I'll do it, I said.

I spent a pleasant couple of half-days in the school garden, weaving in and cutting willow. That is, they started pleasantly enough, but were pretty tiring after a few hours, especially the first day, when I'd forgotten to put the time on my phone forwards by an hour, so stayed an hour longer than I thought I had. It's no wonder that Ian came to see what had happened to me. He then went back for the car, as my original plan of bringing the cuttings home by sack truck didn't seem all that realistic.


Elly the 2CV, proving her worth in the last few days before she comes off the road to await funds for major surgery

I had a couple of plans for the willow, but before I got round to starting on them I had an Idea. It was one of those ideas that's just too tempting to ignore, so everything else gets pushed back to make way for it.


Idea, manifest

Can I make a bench out of willow? Yes, it seems that I can. Can I sit on it? Um, no, not as such... The idea is that all those willow twigs will take root, and as they grow they'll get stronger, and then we'll have a really cool living willow bench that we can actually sit on. Although willow takes root very easily, it really should have been planted about a month ago, before the leaves came out, so I'm not entirely confident that this will work, but I'm reasonably optimistic. In the meantime, I've moved the old bench a bit further along, so we can still use that.

Once I'd made the bench, I turned to more mundane applications. I cut lengths of the sturdiest pieces to stick in a soft bit of ground below the driveway, where the roots should help reinforce the ground and prevent the driveway sliding into the stream when it floods. I should also be able to harvest lots of shoots from these, for either firewood (poor quality, but high volume) or basketry. The medium thickness shoots were used to make a fence around the terrace, to replace the one I planted originally, that subsequently died. I'll take more care with watering, this time.


Willow fence, second attempt

I still have the top pieces that I cut off the sturdiest shoots, which is just as well, because I'd forgotten another use I thought of a while ago. When we moved here there were two wooden arches over our garden path. One of them was old and rotten, and is no more. I'd like to replace that with a living willow arch. I don't think the pieces I have left are long enough to make an arch, so that will have to be a longer term project, but none the worse for that. In the meantime, I was quite glad of the rain yesterday, otherwise I'd have a lot of watering to do.

Sunday, 12 April 2015

Things that go bump in the night

Two nights in a row, we've been woken in the small hours of the morning by the sound of something falling to the floor in the kitchen. The first time, we couldn't find what had fallen. The second time, I went to investigate and found the small hammer, which had been sitting somewhat precariously on the edge of a shelf, on the floor. Precarious though it had been, it wouldn't have fallen off all by itself.

The mice have lived in this house longer than we have, I think. We hear them scrabbling about in the loft and they don't bother us at all. So long as they don't get into the kitchen cupboards, I'm quite happy for them to live there. Well, I say that, but I may have to revise that statement slightly in light of what I found this morning. Under a chair, behind a box of beer bottles...

... one chewed apple. That'll be what fell to the floor the first night, then. Ah, we don't keep all our food in cupboards - there is the fruit bowl, too, and it seems that at least one mouse has found it. I guess it knocked the hammer off whilst searching for more goodies. I think it's time we got another cat.

Saturday, 28 March 2015

Nearly there!

Since I last posted, I've made more progress on the solar panel project (which is just as well, as I'm not doing anything else!) One job that I had thought might be beyond me was fitting a new electric socket into the cupboard where the pump is. I've never tackled mains electricity before, and didn't really know where to start. However, browsing through the Readers Digest DIY manual (as you do), I found nice clear instructions for taking a spur from one socket to supply another. That's exactly what I needed - I could use the socket across the hall that we'd been plugging the extension lead into. Far better to have the wire running under the floor than over it. All I had to do was lift the floor...

In one way, that wasn't too bad as I'd laid that bit of floor myself, so knew where I was with it. On the other hand, the pipes set into the floor had been connected up since then. At least they were flexible plastic, so should cope with having the board gently eased up. I did just that and, after a slight setback when I discovered that the wires to the socket went up, not down (so no hole in the floor beneath them), the job went entirely to plan, and I now have a new double socket in the cupboard. I also tidied up the wiring in there and added a switch for the pump. First I had to find a switch, which came to light when I took the coats off the coat rack before soldering just above them. There was a thermostat on the wall, no longer in use (obviously). That must have a switch in it! I thought. I took it to pieces and discovered not only a switch that's normally on, push button for off, but also a wiring diagram. Perfect. This enables the pump to be switched off with the solenoid valve left open, which is necessary for draining the system. In addition to a switch, the pump now has a connected earth wire. Yes, I know.


Believe it or not, this is the after tidying photo.

I've connected up all the plumbing. This included a few solder joints, most of which were done twice, though in my defense, I was dodging hail showers at the time, and re-doing the leaky connector over the coat rack that I hadn't quite fixed last time I tried. I'd expected the compression joints to be relatively easy, but even they threw up a few challenges. One pipe running down the side of a radiator wouldn't go past the plug I'd put in the other corner, but luckily I had a flatter one in a different corner, so could swap them around. In spite of writing Make sure 1st and 2nd boxes are close enough together for flexi-hose on my list, they weren't, but I solved that by bending the solid pipe instead of cutting it to only just longer than the box. When I went to raid the old radiators for bleed valves, I found that most of them had the grub screws missing. I don't know how that happened - I don't remember taking them out. I used a cap in place of one bleed valve - it works almost as well. Finally, I nearly destroyed two nuts trying to tighten a joint that I'd failed to put an olive in. Luckily, I checked.

Having made all the connections, I needed to fill the system to check for leaks. That meant going up into the loft, which meant a ladder that I discovered, on first climbing it, wasn't very firm on the floor. That is, the floor is dusty and the ladder slipped. I caught it before it went too far, but came down quickly and resolved not to go up again without someone to hold the bottom. Ian being out at work, I called on a neighbour, who kindly came round and held the ladder for me, and was quite interested to see the rest of the system too. Much to my surprise, not to say delight, there were no leaks. Not one.

The next step was to replace the plain water in the system with an antifreeze* mix. I'd originally thought of mixing it up in a watering can then pouring it into the header tank in the loft. Unfortunately there wasn't enough headroom above the tank for that plan to work. When Ian got home from work I asked for his input on the problem. He thought a bit then said, I do have that 12 volt pump and hose that I used to use for biodiesel. Maybe we could pump it up there. I have a spare battery, too. While he went off to fetch those things, I continued to search for inspiration on the internet. Surely other people have solved this problem? Well yes, but most of them solved it at the design stage, incorporating charging valves into the system for this very purpose. Then I came across the following very useful advice:

you could try this "cheapskate" approach:

Make no connection whatsoever to the water main. Use a 5L house-plant sprayer (Hozelock). Remove spray head, fill container with antifreeze water mix, attach hose to system drain and pump. The pump will easily deliver up to 3 bar.
I wasn't sure whether our pump could deliver that kind of pressure, but filling through the drain would be a lot easier than getting the pump within reach of the header tank. It had to be worth a go.


Pump in a bucket of bright pink antifreeze, powered by car battery and battery booster

It worked, just about. We ran the system pump to help it, and there was lots of running out to open bleed valves, then close them again in case the antifreeze all escaped as well as opening and closing the drain to take liquid in, then not let it out again. This required a lot of coordination between the two of us. The pump didn't quite manage the last litre and a half, so Ian took that up to the loft in a jug, and I think we may need to top up with a bit more water, as there are distinct gurgling sounds when the pump's running. However, we now have all the panels connected up and full of antifreeze, ready to go. The controller is doing its thing, and reporting slightly more information than it was last time I wrote about it.


Controller display, now fixed to the shelf

In addition to sensors in the panel and in the tank, I now have one on the pipe just before it goes into the tank. Ideally, this should be at about the same temperature as the panel when the pump's running, but as you can see, it's considerably lower. That means we've lost almost 20°C between the panel and the tank. Not good. Insulation is needed.

I started insulating the pipes around the panels, but I need to improve on this. I'll do more when the weather's better.


More shiny wrapping will be added

For the next stage of their journey the pipes cross the conservatory. I had an idea that since they're running under a transparent roof, maybe they could absorb some more sunlight on the way. It's probably a daft idea, but I persevered. Using an offcut of the roof itself, I made thee sides of a box.


Bent polycarbonate roofing

It is possible to bend polycarbonate cold, but only if you can take it a lot further than the angle you need, to allow for spring back. I couldn't do that, so had to apply heat. This meant waving a blowtorch at a piece of plastic I was holding in my hand. I managed not to burn myself, which is quite remarkable considering how often I burn myself on the oven. The other day I even managed to burn my finger on one of the solar panels. Yes, it did get that hot!

To go inside the box, I taped up some of the thin insulation for behind radiators and pleated a few layers between the pipes, and some more around them. Just the top was left open to the sunshine. When I say open, I mean covered by twin-wall polycarbonate roofing.


Boxed-in pipes

I'm not entirely convinced by this, but it has to be better than it was. If nothing else, it's a lot tidier.

Items remaining on my list are: Insulate pipes and touch up paint on window frames, both of which are waiting for better weather, screw down window on first box, which I'll do when I'm quite sure the system doesn't need bleeding any more, fix blinds to boxes, which can wait, as it's only needed if we go away in the summer, and possibly not even then, figure out clock for controller and program data logging, the first of which I spent quite a lot of time on today, and one I added yesterday, calibrate sensors. When I checked first thing, the display reported that the panel was at -2°C but there was no sign of frost, so it's evidently not accurate. I had meant to do this before I taped the sensor to the back of a solar panel, but I forgot.

As for figuring out a clock, this is so I can record temperatures and keep track of when they occur. People usually use an external, battery powered clock for this, but it is possible to make the Aruduino keep track of time and date after taking a time signal from a PC to start it off. I spent a long time looking up how to do this (it's here, if you're interested), then this afternoon our electricity kept flicking on and off, reminding me why the external clock's a good idea. I guess I'll be getting one of those then. That means more soldering. Hmph.

So there we are, nearly finished. The only remaining job that's going to make a difference to the effectiveness of the panels is adding insulation, and I'm well on the way with that. All I need now is some sunshine.


---


* I spent far too long considering what kind of antifreeze to use. Our system has the unusual feature of two walls of copper between the solar loop and the drinking water. This means I'm not constrained to use non-toxic antifreeze (if you have only one wall of copper separating them, you should use propylene glycol, which is food safe, in case there's a leak. Otherwise you might end up poisoning your drinking water), so could consider other alternatives. Methanol has a low freezing point, low viscosity, and an even higher specific heat capacity than water. It would be absolutely ideal if it weren't for - and I found this fact very frustrating - its tendency to evaporate, filling the space with poisonous, explosive gas. I settled for car antifreeze in the end, which is pretty much where I started from.

Monday, 23 March 2015

The third panel

I'm still working on the solar panels. They're not finished yet, but I'm making progress. This post is a bit about the design of the system.

As soon as you add a second panel to the system, there's a decision to be made about whether to connect them up in series (water goes through each panel in turn) or in parallel (there's a junction to split the water so it goes through both/all at once, then another junction to bring it back together again). Guidelines that I consulted on how to connect up solar panels tended to describe a combination layout, e.g. four panels arranged in two parallel runs, without discussing the pros and cons of each option. I had to do some general reading, and some thinking for myself, and here's what I came up with.

Panels in series make a longer loop for the water to go round, which means a more powerful pump is required. Panels in parallel require balancing to make sure one of the panels doesn't end up dominating the system, which the water essentially bypassing the others. I think that plumbers tend to favour parallel systems for these reasons, as balancing systems is something they do all the time, so it's no big deal to them. As for the effectiveness of catching heat from the sun, given a certain amount of sunlight falling on a given surface area, it might seem that there's no way that varying the plumbing could affect how much heat is captured, but there are a few factors that are worth considering.

Specific to my system is the fact that radiators have a high volume of water relative to commercial flat panel solar collectors. This means that they aren't so responsive; they take longer to heat up, so if there's only a short period of sunshine, they may not get hot enough to trigger the pump and take the heat into the thermal store. Hot enough is an important point here: If my store is at 50°C already, the incoming water needs to be pretty hot before it's any use. This means I want to maximize temperature, if possible.

On the other hand, there's the question of panel efficiency. For all the insulation I've put in, they will radiate heat back into the air, especially through the glass. If heat can be taken away from the panel when it's only a little above air temperature, then very little heat will be lost to the air, so the panel will be operating at a higher efficiency than it would if it was a getting a lot hotter before the heat was taken away and stored. Now we have arguments in favour of both high and low temperatures.

Let's look at how serial and parallel systems vary in terms of temperature. In a parallel system, water in all of the panels heats up at the same time, starting cool then, if it gets hot enough, all being pumped into the store at once. In a serial system, water goes through each panel in turn, so the first panel might be considered a preheat panel, and the last a topping up panel. This means there are different temperatures at different points in the system, which could be a good thing, considering the conflicting requirements mentioned above. The first panel can operate at a lower temperature, and so be more efficient, and the second panel brings the water up to a temperature high enough to be useful, i.e. hotter than the water already in the store.

However, there is a slight weakness in the description I just gave you. Water goes through means that the water is already flowing round the system. This won't happen until the last panel gets hotter than the stored water which, radiators being slow to respond, could take quite some time first thing in the morning. This brings us to the third panel.

How about having a booster panel that will heat up quickly and get the water flowing round the system? There are many designs for DIY solar panels to be found on the internet, and most of them involve much smaller volumes of water than the radiator design. If I made a small one of these and added it after the bigger panels in the series, it would heat up more quickly when the sun hits the panels in the morning and so start the water circulating before the other panels had got up to temperature. After that, it should serve to boost the temperature as the preheated water flows through it, so giving the higher temperatures needed to be worth adding to the store, at the same time as allowing the other panels to operate at cooler, more efficient temperatures. That's the theory, anyway.

I had plenty of microbore (10mm dia) copper pipe salvaged from the old central heating, and a sheet of aluminium that was originally behind a gas fire, and has more recently been part of my heated propagator. These could be used to make a solar collector along the same lines as this one described on builditsolar.com. I went for serpentine design to save making a lot of connections - I don't need a high volume of water here, so it doesn't matter if the pipes are widely spaced.

Having bent my pipe, I then used a 10mm steel bar - I have no idea where that came from - and hit it repeatedly into the aluminium sheet to make grooves. If you're thinking of trying this, it really is worth making a jig to shape the grooves. I started by setting the workbench to the appropriate width, but it kept opening out, which absorbed much of the energy I was putting in with the hammer.


The grooves in this aluminium sheet are carefully aligned to the bent pipe (visible in the background), not accidentally wonky

Once I had the two parts made, they needed connecting together. Following advice from builditsolar, I used silicone gloop to fill the gap between aluminium sheet and copper pipe. I then drilled some holes and tied the pipes into place with cable ties.


Each cable tie is looped twice over the pipe and joined at the back. I had hoped to pull the aluminium more tightly around the pipes, but the cable ties weren't strong enough.

All this got me as far as selecting a radiator for the other panels. I then selected a suitable sized window and made a box in the same way as I had for the other panels (I didn't tell you about the second panel. It was very much like the first one, except that the best fitting windows were wood framed house windows, which took a lot more work to prepare, being old and somewhat rotten). At some point before putting the insulation in, I realised that it would be a good idea to solder the connections that needed it before the pipes were snuggled up next to plastic insulating stuff. I'm glad I realised at that point.

Here is my finished booster panel, out on the hillside. The diagonal lines are reflections of overhead cables.


As you see, the window wasn't a very good fit for the collector, but it does allow space for a bleed valve to one side. The vertical pipe disappears under the top layer of insulation, to exit the box at the bottom.

And here it is in context:


Three solar panels, all fixed to their brick bases.

So, I now have all three panels in position. Once I've connected them together I'll be able to fill them and start catching sunlight. That isn't quite the end of the project, though. Insulation is quite important, too, and it would be nice if the power supply didn't run across the hallway to reach the pump.

Tuesday, 17 March 2015

One solar panel (box) now in position

When I checked my brick bases yesterday morning, they were had indeed set firm and were still horizontal and vertical in the correct places. This was pleasing, if not very surprising. At this stage, I was able to make the final measurement of how steep the bank is, or more precisely, the slope between the two bases. Getting a panel set up at the desired angle to the sun isn't straightforward when you're standing it on such an irregular surface. However, having given it much thought, I had a plan, and measuring the slope was the first step.


Tools for measuring orientation

As previously mentioned, the compass proved less useful than anticipated (and wasn't needed for this stage of the job, in any case), and it turns out that a paperclip makes a poor plumb bob, but the spirit level and protractor, held against a floorboard resting across the brick bases, were quite effective. Once I'd measured the angle of the bank, and I knew (from calculations) the desired angle towards the sky, I could prop up the solar panel box indoors at the right attitude.


Solar panel box propped up on bits of firewood

It's not the most stable of arrangements, perhaps, but it did the job. With this in position, I took the spirit level and drew horizontal lines around all the legs. This part was more difficult than I expected, but I ended up with this:


One solar panel leg marked out for cutting

Do you see where I'm going with this yet? If I cut the legs to horizontal, and have brick bases that are also horizontal, the two should fit together to give me the right angle of the panel. Added to this, I need a vertical hole in each leg for the peg. That is, it will be vertical when it's all in position, but at time of drilling, it has to be perpendicular to the cut surface of the leg. These holes also need to be exactly the right distance apart, so I measured the pegs again, for the umpteenth time. I used a gimlet to make pilot holes as it's much easier with a hand tool to give it half a turn or two then check again with a set square to make sure it's still going in the right direction.

Having drilled the holes, I couldn't resist taking the box up to the bank to see whether it fitted. Halfway up the steps I thought, I'm not going to want to do this again. Luckily, it fitted!


Solar panel box, standing on front bases only

Not only did it fit perfectly, but it stood up on its own, too. That was better than I expected but I thought I'd better stick to the plan and add the back legs. After all, it will be carrying a lot more weight when it's finished. Having got the box in position, the next step was to find the positions for the back legs, which I did with a plumb line made by tying a brass nut to a piece of string and hanging it under the legs. I then mortared bricks and pegs into position, again aiming for horizontal bricks and vertical pegs, though it was slightly less critical this time.

Once the mortar had set (I left it over night, with the panel propped up for extra support, though it didn't really need it), it was time to fill in the gaps. There were some bits of wood up there that I'd taken up some time ago when first thinking about how to support solar panels. I think they were from the leylandii hedge. In any case, they looked quite suitable for making back legs from. I measured these against the gaps between panel feet and brick bases, cut them to length, drilled holes, somehow eased them into the gap, and finally added brackets to connect them up at the top.


First panel box fixed in position

After that, I applied copious quantities of creosote then brought the glass cover out to go on top, which I finished just as the first few drops of rain fell. Now I can turn my attention to the second panel.