About this blog

My photo
Wales, United Kingdom
Documenting one couple's attempts to live a more self-sufficient life.

Wednesday, 2 January 2013

Hat rack

Since we remodelled the airing cupboard to take the thermal store for the new heating system, we've been using the old pipes as a hat rack.


Old heating pipes bent into hooks for hats

This was kind of OK, but they didn't fit very well and I usually knocked at least one off when I was trying to take another out of the cupboard. When I went to help Dad with his house in Cornwall, I scrounged the coat pegs from his house. Over the last few days I've given them a couple of coats of paint, and this morning I hung them on the wall, then added hats.


New coat hat rack

They're not ideal - it would be better if the pegs were further apart - but they're a lot better than what we had before. I decided it really wasn't worth the effort of cutting them up and fixing each part separately, so this is what we've got. I'm starting January as I mean to go on, getting small jobs ticked off the list.

Goodbye 2012, and good riddance!

2012 looked mostly like this:


And the garden looked mostly like this:


It wasn't the best of years. I had depression, too, which wasn't caused by the weather and the slugs, but they didn't help. It is getting better now, though. Recognising the problem and not expecting too much of myself for a while has given me space to recover. I'm now starting to feel like doing things again, which is great.

I'm not going to make the mistake of launching myself into big projects straight away; I'll work up to it. January will be a month of pottering about, doing small jobs and planning. Probably marmalade, too. Maybe that's where last year went wrong - I didn't make any marmalade.

I'll start the new year properly at Imbolc (beginning of February), which feels much more like the start of the year to me. By that time I'll be ready to tackle the solar panels project. I'm confidently expecting this year to be better than last year, but in the meantime I'll remind myself that last year had some pretty bits too:

Saturday, 29 December 2012

Printer table

Some jobs are much harder than you expect them to be, but just occasionally, a job turns out to be easier than expected. This was an easy one.

When we finally got fed up with the artistic effects our old inkjet printer was applying to every page, we bought a second hand laser printer for the princely sum of £50. We then spent almost as much on a toner cartridge (magenta) but haven't actually needed to use it yet, despite the fact that the machine's been complaining for months that it needs changing. We don't do very much printing.

The new printer is much bigger than the old one and has been getting in the way and annoying us for some time. We decided that we needed a little table for it, preferably on wheels so we can pull it out to clear paper jams that inevitably occur at the back. I thought the pieces of fitted wardrobe that we took out of the spare bedroom might do, so I measured the printer and took my tape measure down to the workshop to see what I could find.

The first piece I picked up - and I didn't even have to climb over anything to get to it - was just the right size. There were three others the same size with it, and they still had the brackets attached that fixed them together when they were a wardrobe. They also had hinges, which unscrewed easily. It didn't take much turning about to find a way of fixing three of these four pieces together. I then put my hand out and found a short piece that fitted perfectly to reinforce the front, then not much more searching found another piece the same to go across the back. The whole job took about twenty minutes.

Voila! One printer table:


New printer table in situ. There's even space underneath for the old printer (still serviceable as a scanner) and the spare toner cartridge.

No wheels, though. I don't think we own any casters, so finishing the job will require shopping. I'm not sure it's going to happen.

Saturday, 15 December 2012

More insulation, more jobs, and a cautionary tale

Alongside getting the underfloor insulation finished, I'd applied for a grant for loft insulation, of which we had very little. I filled out an online form and got an email letting me know which local installer would be contacting me, followed shortly by an email from said installer asking when would be suitable to conduct the survey.

At this point I hesitated because the survey was to check that the house was suitable, and I was worried there might be damp in the loft which would rule us out. There definitely had been damp, and there had been insulation stuffing up the ventilation gaps in the eaves, too. I'd removed the insulation some time ago but needed to check whether it had solved the problem but couldn't face going up there to check, and potentially find a problem I didn't know how to fix. Eventually I got round to it, found no damp, and sent an email suggesting a few dates for the survey, then... heard nothing.

After quite a lot more of hearing nothing, I was surprised when a bloke turned up saying he was here to do the loft survey. OK, wasn't expecting him, but never mind. He checked one of the three sections of loft (the house is in three parts; so is the loft), asked whether the other two were much the same, and confirmed that we would be eligible for free insulation, and that it would be installed in a few weeks (a letter arrived a couple of days later with an installation date).

Indeed it was. The same bloke and another one turned up with a van full of insulation and filled our loft with it. In the process they discovered a complete absence of joists in the middle section of the house. Interesting.

We'd removed the most awkward things that were stored in the loft (notably a mattress) but they were OK to work round the smaller things. Nonetheless, it was obvious that stuff in the loft created a problem when resting on all that fluffy insulation.

Box of Stuff squashing the loft insulation

I asked what we should do about this - it's obviously not an uncommon problem, so there must surely be a common solution. Apparently what we should have done was to build up the joists so that the insulation could go between them and boards sit on top. No clever solutions available at this stage. Hmm.

A google search quickly revealed this information to be complete rubbish. I had thought about what I'd ideally need to solve this problem: Short posts to go through the insulation with brackets on the bottom to fit over the joists. Then I could screw the boards down to the top of the posts like a many-legged table. It seems that I wasn't the only one to hit on this design: Loft storage stilts are exactly what I had in mind, but with an additional disc on top to make the screwing down part easier. According to the website, they're only available at B&Q, which is OK as we now have a B&Q in Aberystwyth. I checked this company's website, but no mention of the stilts. I sent an email to the manufacturers expressing hope that they were still in business, dismay at their product's absence from B&Q's website, and some pessimism about my chances of getting any sense out of B&Q's staff.

My pessimism proved ill-founded (well, it may have been well founded, but it was unfulfilled) when we went into B&Q the next day for mortar, and while we were there I asked about the stilts. These couldn't actually be found in the shop, but were on the computer, albeit with unclear information about how many there were, and where. The staff couldn't have been more friendly and helpful, faced with these limitations. The next day (and the first working day after I wrote to them), I got a reply from the manufacturers telling me that they were having trouble keeping up with demand, but all branches should have fresh stock in a week's time. I waited a week, went back to B&Q, and sure enough, there was a big bin of loft storage stilts just in front of the loft insulation, priced at £1.78 each or 12 for £15. I'd calculated that I'd need 25 for four boards (and I'm glad I had, because their guide to how many you'd need didn't make much sense), so that cost £31.78, which wasn't too bad, especially as I'd only seen the each price on the computer the previous week.


One shiny new loft storage stilt

Right then, boarding the loft. Obviously I wasn't approaching the job quite the right way. Even with the fancy stilts, I still should have starting before the insulation was laid across the joists. Oh well. The stilts have tabs on the bottom brackets so you can screw them to the joists, but I didn't think it would matter much if I skipped that step. They'd be stable enough once they had a board screwed to the top.

I was using leftover boards from the underfloor heating, which being flooring boards were far more substantial than I needed for loft boarding, but those were what I had. They're 8' x 2', and needed stilts down each edge, spaced at one per joist. All I had to do was find the joists and poke the stilts down through the insulation and over the joist, which turned out to be surprisingly easy. Most of the places I needed stilts happened to be in the gaps between two pieces of insulation, and where it wasn't, it wasn't too difficult to tear a hole to stick the stilt through. I started next to the loft hatch with the first row, then measured 2' along the joists for the second row before fixing the first board in place.

It turned out that the hardest part of this job was getting the boards up into the loft. Eight foot is pretty long, bearing in mind the typical headroom in a loft. To make it more difficult, the hatch was only about 2' square, so the board had to go through diagonally. Somehow, with a lot of manoeuvring and swinging the ladder out of the way, we managed to get the boards up.

Having got a board into the loft, then next bit wasn't too difficult. One or two of the stilts fell over (not being screwed down) as I moved the board into position, but it was easy enough to pick them up again. At this stage I appreciated the big plastic discs on the tops, as they compensated for less-than-precise positioning and made it almost impossible to miss them with the screws. These really came into their own when I was screwing the second board onto each stilt as I couldn't see the stilts at this stage, so having a big target was very helpful. At least, I assume I didn't miss any; I have no way of knowing.


Loft board screwed to top of stilt

Once the first board was in place the job got easier as I could then kneel on that board to work on the next one. There was a small setback as the space for the second board was partly occupied by the central supports for the roof, but cutting a corner out of the board solved that problem. I didn't manage to fully engage any of the tongue and groove connections between the boards, but I decided that didn't matter much in a loft. Otherwise, the job went pretty smoothly and I now have an eight foot square boarded area in my loft.

The next issue raised by the new insulation was the loft hatch itself. As there's a proper fitted ladder in this section of loft, it was always a bit of a fiddle moving the hatch cover in and out of place past the ladder. With extra insulation around the edges it was almost impossible. There also wasn't space to put any insulation on the hatch cover itself, which obviously isn't ideal.

We'd had a hatch that hinged down in our last house, and I thought I might be able to convert this one to the same design. I knew I had some door hinges somewhere, and even managed to find them, after a bit of tidying up. Again, far more substantial than the job required, but they were what I had. I also found a rather cute little brass latch that I'd probably inherited from Grandma.

With quite a bit of trial and error, I managed to make the hinges fit, sort of. They need to move a little on their fixings as the hatch opens and closes, but that's OK. If I'd measured and calculated I'd probably have concluded that the job couldn't be done, or at least not the way I was trying to do it. Now I have a hinged loft hatch with a cushion of insulation (leftover from downstairs)...


Loft hatch hanging from new hinges

... and a nice little brass latch.


Latch, needed as much to pull the cover down as to hold it up.

Having suitably upgraded my loft, all that remained was to move stuff onto the boarding. That was easy for things already in that section of loft, but a bit more effort for things stored in the loft at the other end of the house. This section doesn't have a fitted loft ladder so we have to use a separate ladder, propped against the edge of the opening. If you push the ladder right into the loft, the hatch cover catches on it when you close it and you can't get the ladder out, so I always rest it right on the edge. It has rubber feet on both ends, so it's secure enough.

As I went up and down the ladder with various boxes and bits, I cursed the flex in the ladder that added to the strain on my already aching legs. I had quite a lot of trips to do to fetch everything down and I'd nearly finished when, stepping out of the loft onto the ladder, suddenly the ladder wasn't supporting me any more. With a small shriek, I fell through the hatch after the ladder, landing in a painful heap on top of it.

As I lay there, my first thought, after Ouch and catching the cast iron fire surround* that was threatening to fall on top of me... OK, my third thought was that there was no-one around to come and rescue me as Ian was out. Then I wondered what I was expecting him to actually do. Then I realised that nothing was broken and I was quite capable of moving, and the ladder really wasn't the most comfortable place to lie. I eased myself off the ladder and a few feet away until I could lie flat on the floor with my knees up and recover.

Although I felt very battered, in truth I wasn't much injured. I have bruises on each arm thanks to a reflex of throwing them out as I fell - painful in a narrow hallway, but probably slowed my fall. My neck and shoulder muscles are aching and stiff from preventing my head smacking into the ground, and I have the most spectacular black-and-blue bruise across my arse from where it met a rung of the ladder. In turn, the ladder is somewhat bent. This wouldn't have happened if it had landed flat on the floor, but in the hall is the cupboard where the hot water tank lives, which we haven't yet put doors back on, and the vacuum cleaner also lives there. Without doors, the hose of the vacuum cleaner spills out into the hall, underneath a falling ladder, preventing it from landing flat on the floor. Like the crumple zone in a car, that bending of the ladder absorbed quite a lot of energy, which probably saved me from more serious injury, so you could say that Henry saved me!

The moral of the story is, don't check your ladder just once at the start of a job, keep checking it as you go, in case it moves.

---

* We brought this from our last house and haven't quite decided what to do with it yet, so it stands in the hall, propped against the wall (except when it's falling over) making a useful small shelf with its mantlepiece.

Thursday, 6 December 2012

Underfloor insulation

This is the job that pretty much finished me off earlier this year. Looking back, I find that I started writing a blog post about this back in February, but that was before the trip to Cornwall with Dad...

Here's what I wrote in February:

This is the job that's been getting me down for the last few months. It feels like a bigger job than replacing all the floors in the house and come to think of it, it probably is. It's the same area (actually slightly more, because we didn't replace the sitting room floor but it still needs insulating), there are three layers to install, and all the work is overhead. But I'm getting ahead of myself...


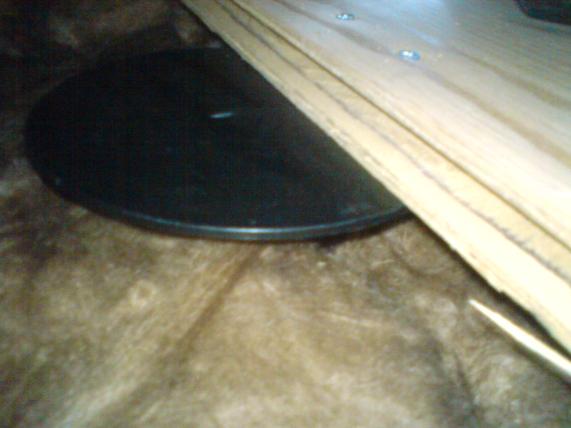
Underfloor heating, viewed from under the floor

The pipes carrying hot water to heat our house run through the underside of the flooring panels and, where they need connecting together, are completely exposed below the floor. They needed to be accessible for installation so, once complete, our underfloor heating was heating the space under the floor. In this case this was the garage, workshop and store room, or a space equal to the house above.

When I was at school, we learnt about three ways that heat can get from one place to another; convection (heat rises), conduction (heat travels along some materials, such as metals), and radiation (heat will just float off into empty space if there's a hot thing surrounded by coldness). More recently, I've learnt that in the context of heating a house, convection is the one that does most of the work and radiation is pretty much irrelevant. Hmm, judging by how warm our unheated downstairs rooms are, I'd say that radiation can be quite important in a house.

So... insulation is required. In fact, insulation is part of the specification for the underfloor heating. If I'd noticed that earlier, I wouldn't have spent so much time trying to find out how much insulation I needed, as the answer was there in the spec. It's all very confusing, as sometimes it's expressed in terms of how much heat is let through, and sometimes in terms of resistance to heat (U values and R values respectively. At least, I think it's that way round. They're reciprocal, anyway.) If you're looking at layers of insulation, one kind - I think it's R values - can be added up but the other kind can't.

Once I'd found out how much I needed, I still had the problem of choosing what kind. This was difficult because rockwool is the work of the devil, but lovely fluffy eco-friendly stuff tends to be very expensive. I also wanted advice on what works well, so perused the Green Building Forum, where someone mentioned leaving an air gap between two layers of foil. That seemed like a good idea, especially as I already had one of the foil layers pasted to the underside of the heating panels. There's a modern type of insulation that consists of layers of foil and spacing, which is claimed by manufacturers to be equivalent to much thicker bulk insulation. The difference is that foil works as a reflective barrier, bouncing radiated heat back, whereas traditional insulation just traps as much air as possible without letting it circulate. If I could get the thinnest (cheapest) type of this fancy new foil stuff, that would make a good start to my insulation.

I wasn't particularly short of space, so no need to go for all super-thin fancy stuff. I'd fill out the rest with traditional bulky insulation. I'd much rather have nice eco stuff but, as noted above, it does tend to be expensive. I needed to know just how much more expensive, so set about doing a bit of research. I took the first price I found for rockwool, which probably wasn't the cheapest, as a baseline. Sure enough, most of the eco products I found were several times the price, until I came across Black Mountain sheep's wool insulation which was only 20% more expensive. I had to double check that, but it was true. It's also Welsh, so a relatively local product.

The only drawback of using sheep's wool (or indeed rockwool) to insulate a ceiling is that it's floppy, which makes it a bit of a challenge to put up. The third component of my insulation would have to be boards to hold the wool up. At this point I ran out of green-ness. I did check eco alternatives to plasterboard, but they were so expensive that I gave up and ordered standard, cheap plasterboard. At least it's not as nasty as rockwool to work with. I also bought sticky tape to hold the foil up and screws to hold the plasterboard up. As for holding the wool up, I'll come to that later.


Insulation in the garage, just waiting to be put up.

As you can see, the sheep's wool is indeed bulky, whereas the foil - just one roll, over there on the right of the photo - takes up far less space. I'm not sure if the plasterboard had been delivered by this time, but if it had, it's on that heap of boards in the middle.

So, I had all the stuff, I was ready to go... but a bit daunted by the task. It didn't help that the rooms I needed to insulate looked like this:


Garage, mostly full of insulation


Store room, mostly full of sundry crap


Workshop, mostly full of, well, more sundry crap

---

So I'd written about the theory and planning, and some introductory stuff, but not got onto the actual work of putting up the insulation. I shall resume:

I started in the garage because most of what was in there was the insulation itself, and that heap of boards in the middle of the room made quite a handy platform to stand on when working on the ceiling. Also, the joists were parallel and evenly spaced in there, which made the job somewhat easier.

The first step was the foil-and-bubblewrap* layer. I found that if I cut it along its length, it had enough rigidity to hold its own weight when wedged between two joists, so the sticky tape didn't have much work to do. I still added it, to minimise air flow around that layer. Here's a ceiling with the foil layer in place:


Foil insulation taped to the ceiling - not the garage ceiling, but they all looked much the same.

The foil looks wonky in that photo because it had to go over (that is, under) some pipes. Once the foil was up, the floppy sheep's wool layer was next. My cunning plan for holding this up for long enough to get the plasterboard fixed underneath it involved wedging struts between the joists under the insulation.


Sheep's wool insulation

The struts in the photo above include foil tape (not ideal, relying on stickiness), buddleia sticks (from hacking back overgrown plants), and strips of Range Rover headlining (don't ask). We also used plastic conduit that once covered electric wires, polystyrene packaging, offcuts of pipes, and various other things that normal people would have long since thrown away.

Once the wool was up, we then moved on to the really difficult part (and sheep's wool, by the way, whilst much nicer than rockwool, still drops bits into your eyes when you're holding it over your head, and I'm still picking strands of it out of one wooly jumper I foolishly wore to work on this back in February). We bought plasterboard in 8' x 4' sheets. This is quite big. Certainly too big for one person to hold up while screwing it to the joists, and a bit much for two people, at least if those two people are me and Ian.

Taking advice from several people, including my dad, if I remember rightly, we tried assembling a jig consisting of one floorboard placed across the middle of the plasterboard to spread the weight and another jammed between floor and ceiling to hold it up. This was moderately successful, but did have a bad habit of collapsing dramatically as the board was screwed up, taking its weight off the support. Halfway through plasterboarding the garage, our very kind neighbours offered to help us, and the next bit was much easier, with four of us working together.


Garage, insulated and boarded

Leaving the garage behind, much moving of things was required to gain access to the workshop ceiling. This ceiling is conveniently divided into three sections by hefty beams running across the room, so I cleared just one section at a time, putting up all three layers in that section before moving things again to get to the next section. Again with help from our neighbours, and from another friend (who may have been bribed with cake), we managed to get the workshop finished.


Workshop ceiling. We weren't too fussy about the finish

I then moved everything from the store room into the workshop (making the workshop almost inaccessible in the process) and started work on the store room ceiling. I'd got the foil layer done and some of the sheep's wool at the point Dad needed my help with his house in Cornwall, so I left in the middle of the job, intending to finish it when I got back. On my return, utterly exhausted, I found that the wool had fallen down.

That was the final straw. I simply couldn't face it any more. And so the job was left, insulation variously hanging from the ceiling or sitting on the ground**, for several months. It didn't improve my motivation when I discovered that the wool on the ground had got damp and mouldy.

Back in March I assumed that I would recover from the Cornwall trip and get back to this job fairly quickly, but as I've discussed before, it didn't happen like that. Summer, such as it was, came and went, and the insulation still wasn't finished (and the stuff was going mouldy). My sister, kindly but firmly, told me to get a grip. Well, she didn't quite put it like that. She saw that this particular unfinished project was really getting to me, and something had to be done to get it moving again. "Just pay someone to do it," she said. She had a point (she usually does). It had got to the stage where I couldn't bear to even think about it, never mind face up to actually doing the work.

I asked Ian to take over responsibility for making something happen and agreed that it would be worth spending some money. He went round to see someone who does odd jobs for the hotel and had said to us at some point that if we needed stuff doing we should ask him. Within a few hours, he'd come round and the three of us were putting up insulation and plasterboard. Just like that.

There was a break for a couple of weeks as either he or Ian were busy doing other things, but then we saw him at the village lighting of the Christmas tree event last Sunday and arranged for him to come over again today, and now the job is finished. I won't say it was easy, but with someone else taking the attitude, "This is just a job to be done - let's get on and do it," the whole thing was a lot less daunting and, well, we did it. I am exhausted now, and my arms ache almost too much to type, but I am so pleased this is finished. I feel released from something that was dragging me back.

As a final bonus, when I asked, "How much do we owe you for all this work?" he said, "Nothing. I'll take payment in kind sometime when I need help with something." Isn't that lovely?

---

* That's what this fancy new insulation looks like - a layer of bubblewrap sandwiched between two layers of foil, then coated with another thin layer of plastic to protect the foil. Makes sense to me.

** I use that word deliberately. There's no floor, as such, in the store room. In fact, parts of it are quite muddy.

Tuesday, 4 December 2012

Roof repairs

There's a damp patch on the dining room ceiling that I've been ignoring for months.


Damp patch on the ceiling. Not pretty, but surely not urgent?

Then we noticed the edges of the wallpaper starting to curl, then a few days later...


Wallpaper trying to fall off the wall and being saved by a picture of a 2CV. You can't see the 2CV, it's busy saving the wallpaper.

Ah, maybe this is a problem that I need to deal with. Since this is around the chimney, we assumed that the problem would be with the lead flashing around the chimney stack, but the only way to find out was to go up there and have a look. If the chimney had been on the conservatory side of the house, that would be relatively easy, but it's not, it's on the driveway side. Luckily, our friend Jasper was happy to lend us his scaffolding tower and roof ladder.


I went up there, several times.

Our neighbour suggested going into the loft to see whether there was moisture on the surface of the chimney breast up there, but after a bit of thought I decided that I'd rather go up on the roof. I hate rockwool insulation (loathe and detest) a lot more than I hate heights (not at all).

I would like to be able to show you a photo of what I found up there but my phone battery chose this time to give up the ghost, Ian refused to lend me his Blackberry, and I didn't want to carry a camera that I couldn't fit in my pocket, so you'll have to make do with a description. I found plenty of evidence for what the neighbours had told me, namely that this has been a problem for a long time - ever since the extension was built in fact.

There was plasticky sealant slathered over every conceivable gap in the brickwork, including the joins between the flashing and the chimney. It had been applied so liberally that it stood proud of the brickwork. This meant that one small fault in its adherence to the wall would allow water to flow down between the sealant and the brick, and be channeled into the gap between the bricks. I pulled a small piece out and confirmed that this was exactly what had happened - it was soaking wet and covered in moss.

Problem identified (well, a problem identified), I needed guidance on how to fix it. I consulted my trusty Readers Digest DIY manual, which had helpful instructions on how to fix various faults with flashing, including repairing the mortar where the flashing joins the brickwork, and where it's appropriate to use sealant (not in place of mortar).

We set off to buy some mortar which, since it was Sunday morning by this time, meant B&Q. By far the cheapest option per quantity of mortar would be to buy the ingredients and mix it up ourselves, but since we only needed a little and cement has a very short shelf life we went for the 'just add water' kind, though I very nearly walked out of the shop in disgust at the cutesy instructions - Reach your right hand over your left shoulder and give yourself a hearty pat on the back. Ugh!

Having survived B&Q (which wasn't nearly as bad as it can be. The staff at the Aberystwyth branch were very friendly and helpful), I didn't manage to steel myself to get up on the roof again on Sunday (though there was some faffing about with phones and old cameras). Yesterday the weather was clear and dry so I really had no excuse. I went up in the morning to pick off all the old sealant, then again in the afternoon to insert mortar into places where there should be mortar. The second time I took a bottle brush to clear out all the moss. I've never done pointing before - where better to learn than on a chimney?

I might add that I only did one side of the chimney and the 'uphill' face as the downhill face didn't need work and I didn't think it was worth moving the ladder to get at the other side when any water that gets in there will end up a long way from the surface of the wall as it's between the old building and the extension. OK, that's not a very good argument, but it would be as much work again to do the other side and I'm not convinced it's necessary.

Even after applying the mortar, the job wasn't quite finished. I'd bent some of the lead away from the bricks so I could get at the mortar gaps behind it, then wasn't sure what to do with them afterwards. It seemed wrong to fill a gap with wet stuff then immediately cover it up with a waterproof sheet, but on the other hand, how long does mortar take to dry? I couldn't leave them sticking out for weeks, so I compromised and left it overnight, in which time it hailed three times.

This morning, I went up again to put the lead flashing back in place, and to clear up the mess. I had dropped rather a lot of mortar all over the roof. Ian was out so I let the neighbours know what I was doing. They promised to listen out for a scream. In spite of the wooden boards now being wet and slippery, that task passed uneventfully and I was able to assure the neighbours that they wouldn't need to call an ambulance after all. All that remained was to take down the ladder and scaffolding, which was a two person job, so I had to wait for Ian to get home.

I just broke off from blogging to catch a break between hail showers and go and do that. We were just manhandling the ladder down to the ground when it hailed again. Meanwhile, with all that climbing up and down a wobbly scaffolding tower (never mind the roof ladder - that tower is the scary bit), the muscles in my legs were aching and getting pretty wobbly too. At one point I was standing on a slippery board with wobbly legs, high enough to look into our upstairs window, and realised I'd have to sit down on that freezing, wet board for safety's sake. This part of the job was not fun.

Still, the job is now done and we can return Jasper's ladder and scaffolding. I feel quite pleased with myself, but it would be nice to know whether I've actually solved the damp problem. I guess I'll just have to wait and see.

Thursday, 15 November 2012

Are dishwashers more efficient than my hand washing?

We often hear that dishwashers, counterintuitively, use less energy and water than washing the dishes by hand. No matter how many times I'm told this, I find it hard to believe, so when I finished a load of washing up today, I took a few measurements so I could compare my washing up with those that have been reported. Firstly, I bailed the water out of the bowl with a measuring jug to see how much there was, then added a bit to allow for water that had sloshed over the side. I hadn't rinsed under a running tap without catching that water in the bowl, so I didn't have to add any for that. The total amount of water was about 5.5 litres.

I know, because I've measured it before, that water that I find hot to the touch is 43°C. It's pretty chilly out at the moment, so let's say the incoming main is 5°C and round it up to 45° for washing-up temperature (all approximations here err on the side of increasing energy usage in my test). Since water is very reliable in how much energy it requires to heat up, I can calculate that this would take 256 Watt hours of energy to heat, or just over a quarter of a kWh.

I then needed to know how much washing up I'd achieved. One load for me is until either the draining rack is full or the water is too dirty to wash any more. This tends to occur at roughly the same time, though I do more rinsing under the tap towards the end of the load, as the water gets dirtier. I noted down what I'd washed:-
  • 4 glasses
  • 2 mugs
  • 1 tin can and 1 jam jar
  • 1 measuring jug (not the one I used for bailing)
  • 5 plates
  • 3 bowls and a basin
  • pestle and mortar
  • 2 saucepans
  • 2 mixing bowls
  • 2 plastic trays that fruit came in, for recycling
  • 15 items of cutlery

One load of washing up

See those pans on the windowsill behind? I used the dirty water from this load to soak them so they'll be easier to wash when I get round to them. I do that.

Having noted down the details of my own washing up, I then needed to find appropriate figures for comparison with dishwashers. The fact that dishwashers are more efficient seems to come mainly from a study conducted at Bonn University, comparing many people actually washing up with dishwashers doing the same work. When I looked for this study I was pleased to find that they've done a follow-up with smaller loads (the original study was a full twelve place settings in one go): Our intention was to simulate the dishwashing situation in a two-person household, excellent! ... in which two place settings are used and cleaned three times per day ah, I'm not sure I wash up that frequently, ... and four additional items are soiled heavily in the food preparation processes and are washed separately. Do you wash up the pans separately? Still, we should be getting close to comparable figures.

I looked at the details of the study. One place setting consists of:-
  • a soup plate
  • a dinner plate
  • a dessert dish
  • a cup
  • a saucer
  • a serving dish
  • a glass
  • a fork, a knife, a soup spoon, a teaspoon, a dessert spoon

So that would be a three course meal with coffee to follow, three times a day?? OK, never mind how unrealistic this is. I now have some details to work with. How does my load of washing up map onto this test load?

two place settings plus pansmy washing up
2 soup plates; 2 dessert dishes3 bowls and a basin
2 dinner plates; 2 saucers; 2 serving dishes 5 plates
2 cups2 mugs
2 glasses4 glasses
10 items of cutlery15 items of cutlery
4 pans/casserole dishes2 pans; 2 mixing bowls
not includedpestle and mortar
not includedmeasuring jug
not includedtin can; jam jar; plastic trays

It looks like my load of washing up was slightly more than one of their two-place-setting loads plus their food preparation load. Let's say they're roughly the same - how do the figures compare with their hand washers?
The water and energy measurements show a very wide distribution of consumption values, ranging from four to 90 l and from 0.03 kWh up to 2.6 kWh for washing a pair of place settings. Washing four heavily soiled cooking items required slightly more energy and water than two place settings.
I used 5.5 l and 0.26 kWh for a pair of place settings plus four cooking items. For water consumption I am off their scale, and I'm way down there for energy consumption too (apparently someone was happy to wash up in cold water).

How about the machines? We need to take account of the fact that you'd put more in a machine than my one load done by hand. I estimate that you'd get two to three times as much in a dishwasher, and their test used six place settings (three times as many as one of their hand-wash loads) plus the pots and pans. I think multiplying my usage by 2.5 gives a fair basis for comparison, so that's about 14 litres and 0.64 kWh. Their machines used 83 litres. With regard to energy consumption (Fig. 8), the tendencies are similar, but the difference between manual and automatic dishwashing is not as pronounced. They don't even report the figures, but examination of their Figure 8 shows almost identical energy consumption for the 6 place setting plus pots and pans; approx. 1.8 kWh.

As I'd suspected, the current emphasis on low water consumption serves to distract from high power usage. When compared with my own washing up, as best I can, I am far more efficient than a machine in both water and energy consumption.

I finish by noting a sentence from their acknowledgements section: Thanks are due to our four European manufacturers of dishwashing machines (Bosch und Siemens Hausgeräte, Electrolux, Merloni Elettrodomestici and Arcelik) for supporting this study.

A beautiful thing

As I was walking down the steps to fetch in some firewood, I noticed this:


One small rose bay willow herb, seed pods dry and curled, having shed their seeds (liberally, all over my garden), casts the most exquisite shadow in the low autumn sunlight.

Monday, 5 November 2012

Unrepeatable Christmas cake

Or, What to do with a dead Herman.

As recipes go, this one's pretty useless, as a key ingredient is a friendship cake starter that's been neglected to the point of alcoholism. Other key ingredients are the remains of two tins of treacle that have been sitting in the back of the cupboard for approximately a decade, which I discovered when I went to put away the two new tins of treacle that had been on special offer in the supermarket.

Where was I? Oh yes, alcoholic Herman. If you neglect the starter for long enough, it will separate into three layers: Gloop on the bottom, froth on the top, and an alcoholic liquid in the middle. The first time I discovered this I tried drinking the liquid, but it wasn't as good as you'd I'd expect alcoholic cake mix to taste. Reasoning that wine yeast survives quite a lot of alcohol, I fed him and sure enough, he revived, but then I neglected him again. I've really lost interest in sourdough cake making by now. I've yet to find a recipe that Ian likes and it's distracting me from making cakes to tried and tested recipes, so all our cakes are slightly (or very) disappointing experiments.

The combination of alcohol, cake mix, and treacle (and the time of year) put me in mind of Christmas cake. I consulted my mum's recipe, which requires a 9 inch cake tin. Is that square or round? In any case, I don't have a tin that big. That one must have gone to my sister. I then consulted Delia, whose recipe for rich fruit cake was very similar (and even richer) and called for a 7 inch square tin, which is what I had. Using these two recipes as a very rough guide, my version consisted of the following:

  1. Cut up the remains of a tub of glace cherries, a few dried apricots and two pieces of crystalised ginger, then make up to two pounds with a bag of mixed dried fruit (including citrus peel).
  2. Add a tablespoon of brandy and the alcoholic liquid from the cake starter to the fruit, mix and leave overnight.
  3. Feed the remaining Herman mix with about 4 fl oz each of flour, sugar and milk. Cover and leave overnight (it bubbled in a desultory manner. I don't think he was going to revive this time.)
  4. Next day, soften/melt about half a pack of unsalted butter together with the remains of the salted in the butter dish - probably about 5 or 6 oz altogether. At the same time, put the treacle over the heat so it'll be easier to get the last bit out of the tin. When fairly liquid (because it's easier to mix that way), stir these into the Herman gloop. I didn't actually use all the treacle, but it was probably about three tablespoonfuls, or three times what the recipe said.
  5. Beat a couple of eggs (half what the recipe said) and mix in
  6. Add sugar (white) until it tastes sweet enough - about 4 oz
  7. Add flour until the consistency looks about right - 8 oz
  8. Add a quarter teaspoon of bicarb (how can such a small amount make any difference in so much cake mix?) and spices to taste - maybe half a teaspoon each of nutmeg and cinnamon, plus a little mixed spice.
  9. Wonder about the grated lemon and orange rinds in Delia's recipe and remember the orange peels still in the freezer from making juice last Christmas. Get out a couple of halves and grate into the mix. They grate well when frozen.
  10. Mix gloop into fruit (the fruit was in the bigger bowl). Look at resulting cake mix and think, That's never going to go into that tin.
  11. Search cupboard for another tin. Find various fancy shaped things lurking at the back (did my sister get all the useful tins?) and settle on the loaf tin (oh no, I got that one.)
  12. Line tins with a double layer of greaseproof paper, leaving plenty sticking up around the top of the tins, and grease well. I hate this job. There's no baking powder in this recipe, so it's OK that I put this off until I had the cake mix, um, mixed.
  13. Fill tins with cake mix to a similar depth, then fold greaseproof paper to make a cover over the top of the tin, but don't seal or the steam won't be able to escape.
  14. Bake at gas mark 1 (yes, really that low) for four and a half to five hours. I took the smaller cake out after four and a half hours, the larger after five. Leave to cool a bit
  15. While they're still a bit warm (I'm not sure whether this matters, but it's the way Mum used to do it), turn the cake over, poke holes in it with a skewer, and pour brandy over it. I used the bottle cap to measure (and to make sure I didn't tip out half the bottle) so it wasn't that much. I may add more over the next month or so.
  16. Wrap in greaseproof paper and try to find a tin that the cake will fit into for storage.

Since this was a very experimental recipe, with a much higher liquid content than the ones I was basing it on, and my track record with the friendship cake not being very good, there was no reason to expect this to turn out well, so I'm glad to have a spare one for testing.


It's important to test it thoroughly.

It's rather good, actually. Against all the odds, this is one successful Christmas cake. Now I hope it keeps!

Sunday, 4 November 2012

A nice cardie

I live in Ceredigion, also known as Cardiganshire, so most of the locals could accurately be described as nice Cardies, but they are not the subject of this post. What I'm talking about is a woolly jacket.

When I went to a spinning class last year, I browsed other stalls at the festival and spotted some pure Shetland wool priced at £1.50 per 50g ball. What a bargain! I asked the advice of the more experienced knitters around me as to how much I'd need for a jumper (that's sweater to those of you living across the pond. I tried looking up transatlantic translations for cardigan, too, but it got very confusing. You'll see what I mean by the end of the post). No-one was keen to commit on quantity of wool required, but the best guess was twelve balls, so that's what I bought.

Then followed a long period of doing nothing much, but pondering design. I definitely wanted a cardigan rather than an over-the-head jumper, I want it as long as possible with the wool available, and I want it nice. I have smart office clothes left over from my old life, but those are rarely suitable these days, and I have scruffy clothes for working around the house and garden, but I don't have much in between. This isn't too much to ask from my first big knooking project, is it?

I started by making up a sample piece, trying out different knit stitches and practising buttonholes. I fancied a chunky knit but the wool was fairly thin, so I wasn't getting what I wanted. After a while it occurred to me that crochet would give a thicker fabric, so I tried a few crochet stitches and settled for counterpane stitch, taking just one loop from the previous row (as opposed to both sides of the loop. The difference is that the half-loops left behind make a line along the fabric.) Experiments with decorative stitches revealed them to be not very visible, so I abandoned those. I used up the whole ball of wool in my sample to give me an idea of how much fabric a ball would make. Ah. Not very much.


Knit stitches to the left, crochet to the right. The extra bit bottom right is crochet buttonholes.

As I was working with the wool it struck me that it's not very soft. I didn't think I'd want that against my neck, so I'd make the neck wide and add a collar in a softer yarn at the end. On the other hand, Pebble liked this little bit of woolliness very much.


Mine now.

A bit of investigation with holding this piece against my back and wrapping it round my arms indicated that twelve balls of wool would be enough, but only just. That was going to influence the design quite a lot. Firstly, this cardie would have to be quite tight, with fairly short, tight sleeves. I decided to knook the sleeves, as I'm quite happy to have them thinner than the rest, and stocking stitch will use less wool than counterpane stitch. I wondered if I could save some wool by adding some decoration in a different colour. I have some white that I bought for socks... stars! It has to be stars!

Once I'd had that thought, I then had to find out how to crochet stars. I found this tutorial which was good, but not quite what I was after. I took that as a basis and played around until I'd figured out a way of making individual stars. It's very fiddly and involves two stitch holders (twist ties). I'm sure there's a better way, but this works well enough for this project.


Test stars. Yes, Pebble sat on it again as I was taking the picture.

That was about as far as I could go with my test piece, it was now time to move on to the real thing. Since I wanted the cardigan to be as long as possible, that meant starting at the top. I also wanted to avoid sewing it together at the end, so each piece would be joined as I went along. I did have a look at patterns, but didn't see anything that particularly grabbed me and in any case, I can't read patterns. Making it up as I went along went like this:

Step 1. Make a foundation chain (I read about this somewhere, but can't remember where. You end up with the first row of stitches already in the chain and it's easier to carry on from there) for the neckline. This included a double row (there and back) along the top of each shoulder, where the seam would be if you were making it in pieces. I judged the length by draping it around my neck.

Step... um, I can't remember what order I did the next bits in. The front two pieces and the back were worked in turn, each starting from the top seam, with the front pieces increasing from the shoulders across the front. For simplicity, I decided on square-set sleeves.

Step 5. Continue those three pieces until they're long enough to join up under the arms. Rather than shaping round the sleeves, I decided to make the body pieces straight then add a gusset between waist and armpit. This meant the body pieces had to get all the way to the waist before they could be joined up. Since the stitch I'm using looks different on alternate rows, I had to be careful to make sure I was on an even row (or an odd row. It didn't matter so long as they were all the same) for all three pieces.

Step 6. Once I'd done a few rows of the joined-up section, I turned my attention to the gussets and sleeves. For these I switched from crochet to knooking, and chose a fairly loose stocking stitch for the gusset, then tighter stocking stitch for the sleeves. The first attempt at a sleeve went a bit wrong. I was reducing the number of stitches at a rate of one per round, which resulted in a pointed shape at the join, making a bulge in the armpit. I unravelled and started again, this time working back and forth round almost all of the sleeve, picking up an extra stitch from the gusset at the end of each row until there were none left and I could switch to working in the round. I'm not sure whether that makes sense or not - it's basically the same technique that I used for the heels when I made socks. The end result looked like this:


Armpit of the cardigan with sleeve at the top.
What looks like a seam is where I reduced the stitches.

Step 7. Shaping the sleeves involved much trying-on to determine how much I needed to reduce the rows as I went. Once I got past the elbow I did a couple of rows of stars, which was even more fiddly in knooking than in crochet. I then finished with a few rows of crochet for the cuff, for consistency with the body of the cardigan.

Step 8. After a few rows at the waist, I needed to start increasing the stitches. I measured, I calculated, I calculated some more, I largely ignored the results of the calculations, I forgot where I measured from, then the whole thing got messed up by the stars anyway. One way or another, stitches got increased by a couple per row, and stars were introduced shortly after that.

Step... ah, there's a bit I did earlier, but forgot to mention. I wanted an edging added for the buttons and buttonholes, but couldn't do this until the very end, when I'd have something to add it to. This somewhat disrupted my plan to keep going until I ran out of wool. I solved this by making up a section of buttonhole edging, unravelling it, and measuring out suitable multiples of that length of wool, which I then put aside.

Step 9. Once I'd got fed up of making stars, I put the white wool aside and carried on in blue until I ran out. This wasn't quite at the end of a row, but near enough that I felt safe pinching a bit of the reserved wool to finish it off. Front edging was then completed, leaving just this little bit of wool:


I felt quite smug to have used up my wool so precisely

Step 10. I raided Grandma's button collection for a suitable selection of buttons...


... and sewed them on.

At this point, I should have had just the collar left to do. Then I tried it on... it was way too tight. I'd known it was going to be tight, but thought the extra panels I added at the end would be enough for a comfortable fit. They weren't. I also discovered a flaw in the way I'd done the buttonholes, which was simply a row of triples. Effectively, I had a buttonhole between each two stitches and I just had to pick one that lined up with each button. That proved more difficult than I'd anticipated.

At this point it would have been very easy to get demoralised and give up. To avoid this, I quickly sought out my next door neighbour and showed her the (un)finished cardigan. She said all the right things about it being not that bad, and she was sure it wouldn't take much extra on the front edges to fix the problem, and how nice it would look when it was finished.

Thus encouraged, I went off to one of the wool shops in town to seek extra yarn. I wanted something soft for the collar, and thought it would be best to have the same yarn for the extra strips down the front, even though soft isn't ideal for buttonholes. I found some nice yarn (50/50 wool/acrylic) and asked the shopkeeper's advice on how much to get. I had in mind that two balls would probably be enough; she said four; I bought three. I actually used one and a half. I intend to take the last ball back for a refund, as a matter of principle.

Although the new yarn was thicker than what I had been using, I stuck with the same small crochet hook for the front panels, as I thought tighter stitching would probably be stronger for the buttons. I also changed the way I did the buttonholes so I wouldn't have the lining up problems that had emerged in the first attempt (which I'd unravelled and redone in plain stitch to match the other side).

For the collar I'd decided on double rib stitch and actually used knitting needles for this (larger, to suit the yarn). With knooking, rib stitch either comes out very loose, or is a right pain to do. Knooking turns out to be not such a great technique when you're switching between knit and purl stitches within the row. I found I didn't mind actual knitting as much as I'd expected. In fact, I might even go as far as to say I enjoyed it, though I did switch back to a crochet hook for the cast off.

Trying on the finished garment, I found that my neighbour was quite right - the fairly small strips I'd added made all the difference between not fitting and an excellent fit. Here I am modelling my creation in classic catalogue pose:


And here is a closer view:


I have to say, I'm absolutely delighted with how this has turned out. Not bad for a first big project, making it up as I go along, eh?