
unless I come across some unexpectedly cheap sock yarn...Well, whaddya know, that's exactly what happened!
I happened to be in a haberdasher's in a different part of Wales - that is, we happened to be in a different part of Wales and I thought I'd check out any haberdashers in the area...
Me: I'm not. I'm looking up haberdashers in Cardigan
Ian: Ah. Google's going to struggle with that
- when I spotted a bin full of cones of yarn. The handwritten note above the bin said
100% wool. £5 each.Most were cream in colour and each cone had a slip of paper indicating thickness and weight. I found one that said
2 ply 452 g.That's a whole pound of pure wool for a fiver!

One pound of two-ply
Now, onto the socks. Well, not quite. The first thing I did was to knit a test swatch with my new, tiny hook. This task suffered a minor setback when the phone rang and Pebble jumped off my lap, taking the cone of wool with her, which broke. Then it suffered a major setback when the knooking hook snapped.

This knooking hook was too thin
So, what to do next? Make another tiny hook and risk the same thing happening again, or use a bigger hook? I used a bigger hook, which was easier to work with anyway. I think it might be the first one I made, which was about 3.5 mm thick [edit: Oh no it's not! I just found that one in the bottom of my handbag. This one's a little thinner - 3 mm now I bother to measure it]. Another test swatch was knooked.

This stuff rolls up something rotten.
I measured the swatch and my leg, did some calculations and decided I need 60 stitches, then promptly forgot how I arrived at that. I started with a ribbed cuff, and tried that on my leg to make sure it was roughly the right size. It wouldn't be too much to unravel if it wasn't.

Ian:
I don't think that's finished yet.Nothing gets past him.
I then switched to stocking stitch (i.e. all knit stitch, going round and round) and found that the stiches were tighter with the simpler stitch. I may find my ribbed cuff is looser than the rest of the sock. Oops.
I continued knooking throughout the evening. Ian went to bed, but I wasn't very tired, so I carried on knooking. I got very absorbed in it and carried on some more, until I noticed it was past 2 am. At that point I remembered that it was the solstice.
If I stay up a few more hours,I thought,
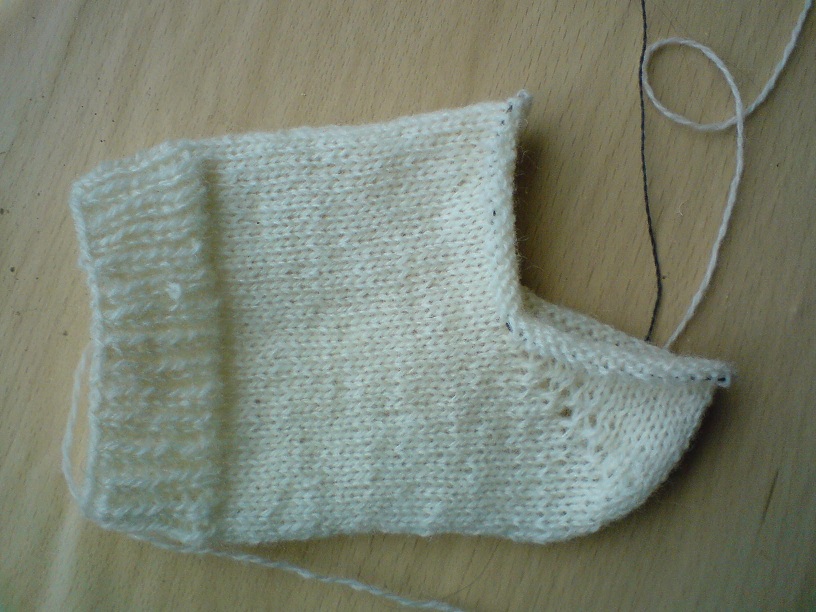
I could see the sun rise on the longest day. That would be cool.So I carried on knooking. I didn't do quite the length I'd planned (as in photo above) but I was impatient to get onto the heel.
I'd read Silver's sock class, which is excellent, but for my purposes needed translating for knooking. This is not terribly easy when the tutorial is written so much in terms of which needle to use. I'm never one to stick to a pattern anyway, so I decided that instead of following the instructions, I'd study them until I understood what was going on, then make it up as I went along.
For the heel, you essentially make a sort-of triangular flap (OK, a trapezium - that shape does have a name) then continue on to another one the same shape but the other way up. These need to be joined together at the sides. To do this in knooking, I divided the sock tube in two and put one set of stitches on a holding cord while keeping the other set of stitches on the working cord. I decided that the heel would be half of the sock, because that seemed about right. It might or might not be what was in the tutorial - I didn't check.
To shape the heel, I knooked a row, then transferred a stitch from each end of that row from the working cord onto the holding cord. Rather than carry on knooking in the round, I then turned back and knooked another row of the flap. In this way, the piece I was working on got two stitches shorter with each row. When it got down to a shortish bit in the middle (I think it was about ten stitches), I did the opposite. The first and last stitches of each row were knooked from the holding cord (not forgetting to remove the holding cord from those stitches afterwards, to avoid horrendous confusion). So it was that as the year was turning, I was turning my first heel. It wasn't as easy as the plain part of the sock because the edge stitches tended to get stretched and awkward to pick up, but it was pretty straightforward and I suspect a darn sight easier than doing battle with a handful of pointy sticks.
Now call me heretical, but I didn't see the need for a gusset. I'd studied my mass produced socks, and could see no sign of any gussets there, and I've been wearing those for years without any problem.

Gusset-free mass produced sock
So, when I finished the heel I went straight back to knooking a tube in the round. I did a few rounds of this in the small hours of the morning, then looked at it and thought,
Oh no, that looks terrible, I'll have to unravel that bit and figure out how to do gussets.I put it down and fell asleep at about 6 am.*
Waking up at something approaching midday, I looked at my half-sock again and decided that it really didn't look too bad, and nothing needed unravelling at all.
Half-sock in daylight looking fine, actually. Note heel but no gusset.
I carried on knooking throughout the day, and in due course reached the bit where I'd have to start shaping the toes.

It's a good idea to leave the hook in when trying on half a sock, otherwise the stitches tighten around the cord. I learnt this by trial and error.
I'd looked at the toe shaping in the tutorial and thought that my toes aren't that shape. On the other hand, my toes are really quite an odd shape. I decided to make the sock fit my feet, with frequent fittings, reducing by a stitch here and a stitch there as needed. I should say to fit my right foot as an asymmetrical sock will be foot-specific. Hmm, am I really going to want that when putting on my socks in the half-light of the morning? Oh, what the hell! I may add some embroidery to the ankle to make them easier to tell apart.
Ian insisted that I went to bed at a sensible time last night, so I didn't get the sock finished yesterday and picked it up again this morning. Eventually I decided I'd done enough toe shaping and could move on to the magic Kitchener stitch, which I was quite excited about. This is a really neat trick to join up two pieces of knitting without a seam, so the end result looks like continuous knitting.
For the Kitchener stitch I did follow the instructions closely. To adapt for knooking, I just had to substitute,
Draw out the cordfor
Slip stitch off the knitting needle.This procedure is just as cool as I'd been led to believe, and I was very pleased with the result.

Kitchener'd toe
Here is the finished sock from the side...

... and from the top:

If you think this is a funny shape, have another look at the picture of my toes
I'm feeling very proud of my first sock. It may be a little shorter than I'd intended and the cuff's a bit loose, but it's a fully functional sock. Except... one sock on its own can't really be described as fully functional. Socks come in pairs, and that generally means matching pairs. The trouble with making it up as I go along is that I now have to make another sock to match and I have no record of exactly what I did. I think I'll just take the same approach of fitting it to my foot as I go along. They may not match exactly, but then I don't suppose my feet match exactly, either.
---
* The sunrise was completely obscured by clouds, by the way.
I may have missed something, having come late to you're blog, but what's knooking?!
ReplyDeleteI thought the title was a euphemism at first, you know, like my brother wanted to call his cat Cooking Fat. (SIL said no, so it's now called Johnny Cash. Don't ask. And yes, they did have June Carter too....)
Anyway, I'm intrigued and the sock looks fabulous!
I was in Cardigan at Easter. We were staying in Newport and had to visit a bigger town to buy something. There was a brilliant chemists that had it (after I'd tried Tesco and Boots. Should have tried the independent shop first.) It is beautiful round there.
Awwww, maaaaan. I've just spent the past three days battling the demon DPNs, determined to master the little buggers (two babies are currently on the way in the family) and then I see your lovely knooked sock ... Your stitches are so much nicer than mine, I feel tempted to throw a fit of sulks - but I can't. I'm too impressed by your EXCELLENT sock. And I'm of the No Gusset Camp aswell. Gussets are for wussies. Or wussets, as the case may be.
ReplyDeleteDitch the DPNs, Gingerbread Lady, knooking is the future! The cord lends itself so naturally to working in the round, I can't see why you'd want to use a fistful of pointy sticks instead. C'mon, it's time you tried it - I did learn about knooking from your blog, after all!
ReplyDeleteHazel, knooking is knitting with a hook. It's not just a crochet hook, it has a cord threaded through an eye at the end (some people used fixed cords, but that wouldn't have be so good for the heel, where I was moving stitches from one cord to another). I first wrote about it in February. I'm now going to improve the labels on my posts!
Gingerbread Lady, would you like a knooking hook? I'll send you one if you email me your address.
ReplyDeleteThat is very generous! It's nice to see there are still people (you) willing to share :)
DeleteMatching is totally overrated!
ReplyDeleteI'm going to have to try this knooking malarky.. if nothing else because of the name :)
ReplyDeleteI think what you've made is called a short row heel... A legitimate sock heeling technique! Socks are definitely the mot useful things that I've knitted
ReplyDelete