About this blog

My photo
Wales, United Kingdom
Documenting one couple's attempts to live a more self-sufficient life.

Tuesday, 7 February 2012

Wood store mark 3

The wood store we bought a year ago is too small for a full load of fire wood, so we've moved it upstairs* to the patio, right next to the door for easy access from the sitting room. This makes space downstairs for a larger store.

Our next attempt was this:


Not very practical wood store

... which looks cool, but isn't actually very good for storing wood. For a start, lacking sides means that the rain just blows in and soaks the wood at the sides. Lacking sides also makes it very difficult to stack the wood efficiently without it all falling down. It takes a lot longer to stack a load of wood if you have to do it three times because it keeps falling down again. I speak from experience. The rain also tended to run down the back because we didn't seal the top edge of the roof. Finally, those twiggy bits don't half get in the way. All in all, a crap wood store.

So... a new design was needed. Having had big things delivered for the heating project, we were in possession of a few pallets. Two had already made their way into the mark 2 wood store, as you can see. The third was bigger, but rather less substantially built.


More a frame than a pallet, really

Having established the importance of sides to a wood store, I decided to use the smaller, sturdy pallets as the sides and the large frame to hold it together. After a false start, halfway through which it occurred to me that the side with three slats would be better for fixing things to than the side with only two slats, I got the three pallets fixed together.

After considerable manoeuvering to get the thing turned over without falling apart, in a space considerably too small for the operation (I'm glad I abandoned my original plan of making this in the workshop - I'd never have got it out again), I then fetched some old floorboards to use as slats across the back. I set the top one higher than the top of the slats, to give the roof a bit of a slope, then rested the wooden roof on top.


New wood store with old wooden roof

As soon as I looked at it I could see something was wrong. No, not the sag in the middle. This roof isn't much higher than waist height, and the store is deep. It wouldn't be much fun getting wood in and out of there. I pondered hinges for a while, then decided on an alternative, flexible solution. I fetched a sheet of plastic that had been wrapped round our big water tank and stapled it to the back edge of the store. I then raided the sewing basket for eyelets (and the gadget for putting them in) so I'd have something to fix the front down with.


Eyelet in wood store cover, hooked over a nail

Here's the finished store in use:


Wood store, full of wood

It has to be said that there's room for improvement with that roof, but having it removable was definitely the right decision. Stacking wood was also a great deal easier with sides to the store. All in all, I'm quite proud of this.

---

*NB references to upstairs and downstairs mostly refer to outdoor space, as that is where the stairs are. Both flights of stairs.

Monday, 6 February 2012

Water-only hair washing, one year on

It's been over a year since I last used shampoo on my hair. I won't say since I stopped washing it, because I still do wash it, but with plain water only. I did try not washing at all (sebum only) but didn't get on well with it. On the other hand, I'm very happy with water-only washing; it's not just stubbornness that's made me stick with it for over a year.

I was a bit puzzled in early October to see a tuft of short hair growing from the crown of my head.


Tufty

I hadn't cut it, I didn't think I'd lost any hair there, so why the tuft? I didn't worry about it too much until a couple of weeks later, when Ian said, Why have you got a bald patch on top of your head? A bald patch?! He was right, too...


Baldy

Although this was quite alarming, I wasn't overly worried as the hair was obviously growing back - the skin wasn't smooth - and it was only a small patch. On the other hand, if that spread all over my head...

I monitored the situation for a week or so, as growth shows up quickly in very short hair. It shouldn't be many days before the bald patch was hidden again, and indeed that's what happened... but then it was back. At this point I started to worry. If the hair keeps falling out then I have a problem. I did a bit of online research, and learnt that patchy hair loss is not that uncommon in women, and has all sorts of causes. It can just happen and then get better again. That was reassuring, but not entirely helpful.

After a bit more reading and thinking, I came to the conclusion that the most likely cause was a bad habit I'd developed - scratching. From reading the Long Hair Community forum (whose abbreviation I can't see without thinking Large Hadron Collider) I'd got it into my head that scritching is good for hair, and this developed into a bad habit. With willpower backed by the fear of going bald, I managed to stop... well, mostly stop, and I'm glad to say my hair is growing back happily now. I may be tufty for a while yet, though.

My current routine is to wash my hair in hot water about twice a week. This shifts some of the sebum, which I find is now a waxy substance, rather than oily, and softens what it doesn't shift. Once the hair is dry (to avoid breaking wet, fragile hair), ideally within a few hours of washing, I brush thoroughly with a natural bristle brush. Because the brush is dense and my hair is at this point covered in a soft wax, this is very hard work and can make my neck muscles ache. As well as spreading the sebum along the length of the hair, brushing removes quite a lot of it, which then needs combing out of the brush afterwards. Apart from that, I just use my old plastic brush every morning, as I used to. Sometimes I don't get round to using the natural brush after showering, sometimes I use it more often.

So how is my hair? Apart from the slight stickiness after showering (which isn't evident just by looking at it), it looks pretty good. It's at its best the next day, looking good and feeling soft and silky. It also has a lot more life than it ever used to. About eighteen months ago, when a hairdresser offered to put a bit of body into my hair by blowdrying, my response was, Good luck with that. Now I have that naturally. I love the way it bounces back when I run the brush through it. I think it's still improving, too, very gradually.

Oh, you want a photo? Oh, OK then!


Hair that hasn't seen shampoo for over a year

Potato audit (and notes on peas and carrots)

I stored our potatoes in sacks in the store room and they've kept reasonably well, except that the King Edwards started sprouting in mid November, and the Desiree about six weeks later. I kept using them and just snapping off the shoots before cleaning them, but there comes a point when all the potato's reserves have gone into the shoots, and there's not much left in the tuber. A few days ago I decided that it was time to see what I have left.

The Desiree were in pretty good shape, though most had one or two short, fat shoots. Since I've found very little blight damage, I've decided these will be OK to use as seeds, so I picked out 36 medium spuds for planting, leaving half a dozen large ones that'll be good for baking, and a few small ones that I confess I couldn't be bothered with, so they've gone on the compost heap, where they'll no doubt turn into small plants to annoy me later in the year.

The King Edwards, on the other hand...


Sprouting King Edwards

There seem to be an awful lot of these, which should make me happy, but as they're all rather small and fiddly, and in urgent need of using up, it doesn't. They've been sitting in the kitchen for about a week, which probably doesn't help with the sprouting. This morning I was trying to avoid a less appealing task, so I picked out a heap of them to make into chips. One tray is currently freezing and another is waiting its turn for freezer space.

Somewhere along the line I must have got my calculations wrong. I thought I'd harvested a year's supply of spuds, but all I have left is about six pounds of chips and roughly the same again in the sack (including shoots). By my previous estimate of using two pounds per week, that's enough to see us through to late March, even assuming they last that long. I guess we must eat a lot more potatoes than I thought, or perhaps when we have sacks of spuds in the store room we eat more of them than I thought. But then, if I had planted a lot more, right now I'd be facing even more soft, sprouting tubers.

I think the answer is that we can eat lots of spuds from mid summer through to the end of winter, but only what I've frozen in spring and early summer. That would be the period known as the hungry gap. I'm very glad I have a freezer! Of course, I could always give in and actually buy some. We ran out of frozen peas in mid January, and carrots not long after that, so I've bought both of those recently. There may still be carrots in the ground, but they're increasingly slug-eaten, difficult to find now the tops have died off, difficult to get out of the frozen ground once I've found them, and on top of all that, I still have to cut away the carrot-fly damage. I've pretty much given up getting carrots from the garden.

In the meantime, when I was in town recently I noticed that Charlie's were selling seed potatoes from the same grower that I bought from online last year, so to add to the saved Desiree, I bought a bag each of Foremost, which I grew last year, and Red Duke of York, both first earlies.


Some potatoes have done more chitting than others.

So the year comes full circle.

Saturday, 4 February 2012

Living with the new heating system

As expected, it took us a while to get used to using the new heating. To start with, we treated the stove as we had an open grate - building small fires that burnt well enough, but didn't really do much for us. For the first week or two we despaired of ever getting the water in the tank properly hot. So much for worrying the tank might be too small, I got seriously concerned that it might be far too big for the stove.

Then we gradually learnt how much wood to put on (more than that... no, even more) and how to control the air flow using the ash flap, and we're now pretty good at getting the tank up to temperature. I should point out that using the ash flap to manage air flow is not the recommended means of controlling a stove, in fact some would say it's downright dangerous, but we keep a pretty close eye on it and haven't seen any sign of overheating. This may have something to do with the fact that this is a multifuel stove but we're only using wood on it. We went through the whole design process working with the nominal heat output for this stove then right at the end, as a passing remark, the plumber said, Of course, if you're just using wood, you'll only get about half that. Now he tells us!

It's possible that our system is somewhat under-sized, but we got used to using it. Even after we'd learnt how much wood the thing eats, we still had to adjust our habits. We'd been used to lighting a fire at about 4pm, and it took quite a big adjustment to get used to lighting it in the morning. We had to remind ourselves that the specification of this system was to give us a couple of hours of heating in the mornings, so we'd be able to get dressed and breakfasted in some comfort before lighting the fire. As we got better at managing the fire, the time we needed to light it varied between about 9am and 4pm. We have two thermometers on the tank, one at the top and one in the middle, so we have a pretty good idea of how much stored heat we have at any one time. One of these days we'll get round to putting the doors back on the airing cupboard and then it won't be quite so convenient to check!

The system consists of three circuits. The first, stove to tank, is as simple as can be; stove back boiler - pipe - tank - pipe back to boiler. Hot water rises, creating a current round the circuit, taking heat from the stove to the top of the tank, and cooler water from the bottom of the tank back to the stove. Something we hadn't anticipated, but which is obvious when you think about it, is that this circuit flows in reverse when the tank is hot and the stove is cold. This isn't a big problem, as it just takes some heat back to the sitting room, but it reduces our level of control a little.

The hot water circuit is only slightly more complicated. There is a coil of pipe immersed in the middle of the tank through which mains water flows. When the tank is hot, the flowing mains water absorbs some of that heat and emerges hotter than it was when it went in. The slight complication is the thermostatic valve that mixes in a little cold water if it's too hot when it comes out. Actually, I have my doubts about how thermostatic that really is - hot water temperature seems to be heavily dependent on tank temperature. Apart from that, I love the simplicity of this system. There's no waiting a few seconds for a valve to notice that you've switched the tap on before it starts to deliver hot water, nor even a valve to wear out, like there is with combi boilers.

In contrast, the underfloor heating is very high-tech. Each room has a separate loop of heating pipe (apart from loo, bathroom and hall, which are all on one loop) and each loop is controlled by its own electric actuator valve. These sit in a row in the airing cupboard so we can see the little buttons pop up on the tops when they're open (you can tell why we haven't put the doors back on, can't you? It's not just because I've lost the screws.) These valves are controlled by a little computer, which receives information from these:


Thermostat. This one's for the hallway, as you'd probably guessed.

Each room has one of these fancy wireless, programmable thermostats. Learning how to use these was a challenge in itself. I felt sorry for the guys plumbing the system in, because they had to set it all up but they'd never seen this system before. They also felt they had to explain to the customer how to use it but I let them off that bit as the customer (me) had, after all, chosen the system in the first place!

We can choose between manual mode, in which we just set the desired temperature, and program mode, which toggles between daytime and nighttime desired temperatures at the programmed times (variable by day of the week, if you like). The fact that there is no off in the programme confused us at first, until we realised that off is replaced by comes on only when it's very cold, so you set the off temperature to the minimum you want the house to get down to.

We thought we had a problem with one of these when the bedroom heating started coming on at unexpected times. Eventually we realised that this was the auto on function, which starts the heating before the programmed time, so that the room gets up to temperature by the time you've asked it to come on. We soon turned off that function because the rooms were never getting up to temperature. We also pretty quickly changed the night/day temperatures from the pre-programmed 18/21 deg C. We were quite surprised by how low the temperature is that we find comfortable in the house: Between 14 and 16 deg C. I've heard that underfloor heating feels warmer at any given temperature, so that may be it.

So there we were, getting used to the fancy-pants electronic controls as well as coming to terms with just how much wood a wood burning stove will eat, and generally keeping quite comfortable, when the weather changed. We've been lucky to have a very mild winter so far, but the last few days have been very cold. We'd get the house up to a toasty 16 or 17 deg C and the tank full of hot water before going to bed, then by morning it's dropped to 11 or 12 and the tank has used up all its heat. This morning I started the fire at 7am and by about 9 it looked like this:
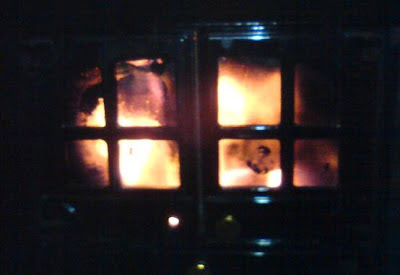

Hot fire; dirty windows

I'd built the fire up nicely, though it was still struggling to keep up with the demands of the heating. Shortly after this the temperature in the tank suddenly shot up. I'm guessing this was the effect of the outside temperature going up. This house is obviously far too affected by the temperature outside: We need better insulation.

And another thing... you may notice that those stove windows are filthy. This is an old stove and it does not have Clearview/Airwash/insert-trademark-of-your-choice technology, so the windows need cleaning frequently - every other day, ideally. This doesn't happen because by the time I remember that they need cleaning I want to get the fire lit, and cleaning them when it's hot is not a good idea. I have learnt about an excellent cleaning paste, though: Vinegar and ash. Do try to avoid contaminating your best spirit vinegar with ash, though, as I did. D'oh!

Nearly forgot to mention: Warm floors are looooovely!

Friday, 27 January 2012

A Blue Peter project

After the crisis of the soggy seeds, I felt the need for a more waterproof container than an old shoe box for my seeds. The gloop we used to cover the mould in the spare room came in a a sturdy plastic tub that would do nicely, but I don't really want Polyfiller cover-all or whatever it was written all over my seed pot.

I got myself a heap of gardening magazines (received free over the last year), a tub of PVA glue, which I always think of as primary school glue (bought for sticking down flotex flooring), scissors and a paintbrush, and spent a happy evening doing this:


Decorated tub for storing seeds

I finished it with another coat of glue, for waterproofing. That made the paper a bit wrinkly, but it's not obvious, and the finished object is still a lot prettier than it was to start with.

I nearly called this post Useless Beauty, pinching Susie's blog title, because I think this is the first project I've done which makes absolutely no difference to the functionality of what I'm working on. The tub would have worked just fine as it was (once I'd cleaned it), but it's much nicer now it's decorated. I think I have room for a little useless beauty in my life.

Thursday, 26 January 2012

A little decorating, while we're at it

Many house renovation projects tend to expand as other tasks get drawn in, While we're at it. So it is with the heating project. Having moved all the furniture out of a room and replaced the floorboards, the obvious thing to do is redecorate before moving the furniture back in. At the very least, floor covering of some kind must be laid. Here is the carpet we used to have in the dining room:


The dining room before we took the floor up

This carpet is not to our taste and besides which, does an extremely good job of hiding anything that's dropped on it, including pieces of dead mice, later to be found by stepping on them. We decided not to put this carpet back down.

Our kind neighbours had some Flotex going spare which they generously gave us. Before getting to the floor, though, it seemed like a good idea to give the room a fresh coat of paint.


We thought this paint was closer to the old colour. Oh well, we like the result.

There was just one more thing to do before laying the flooring. Whilst the new heating boards were the same thickness as the old old floorboards, the new old boards (distinction between the old part of the house - floorboards possibly 200 years old - and new extension - floorboards 30 years old) were thinner, so some padding would be required where the two met. Furthermore, the difference seemed to vary throughout the room. I've no idea how this happened. In some places the difference was about 3 mm, which turns out to be roughly the thickness of cork tiles, in other places less. I used a mixture of cork tiles (spares from the old bathroom floor, left in the house) and lino from the kitchen.

Bits of lino and cork used to level the floor

Now to the flooring...


Pebble supervises the laying of the flotex flooring

Sorry for the poor quality of these pictures, we've been a bit short of daylight lately. I don't seem to have a picture of the room when it was finished. We furnished it with slightly less furniture than we'd taken out of it, and it was lovely for a while. Then about a month later we decided to reclaim our bedroom. We were expecting friends to stay for the weekend and felt that it would be good to have our bed in the same room as our wardrobe so we didn't have to wander the house in search of underwear. At this point we had to take the rest of the stuff out of the bedroom, so the dining room isn't quite so tidy any more.

We'd like to redecorate the bedroom at some point, but for the time being it's OK, so a new look for the bedroom will have to be a future project. I suspect that will disappear into the distant future, but (because) it's not that important. I mean, how much time do we actually spend in the bedroom and conscious? We just put back the old carpet - perhaps should have been more careful about not folding it while it was up - and put the bed, blanket chest and chest of drawers back in there.

That left the spare room more-or-less clear for decoration. Step 1: Clear out last few things. Step 2: Strip wallpaper. Step 3: Recoil in horror at the extent of the black mould behind the wallpaper.


Mouldy wall

Actually I didn't recoil all that far. I'm getting used to mould - it's everywhere at the moment. I did try scrubbing it off, with some success, but it was still pretty grubby by the time I'd finished. The brush I used was completely worn away by then, too, so any failure wasn't for want of effort. Ian went into town to buy paint while I got started with some white paint we already had. We'd discussed colours and agreed on white for three walls and primrose yellow for the fourth. Would you trust your partner to bring back the right paint colour? I even got out the wildflower book to show him what colour primroses are...

After extensive application of a polyfiller/paint mix to cover the dark patches, the white paint went on well enough. Ian's choice of yellow was influenced by experience with the dining room, when the colour ended up lighter than we'd expected. That yellow was a bit much! I mixed in some white for the second coat and the result was very nice. And some point during this process we'd gone out and bought - yes, actually paid for - new carpet. It's cheap, felt-backed carpet, so not too much insulation against the underfloor heating, and it's purple, not that you can really see it from the picture below...


The finished room, partly furnished.

This may be the spare bedroom, but it also has to serve as the music room and craft room. It now also contains futon, desk, treadle sewing machine, spinning wheel and fabric cupboard. There wasn't enough room for the guitars and I haven't yet worked out what to do with a second stash of fabric that I came across the other day. The built-in cupboard in the corner is now full of sewing and knitting things, which frees up a drawer in the dining/room study for various computer-related bits of wire, which reduces the amount of crap we have sitting about the place. It's very satisfying to have proper homes for things!

Saturday, 21 January 2012

Heating project: Register plate

Now, where was I? Ah yes, the heating is all plumbed in and working, and heat is escaping in all directions. The first step in keeping the heat in the house was to block up the gaping hole that is the chimney. This now has a relatively narrow flue pipe taking the smoke out of the house, leaving a big space all around, through with warm air gushes up to the sky. I had thought that dealing with this would be part of stove installation, and the plumber seemed to think that the stove installer would do it, whilst the stove installer seemed to think that the plumber would do it. That'll be my job, then.

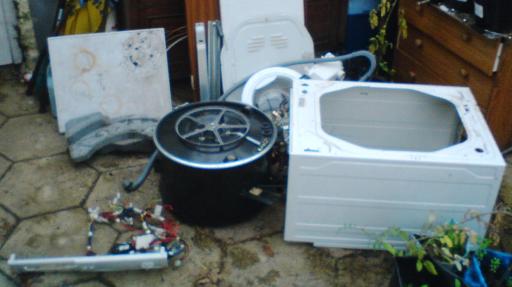
The device needed here is called a register plate. It's very simple, just a heat-proof sheet of something across the chimney, around the flue pipe, closing up the gaping hole. I had my eye on a suitable piece of metal: We replaced our washing machine when the old one rusted through in a critical place, and I fancied that a side panel from the old machine would be ideal for a register plate. Step one was to dismantle the old machine, which was a lot of fun.


Washing machine in pieces

At this point I discovered that the case didn't come apart into panels easily and would need cutting, which was a bit of a pain. I tried using a hand saw, which was effective if very slow. It might have been quicker if the saw hadn't been missing so many teeth. We then got hold of some metal-cutting blades for a borrowed jigsaw. That was much quicker and extremely loud. Earplugs were deployed. Eventually I had not only cut a suitably sized sheet, but also cut a hole in it for the flue to go through.


Register plate, neatly cut out. Ian also cut a smaller rectangular piece to sit on top of and extend the short side.

At this point I was feeling very pleased with myself. Once cut, I then tried to fit the plate into the chimney. At this point I discovered why neither of the tradesmen had fancied this job. Let's take another look at that plate:


Relevant dimensions marked 'A' and 'B'

Consider that 'B' is the distance between the back of the flue pipe and the back of the chimney space (it must be, because I cut this plate to fit the space). In order to the the plate in place, the back part of the plate to the left of 'B' must pass through that space. That means that the back left corner must swing round through a space the length of 'B'. Notice the length marked 'A'. There aint no way 'A' is going to get through 'B's space. That didn't stop me trying though.

There was a bit of space for manoeuver in the vertical direction, but not nearly as much as I tried to convince myself there was. The sheet was flimsy enough to bend up out of the way, but limited vertical space meant that wasn't as useful as it might be. After a bit I gave up and cut off a piece at the back, making dimension 'A' roughly the same length as 'B'. There was still a lot of struggling to get it in place (note similar issues with the right hand back corner) and there may have been quite a lot of swearing.

Eventually I forced the thing into position, uncurled the curled-up bit, added the extra rectangle to fill the space on the left, ignored the scratches to the brass soot door on the flue, and stuffed some spare rockwool above it to assist with the heat loss reduction efforts. Apparently I didn't take a photo of this momentous occasion, but you can see the plate lurking behind the holly and sparkly things in this picture:


One slight downside to this design is that the paint on washing machines is not designed to withstand very high temperatures, and smells a bit when the fire gets really hot. On the other hand, that does let us know that the fire's getting really hot! As to whether it works, disappointingly, I can't say we noticed much difference in the sitting room temperature after this was installed, but I'm sure it was necessary. I need to believe that!

Friday, 20 January 2012

The truth about last month

The last few posts here don't really convey the fact that this is a bit of a low time of year. In the run up to Christmas I was getting very stressed about the heating project, and wishing that Christmas would just go away until I finished the work. Then I realised that Christmas wouldn't go away, gave in and left the work to attend to the festivities. Since then, well, I haven't really managed to get back to it.

I'm firmly of the belief that humans should hibernate, to some degree. These cold, dark days in the middle of winter should be spent eating and sleeping, and doing very little else. It is my ambition to arrange my life so that this is possible, but I didn't quite manage it this year. At least, I have done very little, but as there's stuff that needs doing, I feel bad about it, which really isn't the intention.

Focusing on the positive aspects of life and writing up-beat blog posts is an attempt to cheer myself up, and to a large extent it's worked. The recent few days of bright sunny weather helped a lot too, coming as they did after about a month of this:


The view from the window today. As you can see, the sunshine has gone away again and normal service has resumed.

Although I haven't been doing the big, urgent jobs, I have been getting some things done, and I will tell you about those, along with the rest of the heating project, oh, sometime soon, I promise!

Monday, 16 January 2012

Gather ye rosebuds...

I should be getting on with the heating project (it's insulation that needs doing at the moment) but we have a brief spell of glorious sunshine after a month of drizzle, interspersed with rain, sleet, hail, fog, and other varieties of drizzle for which I don't have words (maybe if I learnt Welsh I'd find there are more words) and it would be such a shame to pass up the opportunity for a walk.


Sheep in the low afternoon sunlight

On the way back we called in on Jasper, who was mending his roof.


Look closely. See, there he is, by the chimney.

As we walked back the sun had dropped behind the hills, so we were in the shade, and flippin' cold it was too, but the light on the far hills was still beautiful.

Thursday, 5 January 2012

So how's it going then, this self-suficiency lark?

I've written one review-of-the-year post that's entirely pictures, so here are some words to go with it. I started to write an end of year review in October, not because I got confused about the dates, but because that was one year after we moved to Wales. That post got very long and boring so I abandoned it. This time I won't try to go through everything and evaluate it all - as the previous post shows, I have done rather a lot of different things this year! I may write a more systematic post about the garden at some point, but this one will just be thoughts and reflections.

When I resigned from my job to start this new adventure in Wales I decided to give it a year and judge at the end of that year whether things were working or not. I didn't have any clear idea of what criteria I'd use to decide whether things were working or not, which wasn't terribly bright of me...

I guess money was a big part of it. Giving up my income and part of Ian's was very scary, so I was worried about whether we'd be able to make ends meet. Well... we can. Money's tight, but we get by, so that's OK.

A more nebulous concern was whether I'd be able to do the self-sufficiency stuff. This led to quite a bit of anxiety about the garden in June, which I worked through with the help of blogging friends. I feel a lot more relaxed about the garden now. I might not be saying that if a storm had wiped out the whole lot, but it didn't, and some things were very successful (potatoes and peas), others weren't (squash and tomatoes) and there were some things I just didn't plant enough of (parsnips. I ate the last of the parsnips this evening. I love parsnips and now they're all gone! *sniffle*).

As well as growing things, there's been a lot of making things too, not least in the kitchen. I've found that cooking on a very low budget requires a lot more time and attention than using ready-prepared ingredients (and I'm talking things like pizza bases and chips, not ready meals) so I spend a lot of my time thinking about food. That's stating the obvious, I know, but I had to live it to really appreciate that fact.

We eat simply (determined as much by Ian's preference as by budget) but oh so well. You know sometimes you have bread that's so fresh it doesn't need anything else with it, except maybe butter? Well we have that every third day. A lot of our veg has been picked less than an hour before we eat it (peas and beans in the summer, cabbage and leeks now), and hotdogs made by wrapping dough round the sausages before baking are about as far from the convenience food kind as you can imagine. Come to think of it, quite a lot of things I've learnt to cook this year are convenience foods; chips, burger buns (I've always made burgers from scratch - just squish mince into shape), hotdogs, ketchup, and of course, baked beans (I haven't given up on those yet...)

There are other improvements to our quality of life as well. We spend a lot more time outdoors and gardening is good exercise. I found that I stopped comfort eating when we moved here. I didn't even know I was doing it before, but every evening I'd get in from work and sit down with a drink and a bag of crisps. I don't feel the need to do that any more, and I lost a lot of weight in the first few months. We're both a lot healthier and fitter than we were in our old life.

There's a lot more flexibility in this lifestyle. I always have a fairly long to-do list but scheduling is up to me. We can take time off when the sun happens to be shining, not just on days beginning with 'S'. And at this time of year, we particularly appreciate not having to get up before sunrise.

Something we never anticipated being so good so quickly is the sense of community. Some of this is here, online. I've met some great people here in blogland and on the 'Ish forum and feel I've made some real friends, even though I've never met you in real life. The internet is a wonderful invention! But I do venture out into the real world occasionally, and we've found the locals here to be very welcoming. We've made some really good friends already, which makes me feel incredibly lucky. This is not something you could possibly plan for. Some neighbours turn out to be horrible and make your life a misery, and some are lovely and you want to invite them all over for tea, which is exactly what I did one day last week, and a very pleasant little party it was too.

The best thing about this new life, though, is that I get to spend a lot more time with my husband. The working day is mostly spent doing our own things, but every lunchtime, every tea break, every I-just-fancy-a-cuddle-right-now break is spent together.


We don't have photos of us just taking a tea break, but here we are at my cousin's wedding last year