It's been ferociously windy here for the last few days, but the garden needs attention, so I ventured out this afternoon. On the advice of a neighbour, I earthed up the potatoes:
It felt wrong, burying plants, but I know it's worth doing. It makes them put out roots from the stem, which makes them easier to harvest. More importantly, it protects them from frost, which could still happen here for the next month or so. With the lovely warm weather we've had (and lots of watering), the plants had grown quite big already, so I had trouble heaping up enough earth to cover some of them. Actually, I'm not entirely sure they need burying completely, but I think that's what my neighbour said. Hopefully what I've done will offer some protection, anyway.
The peas sown outdoors were getting tall enough to need some support, so I put up some canes and hung bits of string from the frame. I say 'hung' - they were all weighted down with stones, and some of them blew around even so.
Emboldened by the success of this operation, I decided to plant out some of the peas from the greenhouse, too. The plan is to use offcuts of the laburnum we moved earlier in the year as central supports for rings of pea plants. The first step was to extract a laburnum offcut, which was easier said than done, but achieved without resorting to hacking the whole lot to pieces.
I then examined the peas in the greenhouse.
Oops. I should have kept a closer eye on these. The whole point of the newspaper pots is that the roots don't like being disturbed!
I stuck the extracted piece of laburnum in the ground, and pea plants around it. I felt they might not reach the twiggy bits without some help, so I tied some string between the twigs and the ground, and it all looked fine...
... for about five minutes until a big gust of wind spun the whole thing round.
Not so successful. I'm not going to try fixing that until the wind drops a bit. Oh well, at least the peas are in the ground now.
Recording one couple's attempts to live a more self-sufficient lifestyle.
About this blog
- Rachel
- Wales, United Kingdom
- Documenting one couple's attempts to live a more self-sufficient life.
Monday, 2 May 2011
Sunday, 1 May 2011
Home-brew beer
Having read enthusiastic accounts of how beer can be made from scratch, including growing the hops and mashing the malt, I had decided not to bother with making beer. I might try cider, and there are plenty of country wines to keep me busy, but I'd skip beer for drinking at home and content myself with having a decent pint or two whenever I could afford to go to the pub.
Then someone on the 'ish forum asked Gregorach, an expert on the subject, for a beginner's introduction to beer making. He said, "Buy a kit." I hadn't really thought about kits. They're not really any more self sufficient than buying beer ready made. On the other hand, they are a lot cheaper.
Having tracked down a shop in Aberystwyth that sells home-brew stuff (with health food - where else?) I chose the cheapest kit, thinking I'd try the branded ones (at twice the price) if the first lot went well, but the beer wasn't that great. I also bought a bucket...
Me:
Shop assistant:
Erm... how does she know how big my bucket it? (Not big enough - I bought a bigger one).
I added a kilo of sugar to the next shopping list, then in theory I was ready to go. The reason I didn't start straight away was washing up. The kit makes 40 pints of beer, which is great until you try and find enough bottles to put it in... and sterilise and clean them all. I gave up and left it all sitting on the kitchen side for ages.
Eventually I got fed up with the bottles getting in my way and decided I had to get on with it, so I sterilised and cleaned the bucket (again) and started the kit off, reasoning that I'd just have to do something about all those bottles when the beer got to the stage of needing them.
That was about three days ago. I now have a huge bucket of bubbling beer in the conservatory:
Apart from the scum around the top, it looks and smells a lot like beer already. So much so, that I dipped a jug in...
Considering it's only half made, it's really not bad. A bit sweet, of course, because the sugar hasn't all been turned to alcohol yet, but as someone who likes shandy, I don't mind that at all. It's possible I may never get round to cleaning all those bottles...
Then someone on the 'ish forum asked Gregorach, an expert on the subject, for a beginner's introduction to beer making. He said, "Buy a kit." I hadn't really thought about kits. They're not really any more self sufficient than buying beer ready made. On the other hand, they are a lot cheaper.
Having tracked down a shop in Aberystwyth that sells home-brew stuff (with health food - where else?) I chose the cheapest kit, thinking I'd try the branded ones (at twice the price) if the first lot went well, but the beer wasn't that great. I also bought a bucket...
Me:
Excuse me, I'd like to buy this beer kit and I'm not sure whether my bucket's big enough for it
Shop assistant:
It is
Erm... how does she know how big my bucket it? (Not big enough - I bought a bigger one).
I added a kilo of sugar to the next shopping list, then in theory I was ready to go. The reason I didn't start straight away was washing up. The kit makes 40 pints of beer, which is great until you try and find enough bottles to put it in... and sterilise and clean them all. I gave up and left it all sitting on the kitchen side for ages.
Eventually I got fed up with the bottles getting in my way and decided I had to get on with it, so I sterilised and cleaned the bucket (again) and started the kit off, reasoning that I'd just have to do something about all those bottles when the beer got to the stage of needing them.
That was about three days ago. I now have a huge bucket of bubbling beer in the conservatory:
Apart from the scum around the top, it looks and smells a lot like beer already. So much so, that I dipped a jug in...
Considering it's only half made, it's really not bad. A bit sweet, of course, because the sugar hasn't all been turned to alcohol yet, but as someone who likes shandy, I don't mind that at all. It's possible I may never get round to cleaning all those bottles...
Tuesday, 26 April 2011
Stop press: I have asparagus!
In the garden of our last house, I planted five crowns of asparagus. These need time to get established before the spears can be harvested, so in the first year I duly left them well alone, then in the second year took only a very small harvest... then we moved house that autumn. Although I got very little asparagus for eating from those plants, one of them (the only female of the group, presumably) produced a good crop of red berries in that second year.
I picked many of the berries and brought them with me to the new house. Asparagus isn't usually grown from seed, but the RHS Encyclopedia of Gardening does contain instructions on how to do so. These instructions aren't entirely consistent, it has to be said, including both,
I'd assumed that asparagus seedlings would look like the spears, but smaller, until I read the following comment on the 'ish forum:
In the meantime, I continued to water the beds... well, a bit intermittently as I kept forgetting there was anything in them. Quite a lot of things started to come up, but nothing that looked much like asparagus. Either I had asparagus that didn't look like asparagus, in which case I'd better be careful about weeding that bed, or - and this seemed increasingly likely - all the asparagus had died/not germinated due to lack of water, and I all I had was well-tended weeds.
Then this morning I saw them!
They really are very small - about two inches tall and so thin they're almost invisible. I shouldn't have cropped that picture - it doesn't really convey how difficult they are to see. They're definitely there, though, and as soon as I saw them I knew they weren't weeds. They look like miniatures of a full-grown asparagus plant, not the spears that come up first. I'm very excited about these. Only three years now until I can harvest my own home-grown asparagus!
I picked many of the berries and brought them with me to the new house. Asparagus isn't usually grown from seed, but the RHS Encyclopedia of Gardening does contain instructions on how to do so. These instructions aren't entirely consistent, it has to be said, including both,
Sow seeds in situ,and,
Plant out the largest the following spring.I followed the first of these instructions, sowing my seeds in the middle of March.
I'd assumed that asparagus seedlings would look like the spears, but smaller, until I read the following comment on the 'ish forum:
I planted asparagus seeds 2 years ago, and this year I have a few very thin but definitely asparagus shaped spears.Hmm, that implies that the previous year they had not been thin, definitely asparagus shaped spears. I wondered whether I should ask what the seedlings looked like in their first year.
In the meantime, I continued to water the beds... well, a bit intermittently as I kept forgetting there was anything in them. Quite a lot of things started to come up, but nothing that looked much like asparagus. Either I had asparagus that didn't look like asparagus, in which case I'd better be careful about weeding that bed, or - and this seemed increasingly likely - all the asparagus had died/not germinated due to lack of water, and I all I had was well-tended weeds.
Then this morning I saw them!
They really are very small - about two inches tall and so thin they're almost invisible. I shouldn't have cropped that picture - it doesn't really convey how difficult they are to see. They're definitely there, though, and as soon as I saw them I knew they weren't weeds. They look like miniatures of a full-grown asparagus plant, not the spears that come up first. I'm very excited about these. Only three years now until I can harvest my own home-grown asparagus!
Wednesday, 20 April 2011
Slow progress in the garden
I'm suffering from a lack of motivation for gardening at the moment, which is why you haven't heard much about it recently. This is odd, because the weather's beautiful and it's a lovely time of year to be outside.

Gratuitous picture of cherry blossom, but this is in our garden, and the photo has not been altered in any way
The reason for my garden avoidance may be that the plan is a little vague about the next bit - the beds in the upper garden - so I don't really know what I'm doing, or it may be that planting out seedlings is harder on the back than digging, or it may be that having to dig up all the weeds that have appeared since I dug up all the weeds is a little demoralising. I don't mind the little ones that have grown from seed so much - there's no way I could have avoided those - it's the ones that are growing from buried roots that get me - I tried to dig those up!
Rather than let it all get too much for me, I've been doing a little at a time. Today, for example, I dug out the weeds from the top bed nearest the fence and marked out the boundary between sunflowers and veg. That isn't much, but it's better than nothing. The next step is to work out what veg are going where within that bed, then sow parsnips in their allocated section.
So what have I done? Well, I've planted out two beds of onions (seedlings) and carrots (seeds) in alternating rows. The spacing between them varied somewhat as I went along, and I probably planted them all too close together, as I have only a few onions left to plant and I was expecting rather more left over.

If you look closely you'll be able to see at least one row of onions in this picture. You won't be able to see the carrots, though, because they're still just seeds.
I continue to sow seeds, some of which are coming up.

Parsley coming up in the herb garden. At least I think it's parsley. When lots of seedlings come up looking the same at about the same time, I tend to assume it's what I planted. Also, some of them had the seeds still attached to their leaves. That's always a good sign, isn't it?
I keep sowing peas in the greenhouse, twenty or so at a time. This isn't sophisticated successional planting, that's just how many I can be bothered to do in one go.

Some of the peas are growing well, but fewer than half have germinated. Are the others just being slow, or is that a really poor germination rate?
Seedlings should be pricked out as soon as they're big enough to handle, but the thyme got overcrowded and the compost started going mouldy long before they could reasonably be described as big enough to handle. I somehow managed to extract twelve, but it was very fiddly.
The tomatoes are mostly doing well, but a few of them are dying for no apparent reason. I'm glad I kept plenty in reserve.
Outside, the potatoes are just starting to show leaves above ground. If I can see enough of them, I can tell where the rows are and make sure not to tread on them when I walk across the bed to get at the bindweed that's springing up all over it.
Various herbs that might have been dead seem to be alive after all. There was a huge lavender bush at our old house and I took a dozen or so cuttings before we left, then didn't do anything much at all with them all winter. Some of them seem to be alive and doing quite well. I've planted out six, and have another four that might yet be worth planting.
The rosemary that I brought with me, that was a cutting from a plant that was a cutting from a plant in Edie's garden, down the road from the house before last (are you following this?) was looking quite sorry for itself recently and I was worried that it was dead, but it's looking better now. If it survives, this'll be the second time I've been convinced it was dying after a move, and it's proved me wrong. A sage bush that's travelled a much shorter distance - from the lower garden to the upper - was showing very few signs of life until recently, but now has tiny new leaves.
I'm also having a go at making fertilizer from nettles and comfrey. It's only been in the bucket a couple of days, but it's already looking vile, so I must be doing something right.
On the subject of plant food, I don't think this is what's usually meant by the term
Gratuitous picture of cherry blossom, but this is in our garden, and the photo has not been altered in any way
The reason for my garden avoidance may be that the plan is a little vague about the next bit - the beds in the upper garden - so I don't really know what I'm doing, or it may be that planting out seedlings is harder on the back than digging, or it may be that having to dig up all the weeds that have appeared since I dug up all the weeds is a little demoralising. I don't mind the little ones that have grown from seed so much - there's no way I could have avoided those - it's the ones that are growing from buried roots that get me - I tried to dig those up!
Rather than let it all get too much for me, I've been doing a little at a time. Today, for example, I dug out the weeds from the top bed nearest the fence and marked out the boundary between sunflowers and veg. That isn't much, but it's better than nothing. The next step is to work out what veg are going where within that bed, then sow parsnips in their allocated section.
So what have I done? Well, I've planted out two beds of onions (seedlings) and carrots (seeds) in alternating rows. The spacing between them varied somewhat as I went along, and I probably planted them all too close together, as I have only a few onions left to plant and I was expecting rather more left over.
If you look closely you'll be able to see at least one row of onions in this picture. You won't be able to see the carrots, though, because they're still just seeds.
I continue to sow seeds, some of which are coming up.
Parsley coming up in the herb garden. At least I think it's parsley. When lots of seedlings come up looking the same at about the same time, I tend to assume it's what I planted. Also, some of them had the seeds still attached to their leaves. That's always a good sign, isn't it?
I keep sowing peas in the greenhouse, twenty or so at a time. This isn't sophisticated successional planting, that's just how many I can be bothered to do in one go.
Some of the peas are growing well, but fewer than half have germinated. Are the others just being slow, or is that a really poor germination rate?
Seedlings should be pricked out as soon as they're big enough to handle, but the thyme got overcrowded and the compost started going mouldy long before they could reasonably be described as big enough to handle. I somehow managed to extract twelve, but it was very fiddly.
The tomatoes are mostly doing well, but a few of them are dying for no apparent reason. I'm glad I kept plenty in reserve.
Outside, the potatoes are just starting to show leaves above ground. If I can see enough of them, I can tell where the rows are and make sure not to tread on them when I walk across the bed to get at the bindweed that's springing up all over it.
Various herbs that might have been dead seem to be alive after all. There was a huge lavender bush at our old house and I took a dozen or so cuttings before we left, then didn't do anything much at all with them all winter. Some of them seem to be alive and doing quite well. I've planted out six, and have another four that might yet be worth planting.
The rosemary that I brought with me, that was a cutting from a plant that was a cutting from a plant in Edie's garden, down the road from the house before last (are you following this?) was looking quite sorry for itself recently and I was worried that it was dead, but it's looking better now. If it survives, this'll be the second time I've been convinced it was dying after a move, and it's proved me wrong. A sage bush that's travelled a much shorter distance - from the lower garden to the upper - was showing very few signs of life until recently, but now has tiny new leaves.
| Rosemary (left) showing fresh green leaves and a small sprig of new leaves on the very dead-looking sage | |
I'm also having a go at making fertilizer from nettles and comfrey. It's only been in the bucket a couple of days, but it's already looking vile, so I must be doing something right.
On the subject of plant food, I don't think this is what's usually meant by the term
green compost:
Sunday, 17 April 2011
Flower wines: progress report
The thing that gets me about home brew is the amount of washing up involved. Everything needs washing, sterilising, then washing again (unless it was sterilised with heat, but that's not an option with plastic bottles).
Today I started a new batch of dandelion wine and siphoned off the gorse flower wine into bottles. I started by chucking a couple of sterilising tablets in some water in the brewing bucket. I then added five wine bottles to that, which is how many fit in the bucket, by carefully scooping sterilising solution out of the bucket, through a funnel into each bottle, then putting the bottles back in the bucket to keep the level up. I left it a while to do its thing, then tranferred the solution into another five bottles and the lid of the bucket, and rinsed the bucket and first lot of bottles thoroughly. All this takes place in one sink, which isn't that big.
At this point I was able to start the dandelion wine. I chopped a couple of small lemons and put these, with sugar and hot water, into the bucket, then went to collect dandelions. Here they are:
I didn't bother to look up how many I'd need - these things seem to be pretty flexible. I picked all the flowers between the house and the fence on the north side. Well, nearly all of them. I didn't bother with the ones on the slope that were too difficult to reach. I was a bit wary of any that might have been run over, too.
I then added some cold water to the bucket to make sure it wasn't too hot for yeast, then added the flowers and some more water until it was full. I didn't add any yeast because I'd like to see if it gets going with wild yeast that is (apparently) on the flowers anyway. If not, I have a cunning plan... (I also have a pot of dried wine yeast in the cupboard as back up).
Later in the day, when I could face washing up again, I rinsed out the rest of the wine bottles and siphoned the gorseflower wine into them.

Ten full sized wine bottles, one diddy one, and a glass full. Well, I had to test it, didn't I?
The small glass of gunk is saved for a reason.
The wine was still fermenting when I siphoned it, so I hope it'll continue a bit more in the bottles and make it fizzy (but preferably not explosive, like the elderflower wine). It didn't work for the nettle wine, but you never know, it might work this time.
Unfinished as it is, I had to sample it, if only because I hadn't cleaned enough bottles to store it all. The verdict: I'm not sure the gorse flowers have made any contribution to this wine at all. Maybe I should have used five pints, as recommended by Hugh F-W, but frankly, it would have had to be very good to be worth that amount of effort, and I doubt any wine I make would come out that well. The wine's pleasant enough, but more like alcoholic lemonade than anything, which isn't very surprising, given that I put in lemons and sugar then fermented it. I hope it does end up fizzy.
And the saved gunk? That's still-active wine yeast. If the dandelion wine doesn't get going tomorrow, that's going in it.
Today I started a new batch of dandelion wine and siphoned off the gorse flower wine into bottles. I started by chucking a couple of sterilising tablets in some water in the brewing bucket. I then added five wine bottles to that, which is how many fit in the bucket, by carefully scooping sterilising solution out of the bucket, through a funnel into each bottle, then putting the bottles back in the bucket to keep the level up. I left it a while to do its thing, then tranferred the solution into another five bottles and the lid of the bucket, and rinsed the bucket and first lot of bottles thoroughly. All this takes place in one sink, which isn't that big.
At this point I was able to start the dandelion wine. I chopped a couple of small lemons and put these, with sugar and hot water, into the bucket, then went to collect dandelions. Here they are:
I didn't bother to look up how many I'd need - these things seem to be pretty flexible. I picked all the flowers between the house and the fence on the north side. Well, nearly all of them. I didn't bother with the ones on the slope that were too difficult to reach. I was a bit wary of any that might have been run over, too.
I then added some cold water to the bucket to make sure it wasn't too hot for yeast, then added the flowers and some more water until it was full. I didn't add any yeast because I'd like to see if it gets going with wild yeast that is (apparently) on the flowers anyway. If not, I have a cunning plan... (I also have a pot of dried wine yeast in the cupboard as back up).
Later in the day, when I could face washing up again, I rinsed out the rest of the wine bottles and siphoned the gorseflower wine into them.
Ten full sized wine bottles, one diddy one, and a glass full. Well, I had to test it, didn't I?
The small glass of gunk is saved for a reason.
The wine was still fermenting when I siphoned it, so I hope it'll continue a bit more in the bottles and make it fizzy (but preferably not explosive, like the elderflower wine). It didn't work for the nettle wine, but you never know, it might work this time.
Unfinished as it is, I had to sample it, if only because I hadn't cleaned enough bottles to store it all. The verdict: I'm not sure the gorse flowers have made any contribution to this wine at all. Maybe I should have used five pints, as recommended by Hugh F-W, but frankly, it would have had to be very good to be worth that amount of effort, and I doubt any wine I make would come out that well. The wine's pleasant enough, but more like alcoholic lemonade than anything, which isn't very surprising, given that I put in lemons and sugar then fermented it. I hope it does end up fizzy.
And the saved gunk? That's still-active wine yeast. If the dandelion wine doesn't get going tomorrow, that's going in it.
Saturday, 16 April 2011
Harvesting dandelions
This week, I have mostly been picking dandelions.
The first tray I picked, I put on the garden table to start drying in the sun while we were having a cup of tea. Ian, sitting closest to the table, watched the insects browsing the flowers. He said, "That bee just set off in a very purposeful manner. I think you'd better move the basket." I did, and sure enough, four or five more bees came to investigate the now-absent feast of flowers, then left looking rather confused. This was either funny or a rather scary, depending on how close you were sitting to the table.
I've eaten a few dandelions as fritters (dip in pancake batter and fry) but mostly I'm drying them for tea (put 6-8 flowers in a mug, add hot water and wait 5 min-ish). As well as a hot drink, dandelion tea is quite a good substitute for white wine in cooking. I ran out of last year's dried dandelions in January, so I'm drying LOTS to make sure that doesn't happen this year. I might have a go at making wine from them this year, too.
The first tray I picked, I put on the garden table to start drying in the sun while we were having a cup of tea. Ian, sitting closest to the table, watched the insects browsing the flowers. He said, "That bee just set off in a very purposeful manner. I think you'd better move the basket." I did, and sure enough, four or five more bees came to investigate the now-absent feast of flowers, then left looking rather confused. This was either funny or a rather scary, depending on how close you were sitting to the table.
I've eaten a few dandelions as fritters (dip in pancake batter and fry) but mostly I'm drying them for tea (put 6-8 flowers in a mug, add hot water and wait 5 min-ish). As well as a hot drink, dandelion tea is quite a good substitute for white wine in cooking. I ran out of last year's dried dandelions in January, so I'm drying LOTS to make sure that doesn't happen this year. I might have a go at making wine from them this year, too.
Thursday, 14 April 2011
Baked bean recipe - nearly there
I may have got a little overexcited and started this post before we'd actually eaten the beans...
This is the third attempt, and I'm getting there with the recipe for imitation Heinz beans, so I will share it with you. I'm writing down what I just did as best I can remember, before I forget any more of it. This is for two servings, i.e. about the same as one tin.
Ingredients:
Method
Start the day before if you're using dried beans and soak them overnight in plenty of water - they do swell up a lot. Then about an hour and a half before you think you need to start cooking, start cooking the beans in the water you soaked them in. You'll probably need to add a bit more water, unless you really did use lots for the soaking. Bring to the boil and keep boiling vigorously for ten minutes. Then reduce the heat and simmer gently for 70 min or so. These beans really do take this long to cook. Possibly longer. Test them to make sure they're soft enough and if not, cook them some more.
Now for the sauce. You need the cooking water from the beans in a pan and the beans themselves in some other container, waiting their turn. Add the half tin of tomatoes to the bean water and boil for 5-10 min, until the tomatoes are cooked and mushy.
Push this through a seive to make it smooth. I seive the sauce into the pot with the beans in, so that for the rest of the sauce making I also have beans in the mix. I do this to minimise washing up.
Put the tomato sauce (with or without beans) back into the pan and add the cornflour, mixed with a little water. Bring back to the boil to cook the cornflour, to thicken.
While waiting for it to boil again, or after it's boiled if you're more patient than me, add the other flavourings; vinegar, sugar, celery salt, mustard, parsley and pepper. At this point you might remember you were going to add a bay leaf. It's a bit late now.
Depending on how thick the sauce is at this point, you might want to boil it for a while, uncovered, to lose some water, or add a bit more. If boiling, don't forget to stir or it will stick and burn.
At this point, I took a teaspoonful of the sauce to Ian (he of the excessive taste buds) for tasting. His verdict on my attempt to imitate Heinz:
So here it is, beans ontoast fresh bread, straight from the oven, with butter melted in because it's still warm:
Then we actually came to eat them...
Ian's enthusiams waned at this point, as the beans taste too beany. This serves me right for being too pleased with myself! It's possible that leaving the beans in the sauce for longer would transfer more of their flavour into the sauce, leaving the beans themselves with a blander flavour. Actually though, I think it's time to admit that Borlotti beans are not the right kind of beans.
This is quite positive, because the point of the exercise was to answer that question. I'm only using Borlotti instead of Canellini because the seed supplier I ordered from didn't have Cannellini. Having got the sauce right, I can be sure that the
I did notice that the beans I bought for growing and the beans I bought for cooking are pretty much the same thing. There's no shortage of Cannellini beans at the supermarket (there seem to be different varieties called Cannellini - the ones labelled as such in Morrisons are small and white, which is what I want), so I'll buy those, trying making baked beans with them and if it works, plant the rest.
This is the third attempt, and I'm getting there with the recipe for imitation Heinz beans, so I will share it with you. I'm writing down what I just did as best I can remember, before I forget any more of it. This is for two servings, i.e. about the same as one tin.
Ingredients:
- Borlotti beans (I believe Cannellini beans are the correct ones, but I don't have those) - about 2 1/2 oz dried; just over 100 g soaked (sorry for mixed measures - I can't help it, I grew up in Britain)
- Water - I really couldn't tell you how much. Sorry.
- Tinned tomatoes - half a can
- White wine vinegar - two teaspoons
- Sugar (white granulated) - I think I put three rounded teaspoons in, but it might have been only two.
- Cornflour - one rounded teaspoon
- Celery salt - sprinkle - mine's in a pot with that kind of lid
- Mustard powder - pinch - probably about half as much as the celery salt
- Dried parsley - sprinkle - less than you'd ever think of using for a herb
- Pepper - very small sprinkle
Bay leaf- I forgot this again. It might be a good idea, perhaps instead of the parsley, or it might be completely unnecessary.
Method
Start the day before if you're using dried beans and soak them overnight in plenty of water - they do swell up a lot. Then about an hour and a half before you think you need to start cooking, start cooking the beans in the water you soaked them in. You'll probably need to add a bit more water, unless you really did use lots for the soaking. Bring to the boil and keep boiling vigorously for ten minutes. Then reduce the heat and simmer gently for 70 min or so. These beans really do take this long to cook. Possibly longer. Test them to make sure they're soft enough and if not, cook them some more.
Now for the sauce. You need the cooking water from the beans in a pan and the beans themselves in some other container, waiting their turn. Add the half tin of tomatoes to the bean water and boil for 5-10 min, until the tomatoes are cooked and mushy.
Push this through a seive to make it smooth. I seive the sauce into the pot with the beans in, so that for the rest of the sauce making I also have beans in the mix. I do this to minimise washing up.
Put the tomato sauce (with or without beans) back into the pan and add the cornflour, mixed with a little water. Bring back to the boil to cook the cornflour, to thicken.
While waiting for it to boil again, or after it's boiled if you're more patient than me, add the other flavourings; vinegar, sugar, celery salt, mustard, parsley and pepper. At this point you might remember you were going to add a bay leaf. It's a bit late now.
Depending on how thick the sauce is at this point, you might want to boil it for a while, uncovered, to lose some water, or add a bit more. If boiling, don't forget to stir or it will stick and burn.
At this point, I took a teaspoonful of the sauce to Ian (he of the excessive taste buds) for tasting. His verdict on my attempt to imitate Heinz:
Blimey, that's close!I was very happy with this!
So here it is, beans on
Then we actually came to eat them...
Ian's enthusiams waned at this point, as the beans taste too beany. This serves me right for being too pleased with myself! It's possible that leaving the beans in the sauce for longer would transfer more of their flavour into the sauce, leaving the beans themselves with a blander flavour. Actually though, I think it's time to admit that Borlotti beans are not the right kind of beans.
This is quite positive, because the point of the exercise was to answer that question. I'm only using Borlotti instead of Canellini because the seed supplier I ordered from didn't have Cannellini. Having got the sauce right, I can be sure that the
Noverdict really does relate to the beans, not my cooking. Therefore, it is not worth growing Borlotti beans.
I did notice that the beans I bought for growing and the beans I bought for cooking are pretty much the same thing. There's no shortage of Cannellini beans at the supermarket (there seem to be different varieties called Cannellini - the ones labelled as such in Morrisons are small and white, which is what I want), so I'll buy those, trying making baked beans with them and if it works, plant the rest.
Wednesday, 13 April 2011
What's the point of knooking?
I started drafting this post a while back. It was a rather waffly discussion of the various reasons people might want to spend time on crafts. Then Susie said it much more concisely:
Then nagging doubts started to creep in. The disappointment when I had to put the knooking hook aside at the end of the baby blanket to start a sewing project... my delight at finding a really good excuse for a knooking project... the fact that I was making dishcloths for goodness sake!
I wouldn't be able to look myself in the eye if I caught myself making knitted flowers...
... but I might quite easily be tempted by Killer Easter Bunny egg cosies.
I may have to face up to the fact that I am a process knooker.
However, that wasn't where I started from. The point of making things, for me, has to be to save money. I need to know something about the costs involved here. I had planned to make up the whole ball of dishcloth cotton into cloths, but I ended up swapping the rest of the ball for some butter, so I don't know how many it would have made. I suspect that at £2.30 for the ball, it's quite an expensive way of buying dishcloths.
I tried to work out the cost of yarn for a jumper - I looked up patterns I liked the look of, tried to find yarn that matched the description of what was needed (and looked nice), and worked out how many balls would be needed from the quoted yardage. I thought I must be getting it wrong, because I was ending up with at least £40 per jumper. It's true I was completely out of my depth, knowing nothing about yarn, so maybe I was just looking at very expensive yarns. I tried to find some that were cheaper, but couldn't get the cost down to much less than £20 for a jumper's worth of yarn.
Then before I got round to writing this post (and I was looking this up yesterday morning), Susie beat me to it again! She wrote a blog post all about the cost of craft materials. Reading this was reassuring in some ways, because it confirmed that it wasn't just me not knowing what I'm doing - yarn really is that expensive - but it was disheartening for the same reason - yarn really is that expensive.
The conclusion seems to be that I've found a hobby I love doing, but can't afford to indulge in it. Unless...
When I started learning to knit, it was meant to be one part of a bigger project. A friend has promised to lend me her spinning wheel, but there didn't seem much point learning to spin if it turned out that I hated knitting. What if I went one step back in the process, and bought ready-to-spin wool? The first place I looked was the shop of someone whose blog I follow, Colour it Green. Here I found carded wool for sale at 90g for almost £9. Eek! I'd been looking at 50g balls of wool for around £2 each. I've no doubt this is the highest quality wool, but there's no way I can afford that!
A little googling revealed that, whilst this price isn't unusual, it is possible to buy spinning wool more cheaply - I found some for £2.10 per 100 g at Handmade Presents. This has come down to less than the cost of spun, dyed wool, but not vastly less, and I have no idea of the quality. If I find that I enjoy spinning as much as knooking, then this might be worth doing, as it brings the cost down to something reasonable for the jumper and I'd get a lot of entertainment thrown in.
On the other hand, perhaps what I actually need is a sheep.
I am not really a process knitter. I do like the process but I only really do it for the finished result.That's what I was trying to say! It's not about the process, it's all about the finished product.
Then nagging doubts started to creep in. The disappointment when I had to put the knooking hook aside at the end of the baby blanket to start a sewing project... my delight at finding a really good excuse for a knooking project... the fact that I was making dishcloths for goodness sake!
I wouldn't be able to look myself in the eye if I caught myself making knitted flowers...
... but I might quite easily be tempted by Killer Easter Bunny egg cosies.
I may have to face up to the fact that I am a process knooker.
However, that wasn't where I started from. The point of making things, for me, has to be to save money. I need to know something about the costs involved here. I had planned to make up the whole ball of dishcloth cotton into cloths, but I ended up swapping the rest of the ball for some butter, so I don't know how many it would have made. I suspect that at £2.30 for the ball, it's quite an expensive way of buying dishcloths.
I tried to work out the cost of yarn for a jumper - I looked up patterns I liked the look of, tried to find yarn that matched the description of what was needed (and looked nice), and worked out how many balls would be needed from the quoted yardage. I thought I must be getting it wrong, because I was ending up with at least £40 per jumper. It's true I was completely out of my depth, knowing nothing about yarn, so maybe I was just looking at very expensive yarns. I tried to find some that were cheaper, but couldn't get the cost down to much less than £20 for a jumper's worth of yarn.
Then before I got round to writing this post (and I was looking this up yesterday morning), Susie beat me to it again! She wrote a blog post all about the cost of craft materials. Reading this was reassuring in some ways, because it confirmed that it wasn't just me not knowing what I'm doing - yarn really is that expensive - but it was disheartening for the same reason - yarn really is that expensive.
The conclusion seems to be that I've found a hobby I love doing, but can't afford to indulge in it. Unless...
When I started learning to knit, it was meant to be one part of a bigger project. A friend has promised to lend me her spinning wheel, but there didn't seem much point learning to spin if it turned out that I hated knitting. What if I went one step back in the process, and bought ready-to-spin wool? The first place I looked was the shop of someone whose blog I follow, Colour it Green. Here I found carded wool for sale at 90g for almost £9. Eek! I'd been looking at 50g balls of wool for around £2 each. I've no doubt this is the highest quality wool, but there's no way I can afford that!
A little googling revealed that, whilst this price isn't unusual, it is possible to buy spinning wool more cheaply - I found some for £2.10 per 100 g at Handmade Presents. This has come down to less than the cost of spun, dyed wool, but not vastly less, and I have no idea of the quality. If I find that I enjoy spinning as much as knooking, then this might be worth doing, as it brings the cost down to something reasonable for the jumper and I'd get a lot of entertainment thrown in.
On the other hand, perhaps what I actually need is a sheep.
Tuesday, 12 April 2011
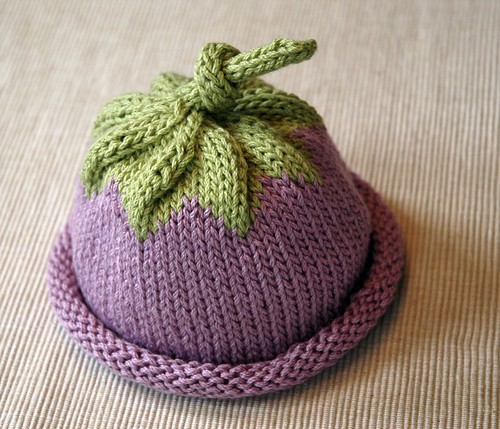
Urgent knooking project: Baby hat
We'd been invited to the first birthday party of a friend's baby, and about a week before the party I suddenly realised we hadn't given any thought to a present! I should point out that our friend was very organised and gave us plenty of notice - it was just me not paying attention that gave this problem its urgency.
A little nervously, as I wasn't entirely confident in my knooking skills, I decided that making some item of clothing would be a good idea. I went over to Ravelry to look for patterns, and found this very cute berry baby hat, with a free pattern. Even better, the pattern looked fairly easy and was written in a very beginner-friendly style. Even I might be able to follow it!
Two sizes of needles were called for, so I grabbed a holly stem that I'd saved from putting holly leaves on the peas and set to work whittling. Because the long stem tapered, it wasn't difficult to find two sections of different thicknesses, and thus I added two new knooking hooks to my set.
I then went shopping for yarn. Although it sometimes seems that every other shop in Aberystwyth has a few balls of wool lurking in a corner, and there are two shops with what looked to me like a huge range of yarns, it turned out to be quite difficult to get exactly what I needed. The pattern called for Worsted weight yarn, cotton with a bit of acrylic to give it some spring. I find the displays of yarn completely overwhelming, so I asked for help finding what I needed. The first attempt at help was less than helpful; the lady in the shop reeled off all the cotton mix yarns she had available. I asked a second time, in a tone intended to convey complete cluelessness, and she pointed me towards some 60% cotton, 40% acrylic yarns. That sounded a bit high on the acrylic to me, but by this time I was in no position to argue. They weren't worsted weight, either, but double knit, but I thought I could cope with 22 stitches to 10 cm instead of the pattern 20 stitches.
Having thinner yarn meant thinner knooking hooks were required, so I made a couple more, then realised I already had one of the smaller size needed, which was no bad thing as the smaller new one wasn't very good. I now have a pretty good set of hooks, though I don't suppose that will stop me making more.
With everything slightly smaller, it was quite likely that the hat would come out slightly smaller, too. I then tried calculating how many stitches I'd need to make a hat the right size, which led to looking up how big baby's heads are at different ages, which confused me greatly as the stitches per 10 cm in the original pattern would come out nowhere near big enough... and then I realised that knitted fabric stretches. At this point I also realised that I hadn't a hope in hell of calculating it, and it might be a good idea to just make up a test piece and see what I'd got. It turned out that with my lighter yarn and smaller hook, I ended up with exactly the right number of stitches per 10 cm anyway (well, 19.5, which I thought was pretty close!)
After a couple of false starts - running out of tail in a long-tail cast-on then forgetting to add the eight stitches to make it toddler-size instead of baby-size - I made the hat very quickly. As I'd expected, knooking lends itself to working in the round. There was no need to switch to a set of double pointed needles towards the end, as would be necessary for knitting (though I was dropping the stitches onto the cord very frequently, which tended to make them too tight). I started on Friday evening, then started again on Saturday morning after undoing the false starts, and finished on Sunday morning. It was a pretty quiet weekend - Ian's sister was staying, and we did a lot of sitting around chatting and doing very little, which was lovely - and I think I spent about 6 hours on the hat, not counting the false starts.
It looked a lot like the photo on the pattern - I'd even used the same colours - but it was very small! It did stretch a bit, but I couldn't believe even a one-year-old's head would be that small. Tip: If you want a hat to be stretchy, don't weave in the long end of the wool by running it all around the edge of the hat. I pulled it all out and wove it in a different way, and the hat was a lot more stretchy after that. Still, I was worried it would be too small.
At the party, I was a bit insistent about the present being opened and tried on, even though the birthday girl was a bit tired by then, because I really didn't believe it would fit, and if it was too small I could always make a bigger one.
I was very pleased, and a bit surprised, that it fits. Let's hope it still does in the autumn, when she might actually need it.
A little nervously, as I wasn't entirely confident in my knooking skills, I decided that making some item of clothing would be a good idea. I went over to Ravelry to look for patterns, and found this very cute berry baby hat, with a free pattern. Even better, the pattern looked fairly easy and was written in a very beginner-friendly style. Even I might be able to follow it!
Two sizes of needles were called for, so I grabbed a holly stem that I'd saved from putting holly leaves on the peas and set to work whittling. Because the long stem tapered, it wasn't difficult to find two sections of different thicknesses, and thus I added two new knooking hooks to my set.
I then went shopping for yarn. Although it sometimes seems that every other shop in Aberystwyth has a few balls of wool lurking in a corner, and there are two shops with what looked to me like a huge range of yarns, it turned out to be quite difficult to get exactly what I needed. The pattern called for Worsted weight yarn, cotton with a bit of acrylic to give it some spring. I find the displays of yarn completely overwhelming, so I asked for help finding what I needed. The first attempt at help was less than helpful; the lady in the shop reeled off all the cotton mix yarns she had available. I asked a second time, in a tone intended to convey complete cluelessness, and she pointed me towards some 60% cotton, 40% acrylic yarns. That sounded a bit high on the acrylic to me, but by this time I was in no position to argue. They weren't worsted weight, either, but double knit, but I thought I could cope with 22 stitches to 10 cm instead of the pattern 20 stitches.
Having thinner yarn meant thinner knooking hooks were required, so I made a couple more, then realised I already had one of the smaller size needed, which was no bad thing as the smaller new one wasn't very good. I now have a pretty good set of hooks, though I don't suppose that will stop me making more.
With everything slightly smaller, it was quite likely that the hat would come out slightly smaller, too. I then tried calculating how many stitches I'd need to make a hat the right size, which led to looking up how big baby's heads are at different ages, which confused me greatly as the stitches per 10 cm in the original pattern would come out nowhere near big enough... and then I realised that knitted fabric stretches. At this point I also realised that I hadn't a hope in hell of calculating it, and it might be a good idea to just make up a test piece and see what I'd got. It turned out that with my lighter yarn and smaller hook, I ended up with exactly the right number of stitches per 10 cm anyway (well, 19.5, which I thought was pretty close!)
After a couple of false starts - running out of tail in a long-tail cast-on then forgetting to add the eight stitches to make it toddler-size instead of baby-size - I made the hat very quickly. As I'd expected, knooking lends itself to working in the round. There was no need to switch to a set of double pointed needles towards the end, as would be necessary for knitting (though I was dropping the stitches onto the cord very frequently, which tended to make them too tight). I started on Friday evening, then started again on Saturday morning after undoing the false starts, and finished on Sunday morning. It was a pretty quiet weekend - Ian's sister was staying, and we did a lot of sitting around chatting and doing very little, which was lovely - and I think I spent about 6 hours on the hat, not counting the false starts.
It looked a lot like the photo on the pattern - I'd even used the same colours - but it was very small! It did stretch a bit, but I couldn't believe even a one-year-old's head would be that small. Tip: If you want a hat to be stretchy, don't weave in the long end of the wool by running it all around the edge of the hat. I pulled it all out and wove it in a different way, and the hat was a lot more stretchy after that. Still, I was worried it would be too small.
At the party, I was a bit insistent about the present being opened and tried on, even though the birthday girl was a bit tired by then, because I really didn't believe it would fit, and if it was too small I could always make a bigger one.
I was very pleased, and a bit surprised, that it fits. Let's hope it still does in the autumn, when she might actually need it.
Friday, 8 April 2011
Everything's growing!
After several days of rain, the sun's out again. Warm and wet - perfect growing weather.
Subscribe to:
Posts (Atom)