About this blog

My photo
Wales, United Kingdom
Documenting one couple's attempts to live a more self-sufficient life.

Wednesday 29 June 2011

Why don't I get things done?

This isn't a whiny, Oh I'm so useless post intended to make you say, Oh no you're not. I know I get things done, but there are other things that don't get done. This post is about those other things.

Susie's try something new challenge has been very interesting because it's made me look closely at something that I wasn't getting done. I chose what I thought was a relatively small project, learning to knit socks, but even that turned out to be more complicated than it first appeared.

It wasn't just the knitting of socks, there was the problem of yarn being expensive so I thought I'd unravel a jumper, and then I had to make a thinner knooking hook as well. Looking more closely at the task I'd been putting off, it turned out to be several different tasks, all challenging. It was made managable by firstly finding cheap yarn (solving the first problem) and then finding that one of my existing hooks was suitable to use with that yarn (solving the second problem). Then the main challenge wasn't nearly so bad.

Potting on the tomatoes was another task that wasn't getting done. Subsidiary tasks were clearing the conservatory, sourcing containers, and sourcing compost (more expense problems). These were tackled all at once, and it was a big job. The only reason I made myself do this was that the tomatoes would fail if I didn't, and I'd already invested a lot of time and effort in them. I also want to eat the tomatoes!

Other potential something new challenges were making liquid soap, making a solar panel, converting my sewing machine to treadle power and learning to spin. By chance, I've made a start on the last of those, but further progress still involves arranging to fetch a spinning wheel*, finding a source of suitable fleece, learning to wash and card the fleece ready for spinning, and finding space for all this activity.

Similar lists emerge when I examine any of the other projects. They all expand into several different challenges, all difficult. So it seems that the reason I don't get things done is that I bundle things up into big, complicated problems with many difficulties. Alternatively, maybe some of the things I want to do just come as big complicated bundles, and I need to recognise that and learn to unwrap them into smaller, more managable challenges. If I can think of, for example, fetching the spinning wheel as a challenge in itself, rather than part of something bigger, maybe it will be easier for me to focus on getting it done.

---

* A friend has promised me long-term loan of her wheel, but she lives in Yorkshire and is extremely busy.

Learning to spin and what to do with 30 g of hand spun yarn

A couple of weeks ago I was clearing out my handbag and found a flyer for the Wool and Willow Festival in Llanidloes, about 25 miles from where we live. Looking through the list of workshops, I saw one on spinning taught by Joanna Kingston, less than a week hence. There was a limit of five students and when I called to check availability, six had already booked. Nonetheless, the organiser called me back later to let me know I could still attend the course. It turned out that a couple of students were taking their own spinning wheels, so I was in luck!

You may wonder why I haven't included this in the try something new challenge. The reason is that happening to find a course nearby and spending the day with a helpful teacher guiding me at every stage didn't really feel like much of a challenge. It certainly wasn't something I'd been putting off trying - it was more something I thought I'd get round to at some point in the future (that's not the same thing, honestly!)

I didn't take any photos on the day, as I was too busy concentrating on learning to spin, so here's a photo of the kind of wheel we used, taken from the manufacturer's website:


Ashford traditional spinning wheel. Traditional in this context means slow enough for a beginner to handle.

The day started with an introduction to the various parts of the wheel, which was essential for someone as clueless as me. Then came a very important step - practising using the treadle. Even so, there were times during the day when I was concentrating on the yarn so much that I forgot about my foot and the wheel stopped. Once I got the hang of keeping the wheel going without thinking about it, I then had to learn to stop it when I needed to. The wheel had a bad habit of snatching the wool out of my hands and running off with it.

Once we knew our way round the wheels, Joanna demonstrated how to spin, teasing out the wool as she fed it into the orifice of the bobbin, holding and realeasing the wool to twist and wind up in turn, counting as she did to ensure an even twist. When we tried for ourselves, I soon discovered that trying to do all of that all at once is a mistake. I also discovered the importance of the brake. When this is at the correct tension, the bobbin stays still when you pull against it to twist the yarn, then spins to wind up the yarn when you let go. Or possibly the other way round. I can't claim to understand this fully, but I did learn that if the brake tension is wrong, it's damn near impossible to spin a yarn.

So, I cut the counting, learnt to prepare my yarn before spinning it so I had the right thickness bundle of fluff for a single strand, and got the hang of keeping the wheel going at the same time as concentrating on the wool. Yippee! I was spinning! Then I got to the end of the bundle of fluff, the wheel snatched the yarn away from me, and suddenly I wasn't spinning any more.

Eventually I learnt to stop the wheel at that point, and some time later also got the hang of joining the spun yarn to a new bundle of fluff. That was progress indeed. By this stage I was feeling very pleased with myself, and really didn't care that I had little control over how tight the finished yarn was - I can learn that later. As it happened, I was spinning too tight, which means the yarn is less likely to fall apart than if I was not spinning tightly enough.

All that was in the morning, and in the afternoon we got to put our new skills into practice with some fabulous merino/silk fluff. This stuff was absolutely gorgeous, so no matter what we did with it, there was a good chance of ending up with some lovely yarn at the end of the day. And so, with much concentration, carefully preparing bundles of fluff and spinning them one at a time, stopping and starting the wheel as I joined in each new bundle, I ended up with two bobbins of spun yarn, which I believe are known as singles at this stage, being just a single strand each. We were then taught to ply, or twist together, these two, resulting in a two-ply yarn.

Joanna told us to gently wash and dry the yarn when we got home, to set the twist. She also mentioned to me that she used to tell people to hold it over a steaming kettle, but didn't say that any more for risk of people burning themselves. Right, that'll be the kettle for me then. Sure enough, the yarn seemed to relax in my hands, just as she'd said it would. I then wound it into a ball, and this is what I ended up with:


Finished product from the spinning class.

I have to say I'm very pleased with that. It's not just the end product, of course. I very much enjoyed the class and think this is something I'd like to do more of. I also think I learnt enough to get started on my own, provided I don't leave it too long before trying again. Once I've got started, I suspect I could make a lot of progress with just practice, though there's probably a lot I could learn from other people, too.

Having got a lovely ball of yarn that I'd spun myself, I very much wanted to do something with it. Out of curiosity, I weighed it. As you may have guessed from the title of this post, it was 30 g, which isn't a heck of a lot.

A friend had recently showed me a shawl she'd just bought, which was very pretty indeed. It looked like a rainbow cobweb. Close examination revealed it to be knitted very loosely from fine ribbon. Maybe if I knitted my wool loosely enough I might have enough for a scarf, perhaps? With that in mind, I made my biggest knooking hook yet.

My first attempt at knooking with the new hook was not encouraging. The knitting was fine, but nowhere near loose enough, and I was getting through yarn very quickly.


Not very loose knooking

I looked over at the shelf where all my mum's old knitting needles live. There is a huge pair in that set (labelled No. 1); perhaps I should try actually knitting for a change. This was an improvement, but still not quite what I was after.


There are gaps in this, but it's still a long way from cobwebby

I was chatting to a friend on skype whilst doing this, and she was also knitting (with plastic bags). She said that she'd seen people knitting with broom handles - what a good idea! If I was going to do this regularly, I'd buy a new handle, cut it to a managable size and shape the ends, and possibly polish it too. However, for a one off experiment...


It would have been easier without the black plastic bit on the end of the mop handle

It wasn't easy and as you can see I used the hook to catch the yarn and loop it around the handles. Each stitch was rather slow, but there weren't very many of them. The result was exactly what I had in mind, but sadly, not a scarf's worth.

Table-mat sized piece of lacy knitting

Now, does anyone have any ideas about what I could do with that?

Tuesday 28 June 2011

Bagging-on tomatoes

I've been putting off the job of potting-on tomatoes for a while now. This is because it's not just a matter of putting plants in pots and adding compost. I had neither pots nor compost and furthermore no space to put the tomatoes once potted. Here's where I planned to put them:


We've been using the conservatory as a junk room since we moved.
If you look closely, you can see a cat in this picture.

The first job then, and it was no trivial task, was to clear space in the conservatory.

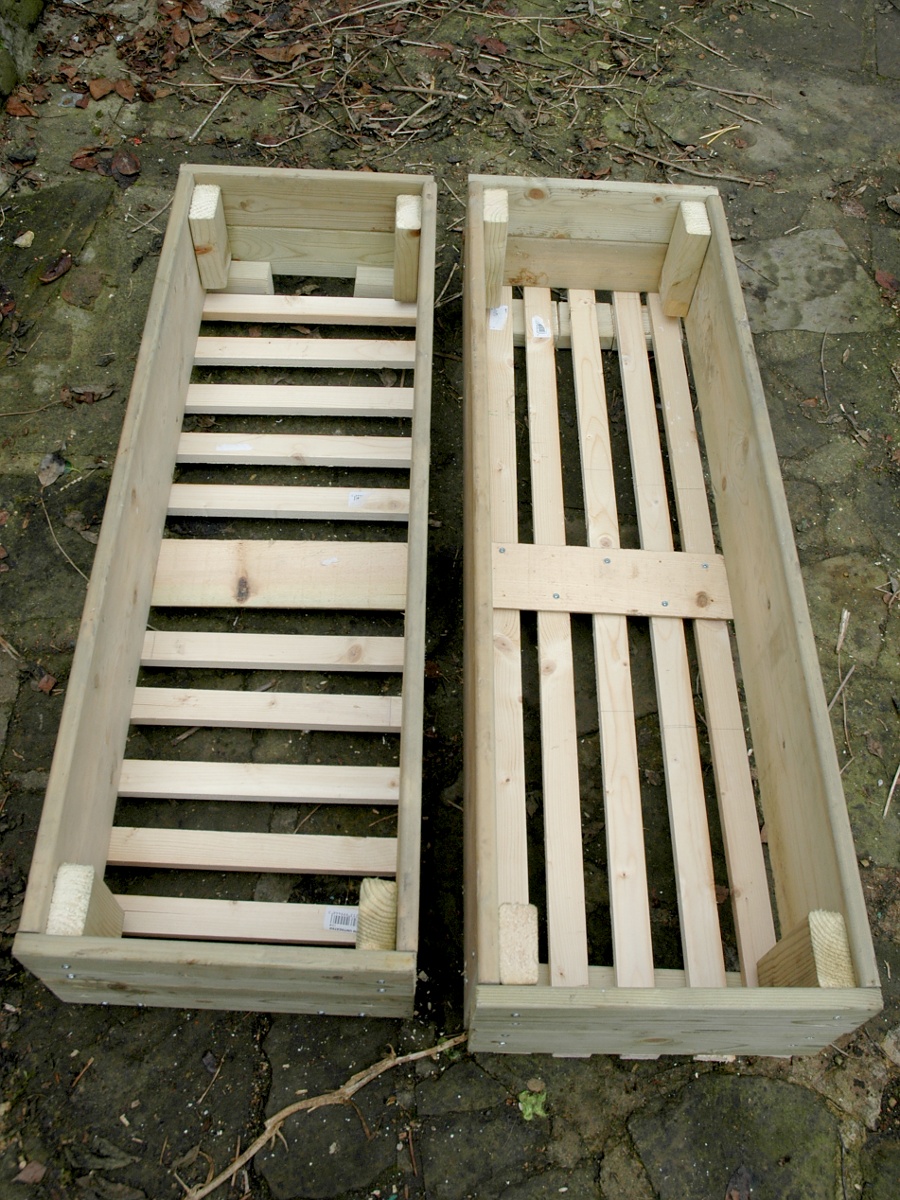
The next problem was the pots. I was impressed by Louisa's planters made from scrap wood, and thought I might have a go at something similar.


I could get four or five tomato plants in one of those

The trouble was, I lacked a ready supply of scrap wood, or the skills to make planters out of it. As the tomatoes got increasingly insistent in their demands for a new home, I decided to bite the bullet and just buy some pots. I looked up prices and found that you can get suitable tomato-sized pots (and they're big plants) for a pound each. That didn't sound too bad until I counted the tomatoes in need of pots. There were 44 of them. That's the best part of fifty quid. Ouch. That's before I've even thought about compost to put in them or trays to stand them in. Maybe I wouldn't resort to buying pots just yet...

Over on the SelfSufficientish website, AngeB had recently won a competition with her money-saving tip for the garden:


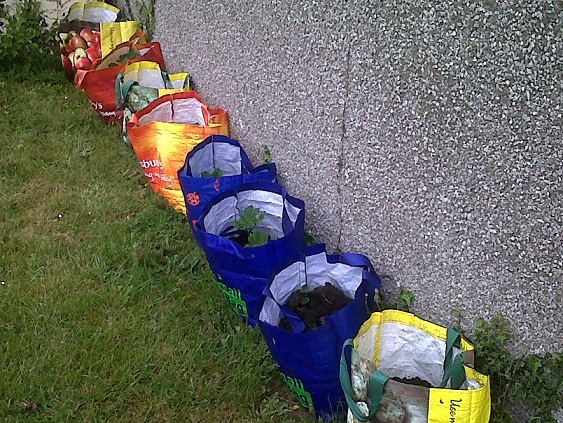
Spuds for life - potatoes growing in sturdy carrier bags

Hmm, I did have a lot of empty compost bags in the greenhouse that I'd kept, just in case they came in useful. Now could be their chance!

The final component was the compost. I had two bags of bought compost, and stretched that by mixing it with garden soil (first weeded - another job along the way). When that ran out - and it went a surprisingly long way - I opened up the big compost heap. That is, I lifted some of the weeds that were growing on it and dug into the side of it. Hey presto, compost! It was pretty coarse, and not as dark and rich as some I've made, but still definitely compost. That also got mixed with soil before giving to the tomatoes.

So, with all the elements in place (and having tidied the conservatory), the procedure was:
  1. Collect compost bags, gravel bags, whatever I can find, and roll down tops of bags until they could pass for pots
  2. Fetch stones* and lay a layer in the bottom of each bag for drainage
  3. Cut comfrey** and add a layer of leaves on top of the stones, because I've heard that tomatoes like it
  4. Fill bag with compost/soil mix and one or two tomatoes, depending on size
  5. Carefully push down the compost around the plants until they're nicely snuggled in
  6. Repeat many, many times, digging and mixing more soil and compost as required
  7. Water
It took me two days, and now I've finally finished, the conservatory looks like this:


There are forty four tomato plants here, though not all of them are in this photo.

You won't see a cat in that photo, no matter how hard you look, because she was on the roof:


Pebble on the conservatory roof

Ignoring Pebble's dastardly deeds and returning to the tomatoes, I am very excited by the first tiny fruit:


Let this tiny tomato be the first of many, and let them all grow big and juicy.
Well, maybe not the cherry tomatoes.

I'm feeling very pleased with myself for doing all that, especially as I managed to avoid spending any more money at all.

---

* This was another incidental tidying up job. Our garden is full of stones and I keep digging them out of the soil and leaving heaps of them about the place. One heap on the patio got sorted, leaving the largest stones in a neater pile and taking the smaller ones.

** The comfrey has been making a nuisance of itself trying to spread its seeds all over the potato patch. I wasn't sorry to cut the horizontal stems and, by the time I'd finished, most of the vertical ones too. There are plenty of new leaves growing from the base.

The second sock

It's possible that the weeding may have been neglected this week, and the runner beans may be desperately searching for support, and the tomatoes may have been begging for new pots, but I did get my second sock knooked.


My first pair of hand knooked socks

I think the left one may be slightly shorter than the right, but never mind. Because there is a left and a right, I added little blobs of purple to the outside of the ankles, to make it easier to tell them apart.


Another picture of first socks

They are very nice and snuggly. Pebble agrees.


Out of interest, I weighed my pair of socks to see how much yarn I'd used: It was 40 g. I could get ten pairs* out of that cone of wool. That's 50p a pair, which isn't bad at all.

---

* Yes, I know 40 goes into 452 eleven and a bit times, but I'm allowing for maybe making some slightly longer socks, or perhaps a more complicated pattern. I may get bored of plain stocking stitch after a few pairs.

Wednesday 22 June 2011

Obsessively knooking sox

I finished my last post on the subject of trying to make socks with, unless I come across some unexpectedly cheap sock yarn... Well, whaddya know, that's exactly what happened!

I happened to be in a haberdasher's in a different part of Wales - that is, we happened to be in a different part of Wales and I thought I'd check out any haberdashers in the area...

Ian: Why are you googling cardigans?
Me: I'm not. I'm looking up haberdashers in Cardigan
Ian: Ah. Google's going to struggle with that


- when I spotted a bin full of cones of yarn. The handwritten note above the bin said 100% wool. £5 each. Most were cream in colour and each cone had a slip of paper indicating thickness and weight. I found one that said 2 ply 452 g. That's a whole pound of pure wool for a fiver!


One pound of two-ply

Now, onto the socks. Well, not quite. The first thing I did was to knit a test swatch with my new, tiny hook. This task suffered a minor setback when the phone rang and Pebble jumped off my lap, taking the cone of wool with her, which broke. Then it suffered a major setback when the knooking hook snapped.


This knooking hook was too thin

So, what to do next? Make another tiny hook and risk the same thing happening again, or use a bigger hook? I used a bigger hook, which was easier to work with anyway. I think it might be the first one I made, which was about 3.5 mm thick [edit: Oh no it's not! I just found that one in the bottom of my handbag. This one's a little thinner - 3 mm now I bother to measure it]. Another test swatch was knooked.


This stuff rolls up something rotten.

I measured the swatch and my leg, did some calculations and decided I need 60 stitches, then promptly forgot how I arrived at that. I started with a ribbed cuff, and tried that on my leg to make sure it was roughly the right size. It wouldn't be too much to unravel if it wasn't.


Ian: I don't think that's finished yet. Nothing gets past him.

I then switched to stocking stitch (i.e. all knit stitch, going round and round) and found that the stiches were tighter with the simpler stitch. I may find my ribbed cuff is looser than the rest of the sock. Oops.

I continued knooking throughout the evening. Ian went to bed, but I wasn't very tired, so I carried on knooking. I got very absorbed in it and carried on some more, until I noticed it was past 2 am. At that point I remembered that it was the solstice. If I stay up a few more hours, I thought, I could see the sun rise on the longest day. That would be cool. So I carried on knooking. I didn't do quite the length I'd planned (as in photo above) but I was impatient to get onto the heel.

I'd read Silver's sock class, which is excellent, but for my purposes needed translating for knooking. This is not terribly easy when the tutorial is written so much in terms of which needle to use. I'm never one to stick to a pattern anyway, so I decided that instead of following the instructions, I'd study them until I understood what was going on, then make it up as I went along.

For the heel, you essentially make a sort-of triangular flap (OK, a trapezium - that shape does have a name) then continue on to another one the same shape but the other way up. These need to be joined together at the sides. To do this in knooking, I divided the sock tube in two and put one set of stitches on a holding cord while keeping the other set of stitches on the working cord. I decided that the heel would be half of the sock, because that seemed about right. It might or might not be what was in the tutorial - I didn't check.

To shape the heel, I knooked a row, then transferred a stitch from each end of that row from the working cord onto the holding cord. Rather than carry on knooking in the round, I then turned back and knooked another row of the flap. In this way, the piece I was working on got two stitches shorter with each row. When it got down to a shortish bit in the middle (I think it was about ten stitches), I did the opposite. The first and last stitches of each row were knooked from the holding cord (not forgetting to remove the holding cord from those stitches afterwards, to avoid horrendous confusion). So it was that as the year was turning, I was turning my first heel. It wasn't as easy as the plain part of the sock because the edge stitches tended to get stretched and awkward to pick up, but it was pretty straightforward and I suspect a darn sight easier than doing battle with a handful of pointy sticks.

Now call me heretical, but I didn't see the need for a gusset. I'd studied my mass produced socks, and could see no sign of any gussets there, and I've been wearing those for years without any problem.


Gusset-free mass produced sock

So, when I finished the heel I went straight back to knooking a tube in the round. I did a few rounds of this in the small hours of the morning, then looked at it and thought, Oh no, that looks terrible, I'll have to unravel that bit and figure out how to do gussets. I put it down and fell asleep at about 6 am.*

Waking up at something approaching midday, I looked at my half-sock again and decided that it really didn't look too bad, and nothing needed unravelling at all.


Half-sock in daylight looking fine, actually. Note heel but no gusset.

I carried on knooking throughout the day, and in due course reached the bit where I'd have to start shaping the toes.


It's a good idea to leave the hook in when trying on half a sock, otherwise the stitches tighten around the cord. I learnt this by trial and error.

I'd looked at the toe shaping in the tutorial and thought that my toes aren't that shape. On the other hand, my toes are really quite an odd shape. I decided to make the sock fit my feet, with frequent fittings, reducing by a stitch here and a stitch there as needed. I should say to fit my right foot as an asymmetrical sock will be foot-specific. Hmm, am I really going to want that when putting on my socks in the half-light of the morning? Oh, what the hell! I may add some embroidery to the ankle to make them easier to tell apart.

Ian insisted that I went to bed at a sensible time last night, so I didn't get the sock finished yesterday and picked it up again this morning. Eventually I decided I'd done enough toe shaping and could move on to the magic Kitchener stitch, which I was quite excited about. This is a really neat trick to join up two pieces of knitting without a seam, so the end result looks like continuous knitting.

For the Kitchener stitch I did follow the instructions closely. To adapt for knooking, I just had to substitute, Draw out the cord for Slip stitch off the knitting needle. This procedure is just as cool as I'd been led to believe, and I was very pleased with the result.


Kitchener'd toe

Here is the finished sock from the side...


... and from the top:


If you think this is a funny shape, have another look at the picture of my toes

I'm feeling very proud of my first sock. It may be a little shorter than I'd intended and the cuff's a bit loose, but it's a fully functional sock. Except... one sock on its own can't really be described as fully functional. Socks come in pairs, and that generally means matching pairs. The trouble with making it up as I go along is that I now have to make another sock to match and I have no record of exactly what I did. I think I'll just take the same approach of fitting it to my foot as I go along. They may not match exactly, but then I don't suppose my feet match exactly, either.

---

* The sunrise was completely obscured by clouds, by the way.

The biggest and smallest knooking hooks

Thinking that socks should be as finely knit as possible, in preparation for making socks I first made myself the smallest knooking hook that I could. I used oak, reasoning that stronger wood would be suitable for something so thin.

That was a few weeks ago. More recently, I had an idea for a project that needs a very thick hook (of which more in due course), so made myself another knooking hook. Again I used oak, this time because I didn't fancy burrowing into a holly bush far enough to find a thick twig.

A thick piece of oak has quite a lot of thinner pieces attached to it, as well as lots of leaves. Not wanting to waste them, I boiled up the leaves to make cordial and kept the smaller twigs for future use.


Bits of oak

Here are the two new knooking hooks:


Biggest and smallest knooking hooks

The little one is about 2.5 mm thick and the big one is, oh, um, I didn't measure it. Quite a lot thicker!

Tuesday 21 June 2011

More elderflower champagne or blackcurrant wine?

The answer is both, of course, but I did think I would have to decide which to do first, as I have only one wine bucket (though a friend did offer me more when I asked this question on facebook). Then as I was transferring a batch of kit beer (I still have plenty of bitter - I thought I'd try some nondescript lager, too) into a plastic barrel thing, I realised that I do have another brewing bucket - the much bigger one that I do the beer in. Just because it holds five gallons doesn't mean I can't use it to brew two gallons of wine.

First I did the blackcurrant in the smaller bucket. I looked up various recipes online and they generally agreed on three pounds of fruit per gallon (one recipe said just two) and an equal quantity of sugar. That sounds like a lot of both to me, but with such a consensus I should really just accept it.

I picked the fruit from the second currant bush and got far less than I did from the first one. I guess being stuck behind the gas tank isn't the best situation for it. I also took any more fruit I could find on the first bush - there was still some to take, and there's more ripening even now.

The total weight of fruit was 2 lb 11 oz, which was a bit disappointing, but still looking like a gallon's worth. I added one bag of sugar (one kilo, or 2.2 lb) as I'm a bit stingy, and even this is more than I've used so far. I poured boiling water over the fruit but didn't cook it as I'm a little concerned about pectin in this wine. After my bad experience with the marmalade wine, I looked up causes of methanol in home-brew.

I learnt that it's generally the heavier alcohols that lead to hangovers (methanol is the lightest) but I still think I had methanol, especially as heating seemed to solve the problem. Apparently methanol can be produced when there's pectin and slow fermentation, both of which were the case for the dodgy bottle of marmalade wine. Blackcurrants are also high in pectin, as well as tannin, which tends to slow the fermentation, so I'm a bit concerned about this one. I don't know whether cooking increases the release of pectin, but it seems likely, so I didn't do it. I'm not sure how I'll tell whether there's methanol in the finished drink except by drinking it and seeing if it gives me a headache!

I topped up the water with cold, so as not to kill the yeast, to about a gallon. I'd kept the yeast from the lager and added a bit of that. I reckon the blackcurrant flavour should be enough to overwhelm any beeriness.

The next day (Saturday), I moved onto the elderflower wine. I'd spotted a tree by the side of a very minor road, about twenty minutes walk from the house, that looked a lot easier to harvest.


Elder flowers requiring neither ladders nor long-handled tools to harvest

I tried to avoid gathering too much wildlife as I went...


A little research suggests that this fellow is a leptura maculatus

... and collected a good basketful of flowers.


Basket of elderflowers with gratuitous buttercups

Because the last batch tasted so good, I added a few strawberries and roses, whilst strenuously defending the basket from an inquisitive mog.


Pebble really wanted to get into that basket

With such a good suppy of flowers, and a bigger bucket, why not make twice as much champagne? Another bag of sugar was purchased.

I didn't think beery yeast would be quite such a good idea in this wine, but by this time the blackcurrant wine was frothing nicely...


Blackcurrant wine getting under way

... so I added a couple of spoonfuls of that to the elderflower bucket. Then I was quite taken with the idea of making pink champagne, so I added a few more spoonfuls - maybe ten big tablespoons in total.

I now have two buckets of wine bubbling away. It's noticeable how much more lively the elderflower is than the blackcurrant - I guess that's due to the tannin in the latter. I should get on and move the blackcurrant onto the next stage. MKG over on the 'Ish forum (I think - I've now lost the post) recommends leaving it on the fruit for four days as standard, three for a lighter wine, or five for one that will keep and mature. I started it on Friday, it's now Tuesday... do I have the patience for a maturing wine?

I was going to bottle some of the oak leaf wine and so free up a demijohn, but that's still bubbling nearly a month on. I'll just have to revert to pop bottles and ballons for the blackcurrant.

Sunday 19 June 2011

Ten things about me

Louisa at The Really Good Life has given me an award.


Thanks, Louisa :-)

This one involves telling you ten random things about myself and passing it on to ten some other bloggers. I won't tell you ten random things. I will tell you ten things, but they won't be random (see Thing 1).

I'll pass it on to three blogs who probably won't join in the game because they're not that sort of blog, but you, dear reader, get to share my appreciation of all the lovely pictures. The first is Page Created A Photo a Day - the clue's in the name. The second is Coffee Slut, who does include some words with her photos, but I mainly love this blog for the beautiful pictures. Finally, my blog reader gets clogged up with posts from So give me your hand and let's jump out the window, which is just full of beautiful images, and some words too.

So, ten things about me:
  1. I get annoyed about misuse of the word “random.” I spent much of my working life teaching statistics and I know the definition of “random.” It does not mean, “haphazard,” “slightly odd,” or, as in this case, “carefully chosen.”
  2. I have the worst sense of direction of almost anyone I know, but if you want to manoeuvre a large wardrobe up a twisted flight of stairs, I'm your woman. From this I conclude that spatial awareness is not a unitary ability, contrary to current psychological theories. I've never got round to doing the research to test this hypothesis, though.
  3. I notice and care about things like the shocking transformation from “conclusion” to “hypothesis” in the last point. As I wrote that there was a little voice in my head shouting, “That's wrong! You can't say that!” I wrote it anyway, though, because I think the sentences look better like that.
  4. I am a hoarder, which is probably not news to you. I can't stand throwing things away. Whenever I overcome this and force myself to accept the conventional wisdom that too much clutter is A Bad Thing, I always regret it when I need whatever-it-was just a few weeks after throwing it away.
  5. Pop music is, and always has been, an alien world to me. At my current stage of life, this is not in the least bit troubling, but when I was a teenager it left me shut off from my peers. I lived in fear of the question, “What kind of music do you like?” because I had NO IDEA! I'll stop here before I start reliving the horrors of being a teenager.
  6. I learnt hairdressing at the BBC. In my last job I was occasionally called on to do TV interviews. This was very exciting, but meant that I had to learn about hair and make-up, which I'd successfully avoided until then. I discovered that a blow-dry is not simply a means of drying hair, but the hairdresser spent hours using this method to get some life into my hair. In the Green Room at Shepherds Bush studios, I observed a BBC hairdresser get the same effect more quickly using a “hot brush” - a method I could manage myself. Since then, I have discovered that avoiding shampoo has much the same result.
  7. I was married by twenty and divorced by thirty. I learnt that eternal love is not something you can promise someone. When Ian and I got married, we chose our wedding vows carefully, promising trust, respect and friendship for “as long as love shall last.”
  8. My mother died when I was thirteen. I'll never know what my relationship with her would have been like as an adult, but knowing what her relationship was like with her mother, perhaps that's just as well. I get to remember her as a wonderful person and choose to ignore her faults and weaknesses.
  9. I love folk dancing. One of the best things about living in Cambridgeshire was joining The Round, a folk dance club. As the excitement of our new life is wearing off, I'm starting to miss that. I hope I'll find a group to join in this part of the world.
  10. Another good thing about living in Cambridgeshire was that I got to fulfil a childhood dream of ice-skating outdoors.

Saturday 18 June 2011

Harvesting garlic and blackcurrants

My garlic all fell over.


I'm sure garlic leaves shouldn't be horizontal like that

I took this as a bad sign and thought I'd better get it out of the ground ASAP. It could have been worse. A few of the bulbs were kind of squishy in the outer layer, but I was able to remove that and reveal a firm bulb of garlic in the centre. Most of them weren't affected, but none were very big and they don't seem to have done much splitting into cloves, either.


I thought I'd taken a decent picture of these, but I can't find it so you'll have to make do with this terrible one instead.

That's disappointing, but not catastrophic.

The blackurrants, on the other hand...


Here's one of the blackcurrant bushes, between the peas and the potatoes. The other one is behind the gas tank, to the left.

... are doing very well. No need to dig these up to see the crop!


Lovely, plump, juicy blackcurrants

Of course, the birds can see these too (or could if they could get under the leaves), so I had to get in quick and harvest them before someone else did. Picking most of the fruit on the first bush yielded two colander-fulls, or 5 lb 6 oz.

Lots of blackcurrants

Having picked all this fruit, I then had to decide what to do with it. The options that came to mind were jam, cordial and wine - all good options. Whatever I used it for, I'd have to start by stewing the fruit, so I sat down to top and tail the currants, removing both stalk and remains of flower as my mother had taught me to many years ago. I also removed a few spiders, caterpillars, snails and snail poo while I was at it.

As I picked over the fruit I decided that, after my success with rhubarb cordial I'd make another cordial from the blackcurrants. The picking over took a long time. I tried to focus on the process (and it's not an unpleasant task) rather than the outcome, but competing with this was my desire to get the fruit stewed and before bed time, so I could hang it to drip overnight.

I started to wonder, if I was only using the juice anyway, why I needed to remove the flowers. I can understand that maybe the stalks (and snail poo) might impart an unpleasant flavour, but surely not the flowers? After a bit I stopped removing the flowers, which speeded things up a bit, then the checks got more cursory, until by the end it was pretty much, Is this a beetle or a currant?*

When I'd finally picked over all the currants, I put them to stew with a little water, and they turned to slush remarkably quickly. I barely had time to scald the muslin that I was using to hang them in. Then it was the same procedure as with the rhubarb, with much the same difficulty wrapping the muslin round the fruit. At one point a corner broke free and fired scalding hot blackcurrant juice at my belly. Not good.

I did manage to get it strung up in the end, and was rewarded the next morning with a bowl of beautiful dark blackcurrant juice. I didn't bother heating it to dissolve the sugar this time, just stirred some in. There must be quite a lot of sugar in the fruit already, because it didn't take much extra to make it taste nice. Mind you, my bases for comparison are oak leaves and rhubarb, so a lot is distinctly relative here.

I'd been able to use the leftover stewed fruit after making rhubarb cordial and wondered if I could do the same with the blackcurrants. A little searching found these recipes for cordial (I didn't add as much of either water or sugar as that recipe) and fruit cheese, which said, You can use the fruit pulp left over from the previous recipe to make this one. Bingo!

I've had quince cheese before - it's essentially a jelly that's solid enough to slice with a knife, and rather nice with actual cheese. I don't suppose the blackcurrant kind will go with cheese, but could be nice anyway. I duly pushed the pulp through a seive (hard work), added sugar (I think I guessed the quantity - I don't remember weighing the pulp) and boiled it up. The recipe suggested adding a little cinnamon, but I thought I'd go for a fairly spicy version. Someone had mentioned cloves in blackcurrant cordial, so I added those (ground, not whole) as well as cinnamon and a little ginger.

I wasn't sure what would be suitable to use as a mould, and in the end settled on a cake tin lined with oiled greaseproof paper.


Moulding blackcurrant cheese

The smell at this stage was intensely blackcurranty, but also verging on the medicinal. Perhaps I overdid the ground cloves a bit. Oops - I may have accidentally made cough sweets instead. Oh well, I'm sure come winter time, a chunk of that in a mug of hot water will be just the thing.

---

*I still removed caterpillars if I saw them. And poo. Actually, the beetle thing was a lie. I was still checking carefully right to the end, but quickly.

Try something new challenge: Making socks from an old cardigan

Susie has posted a challenge, for herself and whoever feels like joining in, to try something new. This may sound like a pointless challenge for me, as I'm trying new things all the time, but the idea is to pick something that's not, I'm really looking forward to trying that, but, I'd love to try that, but...

I promised enthusiastically to try something for this challenge, and came up with a list of projects including making a solar panel and converting my sewing machine to run on treadle-power, both of which I've been meaning to do for ages but not getting round to because they sound difficult, so exactly what this challenge is about. However, time ticked past and I didn't get round to the first stages of either of these, so I turned to my fall-back project of making socks.

I understand that socks are very difficult to knit...


I won't pinch the entire cartoon, but click the picture to see the rest of it on Gingerbread Lady's blog. It's very funny.

... but even knowing that, I had to add another element to challenge. I specifically wanted to knit socks out of wool salvaged from from an old cardigan. Whatever Susie might think, I'm not convinced it's worth spending £15 on yarn for a pair of socks, especially when I don't even know whether I'll succeed in making them. So... old jumper desctruction was in order.

I identified a sacrificial cardigan...


Rather frumpy cardigan. I quite like it, but Ian hates it, so I never wear it. Pebble doesn't think much of it, either

... and set to work with the quick-unpick dismantling the seams. When I eventually got a corner unfolded I made a discovery.


Cut edges of fabric

It turns out that this isn't a knitted garment as such, but a garment made out of knitted fabric. I should have guessed from the way it was stitched together, I suppose. That means that the yarn will be cut at each edge of piece, so I won't get a continuous thread. I unravelled a few pieces anyway, as I might as well, having got so far.


Pieces of cardigan-yarn. Not only short, but very crinkly

I had a go at knooking with one piece, and it was a @*&! not very nice thing to work with.


Attempting to knook with very crinkly yarn

That means I've ruined a perfectly good frumpy, old, slightly tea-stained cardigan for nothing. It also means that I haven't even got to the starting line in the challenge of making socks. I'm not sure I want to learn this skill enough to fork out on expensive yarn, so unless I come across some unexpectedly cheap sock yarn, I'll be leaving this challenge unmet.

Friday 17 June 2011

Ice cream

I'd spotted in a recipe book that the best way of using up breadcrumbs is brown bread ice cream. This sounds very odd, but intriguing, and the other day I happened to have a lot of brown breadcrumbs needing a home...

The first thing I did was to prepare the breadcrumbs. This involved mixing them with an equal quantity of sugar, spreading on a baking tray and baking until the sugar has melted and the crumbs have caramelised. I didn't have the demerara sugar called for in the recipe, but never one to let a lack of ingredients put me off, I used a mixture of white granulated and soft dark brown sugars. Spreading it on a baking tray was a bit of a challenge - it ended up about half a centimetre thick, and in serious danger of falling off the edge whenever I stirred it, which I did because I didn't want the top to burn while the rest stayed uncooked. A fair bit ended up on the floor. What didn't go on the floor went in a pot for use the next day, as I had yet to obtain the cream.

Rather more than a pint of double cream was duly procured (metric measures - the big pots are now 600 ml) and most of it whipped, eggs were separated and beaten, and the whole lot combined.


Ingredients for brown bread ice cream

The recipe said it would make a pint of ice cream, but the ingredients were about a pint and looking at the amount of air in that recipe, I reckoned it would make a lot more than that. Sure enough, it nearly filled a one-litre tub.

I kept back some of the beaten egg white because I had an idea for another recipe. When I made rhubarb fool I thought it might be nice frozen, so I decided to try some as ice cream. I'd frozen the stewed rhubarb, so had to take some out of the freezer for this. It didn't seem very efficient thawing it out only to refreeze it, so I let it soften just enough for me to scrape it into mush with a knife and fork. I then mixed in sugar, the egg white, and enough cream to make it look the right sort of colour. It actually ended up looking pinkish, rather than sludge coloured like the fool.

I stirred both of them once when they were half frozen, then tested a scoop of each later in the day. I was surprised that the brown bread one wasn't fully frozen, as I'd started it earlier, but it was in a bigger tub.


Rhubarb and brown bread ice creams. Can you tell which is which?

Ian hasn't tried the rhubarb yet, and says the brown bread one tastes a bit like cookie dough ice cream, but he doesn't like the texture. The crumbs aren't as hard as toast crumbs, but they're certainly not soft. Oh well, all the more for me, then!

Wednesday 15 June 2011

Elderflower champagne

It's now a year since my first experiments with homebrew and it feels that things have come full circle (for some reason, harvesting this year's dandelions didn't have the same impact on me). As soon as our elder tree started flowering, a couple of weeks ago, I got very excited about picking some flowers to start the next batch of elderflower champagne. There was just one problem...


Elder flowers playing hard to get

Actually, there were two problems. Not only were the flowers a long way from the ground, but the ground had a good covering of nettles and brambles. The second problem was tractable, though, and after a lot of careful work with the secateurs, I'd cleared a space around the tree. This didn't get me much closer to the flowers, though - more tools were needed. With the aid of the branch loppers (six foot long secateurs - effective, but difficult) and a step ladder (not to be recommended) I managed to pick a few heads of flowers.

I didn't really have as much as I would have liked, though, so I supplemented them with a few roses and three very small, unripe strawberries. The resulting mix was very pretty in the wine bucket.


Pretty flowers for making champagne

After last year's explosion, I've played safe and put it in plastic bottles, which are far less attractive than glass wine bottles. They're also bigger. I'm not sure if this is a good thing or a bad thing. One advantage of plastic is that you can judge whether the drink's getting fizzy by squeezing the bottle. I did, and the first one - the last one filled, that is, with less liquid and more yeast because it has the dregs from the bottom of the bucket - was getting very tight, so I opened it for testing.


First glass of elderflower champagne

It was most delicious! I then got carried away and opened a second bottle, which was still very sweet, but tasty nonetheless. I think I'm going to have to find a way of harvesting more flowers to make a second batch of this.