About this blog

My photo
Wales, United Kingdom
Documenting one couple's attempts to live a more self-sufficient life.
Showing posts with label Experiment. Show all posts

Saturday, 7 November 2015

How much CO2 does fermenting wine give off?

We have a couple of demijohns of elderberry wine bubbling away noisily in the sitting room. They were in the kitchen, but that's next to the bedroom and the bubbling was keeping us awake, so I moved them. As we sat down for the evening the other day, Ian asked me what gas it is that's bubbling out so vigorously. Carbon dioxide. Hmm. That does seem to be rather a lot of carbon dioxide. I wonder whether it's enough to be a health risk?

My attempts to find the answer to this question via Google led to one Daily Mail article about a couple of Frenchmen dying of suffocation while treading grapes, but not much else. I decided to measure it for myself, so here is what I did:

  1. Find a piece of plastic tubing and bend it into an S shape using hot water to soften. This was not easy because it kept buckling.
  2. Take a graduated jam jar (I marked lines at 100ml intervals) and completely fill with water, then invert in a bowl of water. This was not easy because the jar was taller than the bowl, so the whole lot had to be submerged in a bigger bowl to get all the bubbles out.
  3. Faff about for ages trying to raise the jar off the bottom of the bowl so that it wouldn't squash the plastic tube, before realizing that it wouldn't squash it anyway.
  4. Recognize that the jar wouldn't need to be horizontal all the time, just when the measurement was taken, and I could hold it for that bit. Considered a spirit level, then decided that would be going a bit far (!)
  5. Bring a small table (for the bowl/jar), blu tac (for sealing), and mobile phone (for timing) through to the sitting room.
  6. Assemble the apparatus, connecting the plastic tube to the air lock with blu tac, and start timing.
  7. Notice that the tube has filled with water again, reseal the blu tac, and hope not too much gas was lost.

The tube takes the CO2 into the water-filled jar, hopefully catching it all

Here's a closer view of the jar-in-a-bowl assembly. If you look closely, you can see a bubble rising between the two marks on the jar. Please do look closely; it took me several attempts to get this picture.


Look, a bubble! More to the point, lots of gas collecting at the top of the jar.

The idea was to see how long it would take to produce 100ml of CO2 and then work out volume (or weight) produced per day, and compare that with what a human breathes out, or maybe a cat. I did wonder whether the extra pressure of the water might slow down the bubbles, but they were still coming out at much the same rate as the other demijohn, so that was OK. Holding the jar horizontal was a bit of a challenge, as everything else in the room, and particularly the cupboard behind, is on the skew.

And the result was... about 20 min for 100 ml CO2. It took 22 min for the first 100 ml, then the second 100 ml, which I expected to be slower due to the extra weight of water, was actually quicker and I missed it. At 43 min, there was already more than 200 ml gas in the jar. This may be due to a bit escaping when the seal broke at the beginning, so approx. 20 min will have to do. That's 300 ml per hour, or 7.2 litres per day.

I found a few different figures for the amount of CO2 breathed out by a human, of which this page includes the lowest estimate: An inactive person (as they would be, in a sitting room) breathes out 350 litres of CO2 per day. That's 48.6... almost 50 times as much as my gallon of fermenting wine.

I couldn't find any information on other mammals, still less on cats, specifically.* If amount of CO2 exhaled is proportional to body weight (which it probably isn't) and cats are about one twentieth the weight of an adult human, one cat would be breathing out about two and a half times as much CO2 as a gallon of wine. Even with two demijohns, George is probably still breathing out more CO2 than the wine is. Daily Mail notwithstanding, I'll stop worrying about suffocation from fermenting wine.


---

* Though apparently there is a myth that cats breathe in carbon dioxide, and this is linked to the myth that they smother babies. Surely if they're breathing in the CO2 that would be a good thing for the baby? Not only does that myth take no account of biology, it's not even internally coherent.

Monday, 25 August 2014

Wine yeast experiment

On the 'ish forum, we were discussing different kinds of yeast that can be used in brewing. Last year I used lager yeast (from a beer kit) throughout the year, keeping a bit from the bottom of the bucket after each brew and using it to start the next one. This year, not having a beer kit to hand, I looked at sachets of brewing yeast, decided that a pound for a little sachet of yeast was a bit excessive, and bought bread yeast instead, which is much cheaper. I think at least one person in that forum conversation was a bit horrified by my inappropriate yeast!

So far, I've had excellent heather ale and elderflower champagne from that yeast, but I none of the wine is ready yet, so I don't know how that will turn out. Since wine yeast is bred to tolerate higher alcohol concentrations, the bread yeast is likely to give up the ghost at about 12% abv, possibly before all the sugar's fermented. This is fine, as I'm not aiming for strong wine, but there is some concern that as it struggles in the toxic, alcoholic environment, it might produce off flavours.

In the interests of science, and taking advantage of the abundance of blackberries, I decided to make a second batch of blackberry wine, this time investing in a sachet of wine yeast. For my record, here are the details:-

  • Two 2 gallon batches, each made with 8 lb blackberries and 2 kg sugar.
  • The first batch uses bread yeast, previously used for mugwort ale and washed in sugar and water in between. The second batch uses half a 5g sachet of Young's red wine yeast.
  • For the first batch, berries were picked on Sun 17th and Mon 18th Aug (4 lb each day); fermentation of 1 gallon started on Sun.
  • For the second batch, berries were all picked on Tue 19th Aug and fermentation started that day.
  • The first batch went into demijohns on Sat 23rd Aug and the second batch on Mon 25th Aug (late in both cases)
I now have four demijohns of blackberry wine bubbling away.


Blackberry wine, or at least potential blackberry wine

By chance, I used two different types of airlock for the two batches, so I can use that to identify them. The ones on the left, with the old, one piece airlocks, are the first batch, with bread yeast. The ones on the right, with the new, two piece airlocks, have wine yeast. I'd only just filled the second batch, so you wouldn't expect it to be frothy yet, but in the buckets, it did seem that the bread yeast was a lot more lively. I suppose it's bred to produce bubbles, so maybe that's not terribly surprising.

These will stay in the (relatively) warm kitchen for a few days before I take them down to the cooler store room. I might even take the first batch down first, to keep everything as similar as possible. Then we'll just have to wait and see what happens. I will conduct blind taste tests, and I'll let you know the results in a few months.

Friday, 29 November 2013

Foraged Food Friday: Sloes

Like blackberries, sloes are often picked by people who don't otherwise scour the hedgerows in search of forageable goodies.


Sloes, fruit of the blackthorn tree (Prunus spinosa)

When sloes are someone's only foraged food, they tend to get made into sloe gin. I have a bit of a problem with the concept of sloe gin, in that if I'm buying alcohol to start with, why not just drink it as it is? For my foraged and home-made drinks, I'd rather use sugar and let yeast make the alcohol for me. The sugar still has to be bought, but it's closer to self-sufficient booze than buying booze to start with, I feel. With this in mind, I experimented with sloe and elderberry wine a couple of years ago. This was hugely successful, and I have a batch on the go this year, which I'll file under elderberries and tell you about when it's ready.

The usual advice on picking sloes is to wait until after the first frost. This advice is given for various other things, including parsnips, and I'd heard that it's just an indicator of season, and when they're likely to be ripe. In other words, the frost itself has no effect on the fruit. I had the opportunity to test this theory when I was visiting my sister. I'd picked a few sloes near her house, then a couple of days later we had the first frost of the year, so I went back and picked a few more (not from exactly the same place, but somewhere a little closer, as we were leaving that morning and I didn't have very much time), so I had two samples of sloes to take home with me, picked just a couple of days apart, but before and after the first frost. Once home, I split the earlier sample and put half of it in the freezer overnight, which some people do to mimic the effect of frost.

I did my best to set up a blind taste test. I put my samples in three ramekin dishes and stuck labels to the bottom of the dishes. Over the course of a few hours, I then shuffled the dishes every time I went past them, so that I wouldn't remember which one was which. Unfortunately, it was quite easy to tell them apart. The sloes in the second sample were slightly larger than those in the first, and those that had been in the freezer were considerably messier than those that hadn't. Still, I did my best to ignore these features when I tasted them.


Three samples of sloes: Pre-frost, freezer, and post-frost

The first one I tried had the familiar astringency - you know, the kind that instantly removes all moisture from your mouth and turns your face inside out. Yep, definitely a sloe. The second one... Oh! Where has all the flavour gone? On further testing, there was some flavour - mostly of plums - but no face-turning-inside-out astringency. The third one was somewhere between the two - sharp, but quite palatable. These differences were huge - I felt that my precautions to disguise the samples were entirely unnecessary, but then I didn't know there'd be big differences before I did the test. On looking at the labels, sure enough, the first sample was pre-frost, the second freezer, and the third post-frost. Conclusion: Freezing sloes does indeed reduce the astringency and more freezing (overnight in the freezer) reduces it more.

That said, milder tasting sloes are not necessarily a good thing. Especially in wine making, I value that tannin and balance it with sugar. I'm glad I picked mine early. The sloes I've been eating this week were picked even earlier...

I'd read on the self sufficientish website that unripe sloes can be used as an alternative to olives, if soaked in brine followed by vinegar. Back in early September I spotted a great abundance of unripe sloes growing a long way from where I live, making it impractical to go back for them later in the year. I remembered the olive-substitution, and thought I might as well pick a few and give it a try, seeing as there were so many there. At about the same time, I was starting to experiment with lacto-fermentation and noted the similarity of the salt then acid sequence. How about trying lacto-fermented sloes?

I started with a fairly strong brine - about a tablespoonful of salt in a smallish jarful of sloes in water.


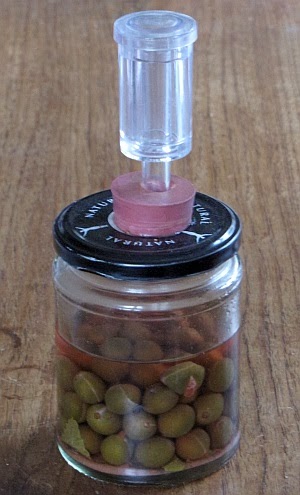
Jar of fermenting sloes. It was fuller to start with - I've eaten some.

After a couple of weeks, I diluted the brine a bit (can't remember whether I took some out or just added water) and added a blackcurrant leaf to introduce the right kind of bacteria, then put an airlock on the jar, as in the photo above. I'm not sure I needed to bother with the airlock, as it fermented so slowly. But... it did ferment. Every day or so I looked at it and saw tiny little bubbles making their way to the top of the jar. I usually gave it a little shake to help them on their way.

A few weeks ago I tasted one of the sloes... Ewww! Way too salty! I removed about half of the liquid (using it later as seasoning in a stew) and topped up with water (tap water left to stand for a bit to let chlorine evaporate. I've come to accept that too much chlorine is not going to be good for lactobacilli. I've no idea whether the chlorine in tap water is too much but it's easy enough to let it evaporate.) After a couple more weeks of slow fermentation I tried again, and... these are really good! They don't taste exactly like olives, of course, but they're similar enough to be an alternative. If I really wanted some olives and only had these in the house, I'd be happy to eat these instead.

Also harvesting this week:
Leeks
Sorrel

Also eating:
Potatoes
Tomatoes
Laver
Blusher mushrooms
Dandelion flower tea
Rowan jelly
Knotweed chutney
Chestnut biscuits (Previous post edited to correct the recipe for these.)
Pickled samphire
Courgette and mint soup (from freezer) with added fresh sorrel

Also drinking:
Hopped ale
Blackcurrant wine
Dandelion and honeysuckle ale

Foraged food challenge summary page here.

Sunday, 17 November 2013

Lacto-fermentation: An upgrade and an experiment

In my last post about lacto-fermentation, I mentioned an improved method for keeping carbon dioxide on top of the vegetables. Here's the blog post where I read about it. Just like wine fermentation, an airlock is used to allow carbon dioxide to escape (pushing the air out ahead of it) without letting oxygen in.

I bought a couple more airlocks (I have a dozen or so, but they're all in use) for 50p each from the health food shop where I buy my home brew stuff then went to the hardware shop in search of rubber seals. I wandered around the shop looking at various bits of rubber that weren't quite what I wanted, but might do, then approached the lady at the counter. I presented an airlock and explained, I'm looking for something that'll seal that into a jar lid. A rubber grommet would be ideal... I don't suppose you have anything suitable? She reached behind her and took a small box marked Grommets from the shelf, and tried several until she was sure she had the right size, then sold them to me for 15p each. I bought four.

With a bit of trial and error, I found the best way of gripping a jar lid for drilling. Trying to grip the edge doesn't work very well, as the edge slips easily if gripped loosely and the lid is flimsy and bends if you grip it more tightly. However, a lid is designed to grip to something - the jar itself - and the jar can be gripped more easily.


I drilled a pilot hole first, then used the flat drill bit to make the correct sized hole.

It wasn't easy getting the grommets into the holes as I'd drilled the holes to be a very tight fit, and also smeared Vaseline into the groove to stop the cut lid going rusty. I did manage to get them in without too much swearing, though, and then the air lock fitted in quite easily.

My next two vegetables for lacto-fermentation - samphire and sloes, of which more in a future post - both had a much higher salt content than the courgettes and beans I'd started with. They both showed signs of fermentation but very, very slowly. I suspected that the bacteria were not thriving in this very salty environment. I decided that the next time I had a suitable opportunity, I'd compare different levels of salt to see whether it made a difference to the speed of fermentation.

The opportunity presented itself when a neighbour gave me a couple of marrows (the same neighbour who'd given me courgettes earlier in the year - he now has a great many marrows). I modified the lids of a couple of large jars that a friend had given me (thanks, Steve!) to make two similar fermenting vessels.

To keep the two jars as similar as possible apart from the salt content, I filled them at the same time: From the heap of marrow pieces, one handful in this jar, one handful in that jar. After each layer of marrow, I sprinkled in salt: One pinch per layer in one jar, three pinches per layer in the other jar. This is still quite a lot less salty than the samphire and sloes, but I don't want my marrows that salty. Comparing three pinches with one pinch should give a clear difference in salt content, even allowing for variations in pinch size (which shouldn't be systematic, in any case). I pressed down the veg as I went and plenty of water was drawn out, so I didn't need to add any to either jar. Instead of blackcurrant leaves, I inoculated the jars with liquid from the fermented courgettes to get the right bacteria in there*.


Two jars of marrow pieces, matched (reasonably) carefully on everything except salt content

I had imagined these air locks bubbling as they do with wine, so that I'd be able to count bubbles per minute or some equivalent. Unfortunately it didn't quite happen like that. The bubbles certainly formed in the jars but with the jars so packed full of marrow, they couldn't rise to the top so they just stayed there. Eventually, of course, enough pressure built up that something had to give. What gave was not gas but liquid, which got a little messy.


More salt is currently in the lead

At this stage the 'three pinch' jar was looking distinctly more active than the lower salt jar. I started to worry that I hadn't matched them adequately and had overfilled the 'three pinch' jar, which was why it was overflowing. Although I was reluctant to break the air locks, I opened both jars to push the veg down. There was no sign that I'd overfilled the higher salt jar; in fact, having overflowed, it now had less liquid than the other one. I spooned a little liquid out of the 'one pinch' jar to compensate, and resealed the lids.

After that nothing much happened for a few days because the temperature's quite a bit cooler than it was in the summer. I put both jars on top of the cooker for a bit to encourage some action and again, it was the 'three pinch' jar that lifted its cap. Things continued in this vein for a couple more weeks, until I decided that it must be time to open the jars and taste the results of my experiment. At this point another difference became apparent.


More salt still winning

I had noticed some mould forming at the top of the jars (or is it yeast? Either way, it doesn't smell very nice), and it's not very surprising that there's more in the lower-salt jar. I scooped out all of the mouldy marrow pieces (rather more from the lower-salt jar) and tasted the fermented marrow. Both jars tasted OK - the only difference was that the more-salt one was... saltier. A bit too salty for my taste, actually, so I'm glad I didn't try a higher concentration of salt for the experiment - I would have ended up with a whole jar full that I didn't want to eat. I couldn't detect any difference in acidity, which surprised me, given the apparent differences in fermentation activity, but perhaps I just couldn't tell over the saltiness.

The presence of mould indicates that the upgrade wasn't entirely successful. That space at the top was supposed to fill up with carbon dioxide so the mould wouldn't grow there (unless of course it's yeast, which can grow anaerobically, in which case pushing out the oxygen wouldn't help). The fact that the bubbles were getting stuck was a sign that things weren't going entirely to plan. I wonder if I need a little more liquid per vegetable solid, or maybe I just need to cut the pieces smaller so it's easier for the bubbles to find a way through. Either way, I don't want a stack of solid pieces that trap the bubbles when they form. Probably.

Conclusion: Three pinches of salt per layer appear to provide a better environment for fermentation than one pinch per layer, though there was no obvious difference in flavour apart from the salt itself, which favoured the less-salt jar.

You'll notice that I don't generalise to 'more salt is better for fermentation' which you might think is a cop-out just because the results didn't go the way I predicted, but there is a reason: From some reading I did at the same time as running this experiment, I learnt that whilst salt is generally bad for bacteria (which is why salting is an effective method of preserving food) lacto-bacili are more resistant to salt than most. The reason for adding salt here is to kill off the bacteria that we don't want, leaving no competition for the ones we do want. If we add too much salt we'll kill off our friendly bacteria as well.

There is an optimum level of salt and it appears to be closer to three pinches per layer than one pinch per layer of marrow. It's still possible that my samphire and sloes had too much salt, but this experiment didn't really address that question because I didn't include such high levels of salt. You could legitimately say that this is a weakness of my experimental design.

---

* Some people believe that this method gives an inferior result, as what you really want is the progression of microbes that occur naturally, to give the full complexity of flavour, not just the one that comes in at the end and makes the acid. Others say it's hard to tell the difference. I don't think I'm that fussy, at least not at this stage.

Thursday, 15 November 2012

Are dishwashers more efficient than my hand washing?

We often hear that dishwashers, counterintuitively, use less energy and water than washing the dishes by hand. No matter how many times I'm told this, I find it hard to believe, so when I finished a load of washing up today, I took a few measurements so I could compare my washing up with those that have been reported. Firstly, I bailed the water out of the bowl with a measuring jug to see how much there was, then added a bit to allow for water that had sloshed over the side. I hadn't rinsed under a running tap without catching that water in the bowl, so I didn't have to add any for that. The total amount of water was about 5.5 litres.

I know, because I've measured it before, that water that I find hot to the touch is 43°C. It's pretty chilly out at the moment, so let's say the incoming main is 5°C and round it up to 45° for washing-up temperature (all approximations here err on the side of increasing energy usage in my test). Since water is very reliable in how much energy it requires to heat up, I can calculate that this would take 256 Watt hours of energy to heat, or just over a quarter of a kWh.

I then needed to know how much washing up I'd achieved. One load for me is until either the draining rack is full or the water is too dirty to wash any more. This tends to occur at roughly the same time, though I do more rinsing under the tap towards the end of the load, as the water gets dirtier. I noted down what I'd washed:-
  • 4 glasses
  • 2 mugs
  • 1 tin can and 1 jam jar
  • 1 measuring jug (not the one I used for bailing)
  • 5 plates
  • 3 bowls and a basin
  • pestle and mortar
  • 2 saucepans
  • 2 mixing bowls
  • 2 plastic trays that fruit came in, for recycling
  • 15 items of cutlery

One load of washing up

See those pans on the windowsill behind? I used the dirty water from this load to soak them so they'll be easier to wash when I get round to them. I do that.

Having noted down the details of my own washing up, I then needed to find appropriate figures for comparison with dishwashers. The fact that dishwashers are more efficient seems to come mainly from a study conducted at Bonn University, comparing many people actually washing up with dishwashers doing the same work. When I looked for this study I was pleased to find that they've done a follow-up with smaller loads (the original study was a full twelve place settings in one go): Our intention was to simulate the dishwashing situation in a two-person household, excellent! ... in which two place settings are used and cleaned three times per day ah, I'm not sure I wash up that frequently, ... and four additional items are soiled heavily in the food preparation processes and are washed separately. Do you wash up the pans separately? Still, we should be getting close to comparable figures.

I looked at the details of the study. One place setting consists of:-
  • a soup plate
  • a dinner plate
  • a dessert dish
  • a cup
  • a saucer
  • a serving dish
  • a glass
  • a fork, a knife, a soup spoon, a teaspoon, a dessert spoon

So that would be a three course meal with coffee to follow, three times a day?? OK, never mind how unrealistic this is. I now have some details to work with. How does my load of washing up map onto this test load?

two place settings plus pansmy washing up
2 soup plates; 2 dessert dishes3 bowls and a basin
2 dinner plates; 2 saucers; 2 serving dishes 5 plates
2 cups2 mugs
2 glasses4 glasses
10 items of cutlery15 items of cutlery
4 pans/casserole dishes2 pans; 2 mixing bowls
not includedpestle and mortar
not includedmeasuring jug
not includedtin can; jam jar; plastic trays

It looks like my load of washing up was slightly more than one of their two-place-setting loads plus their food preparation load. Let's say they're roughly the same - how do the figures compare with their hand washers?
The water and energy measurements show a very wide distribution of consumption values, ranging from four to 90 l and from 0.03 kWh up to 2.6 kWh for washing a pair of place settings. Washing four heavily soiled cooking items required slightly more energy and water than two place settings.
I used 5.5 l and 0.26 kWh for a pair of place settings plus four cooking items. For water consumption I am off their scale, and I'm way down there for energy consumption too (apparently someone was happy to wash up in cold water).

How about the machines? We need to take account of the fact that you'd put more in a machine than my one load done by hand. I estimate that you'd get two to three times as much in a dishwasher, and their test used six place settings (three times as many as one of their hand-wash loads) plus the pots and pans. I think multiplying my usage by 2.5 gives a fair basis for comparison, so that's about 14 litres and 0.64 kWh. Their machines used 83 litres. With regard to energy consumption (Fig. 8), the tendencies are similar, but the difference between manual and automatic dishwashing is not as pronounced. They don't even report the figures, but examination of their Figure 8 shows almost identical energy consumption for the 6 place setting plus pots and pans; approx. 1.8 kWh.

As I'd suspected, the current emphasis on low water consumption serves to distract from high power usage. When compared with my own washing up, as best I can, I am far more efficient than a machine in both water and energy consumption.

I finish by noting a sentence from their acknowledgements section: Thanks are due to our four European manufacturers of dishwashing machines (Bosch und Siemens Hausgeräte, Electrolux, Merloni Elettrodomestici and Arcelik) for supporting this study.

Monday, 18 June 2012

Copper wire as slug deterrent: a test

Amongst many things that are supposed to deter slugs, a strand of copper wire allegedly gives them an electric shock when they try to cross it. I was chatting to Dad yesterday and he mentioned this, suggesting that two strands might be necessary to make a circuit. Slugs are currently munching their way through our strawberries and the pots are quite hard to defend by other methods, so I thought this would be worth a go.

I took a bundle of electrical wire from the old washing machine and stripped a length, which turned out to be stranded. That should be ideal.


I took the strands out to the patio and started stringing them round the strawberry pots when I thought that it might be an idea to test the theory first. It shouldn't be too difficult - I'd just need to find a slug.

It took me about ten seconds to find this big boy hiding in some leaves...


... but he was sleepy and couldn't be persuaded to go anywhere. It didn't take much longer to find this little guy...


... who was much more sprightly. I put him on the patio in a circle of copper wire (several strands) and waited.

The first encounter with the wire was encouraging. When his antenna touched it, he withdrew and turned away.


After a couple of attempts, though, he braced himself and slid straight across.


Test result: Copper wire completely ineffective as a slug deterrent, at least against this slug.

Monday, 6 February 2012

Water-only hair washing, one year on

It's been over a year since I last used shampoo on my hair. I won't say since I stopped washing it, because I still do wash it, but with plain water only. I did try not washing at all (sebum only) but didn't get on well with it. On the other hand, I'm very happy with water-only washing; it's not just stubbornness that's made me stick with it for over a year.

I was a bit puzzled in early October to see a tuft of short hair growing from the crown of my head.


Tufty

I hadn't cut it, I didn't think I'd lost any hair there, so why the tuft? I didn't worry about it too much until a couple of weeks later, when Ian said, Why have you got a bald patch on top of your head? A bald patch?! He was right, too...


Baldy

Although this was quite alarming, I wasn't overly worried as the hair was obviously growing back - the skin wasn't smooth - and it was only a small patch. On the other hand, if that spread all over my head...

I monitored the situation for a week or so, as growth shows up quickly in very short hair. It shouldn't be many days before the bald patch was hidden again, and indeed that's what happened... but then it was back. At this point I started to worry. If the hair keeps falling out then I have a problem. I did a bit of online research, and learnt that patchy hair loss is not that uncommon in women, and has all sorts of causes. It can just happen and then get better again. That was reassuring, but not entirely helpful.

After a bit more reading and thinking, I came to the conclusion that the most likely cause was a bad habit I'd developed - scratching. From reading the Long Hair Community forum (whose abbreviation I can't see without thinking Large Hadron Collider) I'd got it into my head that scritching is good for hair, and this developed into a bad habit. With willpower backed by the fear of going bald, I managed to stop... well, mostly stop, and I'm glad to say my hair is growing back happily now. I may be tufty for a while yet, though.

My current routine is to wash my hair in hot water about twice a week. This shifts some of the sebum, which I find is now a waxy substance, rather than oily, and softens what it doesn't shift. Once the hair is dry (to avoid breaking wet, fragile hair), ideally within a few hours of washing, I brush thoroughly with a natural bristle brush. Because the brush is dense and my hair is at this point covered in a soft wax, this is very hard work and can make my neck muscles ache. As well as spreading the sebum along the length of the hair, brushing removes quite a lot of it, which then needs combing out of the brush afterwards. Apart from that, I just use my old plastic brush every morning, as I used to. Sometimes I don't get round to using the natural brush after showering, sometimes I use it more often.

So how is my hair? Apart from the slight stickiness after showering (which isn't evident just by looking at it), it looks pretty good. It's at its best the next day, looking good and feeling soft and silky. It also has a lot more life than it ever used to. About eighteen months ago, when a hairdresser offered to put a bit of body into my hair by blowdrying, my response was, Good luck with that. Now I have that naturally. I love the way it bounces back when I run the brush through it. I think it's still improving, too, very gradually.

Oh, you want a photo? Oh, OK then!


Hair that hasn't seen shampoo for over a year