About this blog

My photo
Wales, United Kingdom
Documenting one couple's attempts to live a more self-sufficient life.

Wednesday, 27 February 2013

DIY Heated Propagator

Instructions on seed packets often suggest starting them off on a sunny windowsill or some other such warm place. Now, warm places are in rather short supply round here (bread dough takes ages to rise at this time of year), so I thought it might be worth providing a dedicated heat source for my tomato seeds. More to the point, I had an idea for how to do it.

1. Take one drawer from an old wardrobe.


2. Line with polystyrene then put a heater, from the same old wardrobe (yes, there were heaters in the wardrobes when we moved in. That tells you something about how damp this house gets), in the bottom. I thought about taking it off the board it was attached to, then decided it wasn't worth the effort, so the heater is a bit off centre. The plug socket is a bit unnecessary, but I couldn't be bothered to remove that, either.


3. Add bricks. These are mainly to help support the top, but they'll add thermal mass too, for what it's worth.


4. Cover with a sheet of aluminium that used to go between a gas fire and the fireplace behind (hence the hole).


5. Add seed trays and a couple of sheets of greenhouse glass on top. Just the right size for eight seed trays.


Two types of tomatoes, celery and potatoes.
I'll tell you about the potatoes in another post.

6. I pinched a thermometer from the central heating so I could keep an eye on it.


Starting temperature; it had increased by 5 degrees by bedtime

I spent quite a lot of time with Google, trying to figure out how long to leave the heater on for, and whether I should try to incorporate a time switch. This heater is 60W, the same as a not-particularly-bright old-fashioned light bulb. I saw descriptions of propagators with 8W heating elements, but they only heated one seed tray at a time, so scaling it up, 60W would be about right for 8 trays. I also came across one DIY system that was 150W for 20 trays (I'm assuming all seed trays are the same size), which would also be about right. All these were on all the time, but only for a few days until seeds germinated. The temperature should ideally be in the low 20s (Celsius), so I'll leave it on constantly and check quite frequently to make sure it doesn't get too hot and cook the seeds.

EDIT: It had got to 20°C by morning, so will certainly need turning off for some time during the day, even if the sun doesn't come out.

Monday, 25 February 2013

Sloe biscuits

When I make sloe wine, I leave the fruit in until I'm ready to bottle and drink it, as for sloe gin. This year, I thought it would be a shame to throw out the fruit when I'd finished, but couldn't think of anything to do with it, so I pushed it through a sieve to make sloe pureé, and put in a couple of jars. With the high sugar and alcohol content, I wasn't too worried about it going off.


Sloe pureé

That was before Christmas and I still hadn't thought of a use for it, though as expected, it's kept well. Then I came across this recipe for sloe biscuits. It uses fresh sloes and a dash of sloe gin, but it should adapt easily enough. I even had half a bag of medium oatmeal lurking at the back of the cupboard.

I would have liked to include ground, foraged hazelnuts, but when I cracked the remains of a big heap of nut shells that I gathered over a year ago, it yielded five nuts, of which three were about the size of apple pips. I put a couple of tablespoons of ground almonds in instead. The tweaked recipe ended up looking like this, with ingredients added in the order listed:

  • 100g wholemeal flour
  • 100g white flour
  • 1 teaspoon baking powder
  • 200g medium-fine oatmeal
  • 250g salted butter
  • 2 tablespoons sloe pureé
  • 2 teaspoons syrup from jar of stem ginger
  • 2 tablespoons ground almonds
  • 2 tablespoons sugar

My biscuits took a bit longer to cook than the recipe said, and even longer because I kept opening the oven door to check how they were doing. That might have been because the mixture was a little too wet. Anyway, when they were finally cooked, the finished biscuits were excellent.


Sloe biscuits

You wouldn't know they had sloe and ginger in if I hadn't told you. Even Ian likes them, so don't tell him what's in them, will you?

Friday, 22 February 2013

Foraged Food Friday: Dandelion roots

I know I had dandelions just a couple of weeks ago, but I'm allowed (by myself) to count different parts of the plant as different foods, and it was leaves last time. I was digging over a veg bed yesterday and, unsurprisingly, dug up a number of young dandelion plants as I went. Bearing in mind that the roots are supposed to be edible, I flung them in a heap and took them indoors at the end of the day. It wasn't a very impressive haul...


Pathetic-looking young dandelions

I've heard about dandelion root coffee before, but never bothered to try it because it sounds like a lot of faff, and besides, I'm not much of a coffee drinker. However, since I'd already dug the plants up anyway, I decided to give it a go for the sake of this challenge. I found an interesting website that gives a very easy recipe for making the drink. It also includes a warning that the strong diuretic effect make this inappropriate for those with low blood pressure. Since I do indeed have low blood pressure, the cautious approach would be for me to avoid dandelion coffee entirely (and possibly other parts of the plant too). I'm not that cautious, but I will bear this in mind and make sure I only drink this when well hydrated and not, for example, at the end of a boozy meal.

Following the instructions, after washing the roots and patting dry (with a tea towel), I roasted them. I had the oven lit anyway for stew (gas mark 3, which is 160°C or 325°F), so I just put the roots on a baking tray on a lower shelf for a couple of hours. When I checked them after that, they looked pretty well done. I broke one in half so you can see that it's dark brown all the way through.


Roasted roots

I don't have a coffee grinder and I did consider using a spare pepper mill, but in fact these roots were so brittle that they were easy to break up and crush to a fine-ish powder with the pestle and mortar.


Ground dandelion coffee - roughly a heaped teaspoonful.

Although the recipe said to simmer the drink for around 10 min, I couldn't shake the maxim, Boiled coffee is spoiled coffee. OK, I know it's not really coffee, but still. Lacking also a coffee pot or cafetiere (being not much of a coffee drinker) I chose to brew this in much the same way as I'd brew tea, but with not-quite-boiling water. I left the pot on top of the wood burner to keep warm while it brewed for ten minutes or so, then poured through a strainer lined with a bit of kitchen towel, as the powdered root is probably finer than loose tea.


Well it looks like coffee...

I added milk and sugar, as I would for coffee, and it was remarkably nice and surprisingly similar to actual coffee. It was a bit weak, but then I didn't have many roots. Perhaps it would have been stronger if I'd simmered it, but that would have been more work.

In fact, what surprised me most was how little effort all this was. Starting with roots as a byproduct of gardening (no additional effort), and apart from cleaning, which was a bit fiddly, this was hardly any work at all. I don't think I'll set out to harvest dandelions this way, if only because it destroys the plant, but if I dig up some plants anyway I might well clean the roots and put them aside until next time I have the oven lit.

Also harvesting this week:
Hairy bittercress (+cream cheese sarnie)
Parsnips, unexpectedly
Potatoes, ditto
Red cabbage
Navelwort; Lesser celandine; Sorrel: salad

Also eating this week:
Bilberry and blackberry jam

Foraged food challenge summary page here.

Tuesday, 19 February 2013

Parsnip surprise

The surprise being that there were some!

I sowed lots of parsnips last year, but when I investigated in late autumn, I found none thicker than a pencil and most not even that. I quickly - perhaps too quickly - concluded that, like everything else in the garden, they'd failed. Then yesterday I noticed fresh new parsnip leaves coming through.


New leaves, so there must be something under there

Then on closer inspection:


It's huge!

In my despondency I'd obviously missed these last year. If there are roots worth having, I don't want them putting all that stored energy into making new plants, I want to eat them! I dug up all I could find, and though most were pretty tiny, there were several that were well worth the effort of digging up.


Parsnip harvest.

I was even more surprised when I discovered this one:


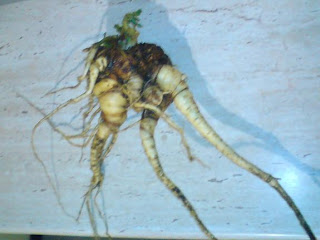
Mutant parsnip monster

This beast is now going into its third year. I could have eaten it a year ago but instead saved it for seeds (which I then failed to collect. They might yet come up amongst the peas). Several of those side roots are bigger than many of the parsnips I sowed last year.

All in all, I have a much better parsnip harvest than I thought I had. I put a few of the smaller ones into a stew this evening and they were delicious - really sweet. I'm looking forward to eating the rest of them, or at least, those I can be bothered to prepare (the little ones might just be too fiddly).

Friday, 15 February 2013

Foraged Food Friday: Navelwort

Thanks to Hazel for introducing this one to me last year. I've long been familiar with this plant (though mainly from holidays in Cornwall - I wonder if it grows mainly in the West?) but didn't know that it was edible.


Navelwort (Umbilicus rupestris) in what appears to be its natural habitat,
i.e. clinging to a rock.

This has been around for several weeks, if not all winter. I saw some encased in icicles a few weeks ago. In summer it puts out spectacular spiralling turrets for its flowers (I don't remember whether the flowers were interesting or not). Although this is available in the heart of winter, it's essentially a salad leaf, being crisp and somewhat lettuce-like in flavour (you may disagree with that description), and I don't tend to eat salad in the middle of winter. However, I did have some in a sandwich the other day, and very nice it was too.


Navelwort leaves in a chicken sandwich, with mayonnaise.


Also harvesting this week:
Bay leaves for chicken stock and tomato/bacon sauce and bolognese
Ground elder to go with leftover pasta and in chicken stock
Oregano; Bittercress; Lemon thyme: bolognese
Leeks to go with chicken risotto

Also drinking this week:
Dandelion wine
Sloe wine
Dandelion tea

Foraged food challenge summary page here.

Saturday, 9 February 2013

New Very old doorbell

When we moved here, there was an electric doorbell that didn't work, as they often don't. We removed it and since then, have had to listen for a knock, often running to the door when Pebble scratches her ear while sitting next to something, or going to the wrong door as we can't tell which one is being knocked on.

I inherited a rather fine brass bell. Grandma said it came from a monastery, but then she said the little spice chest was Jacobean - a view not shared by the probate officer. In any case, it's a very fine bell and I rather fancied it for doorbell. Not long after we moved here, we replace a couple of wall lights and I kept the brackets, thinking I might find a use for them...

Doorbell suspended from old light fitting

As you can see, the bell has two holes in the top. I used one of these to support the weight of the bell, taking a strip of leather from one of my old shoes and sewing it into a loop. Doing this job first made every subsequent job awkward and noisy. I used the other hole for the ringing mechanism which was, in essence, a bit of string. However, making that bit of string work proved more complicated than I had initially anticipated.

My first attempt followed the path of the electric wire that had formerly powered the light, going up from the bell, through a hole in the bracket, then along a channel in the top of the bracket. Because I didn't want the bell pull to go into the wall, I cut a side channel to allow the string to come down in a convenient position.


First attempt at bit-of-string pull mechanism

Unfortunately, friction proved my enemy. It was possible to make the bell ring, but one had to pull very hard indeed. My neighbour, who kindly tested the bell for me on a number of visits, almost pulled the bell off the wall when she finally pulled hard enough to make it sound. Back to the drawing board.

I thought about it, and thought about it some more, and just as I was falling asleep, the solution came to me! Remarkably, I remembered my bright idea the next day. Off to the workshop I went in search of useful things...


Exactly what I needed!

Even better, there was a bent tent peg close by that was just the right thickness to go through those holes in the middle of the Useful Things. With the application of some superglue, a hammer, pliers, and most importantly a pipe-and-stick gadget whose name I don't know, in spite of the fact it was still in its packaging...

Bit of string now has a pulley to go round. Considering how easily tent pegs bend when you don't want them to, it was very hard to make one into this shape!

With the string now rising straight up to a pulley, there is far less friction and the doorbell works easily. Now all I have to do is rig up another bit of string to the other door, and a second bell so they don't sound the same. I think I'll leave that for another day.

Friday, 8 February 2013

Foraged Food Friday: Dandelion leaves

Dandelion greens seem to be a staple of wild food, perhaps because the plant is fairly well known. Personally, I've always found the leaves too bitter to enjoy, but I've heard that if they're blanched they're much milder, so that has to be worth a try. Blanched in this context means grown without light, so the leaves end up pale and anaemic-looking.

If you're going to the trouble of depriving a plant of light for a while, this seems to me to be getting away from wild food. Even if the plant self-seeded (and they do, more than somewhat), this does seem to be an element of cultivation. On the other hand, if you move a bag of stuff that's been sitting in a corner for several months and happen to find a blanched dandelion or two underneath, well that's a different matter entirely.


Dandelion (Taraxacum officinale), looking rather sorry for itself.
The brighter green leaves just behind are ground elder.

Having chanced upon this specimen of blanched dandelion, I picked a leaf and nibbled cautiously. Nope. Still way too bitter. You might like it - lots of people do, apparently - but it's not for me, and I'm not especially sensitive to bitter tastes.

When I said I'd eat a different food each week, I didn't say how much I'd eat, did I?

I'll try to find something tastier next week. Any suggestions?

Also harvesting this week:
Hairy bittercress, for soup
Also drinking/eating this week:
Blackberry wine
Sloe wine
Rhubarb squash
Blackcurrant fruit leather

Foraged food challenge summary page here.

Thursday, 7 February 2013

(Not so) new kettle

Our electric kettle sprang a leak, which upset Pebble greatly. You see, it sat on the counter directly above where we fed her, so a leaky kettle meant drops of boiling water landing on a cat's head while she was trying to have dinner.


The things a cat has to put up with!

We then started using an old camping kettle, heating it over the gas hob.


Camping kettle. It's red, and it has a whistle.

This was fine - how did we all get persuaded that an electric kettle is more convenient than a hob kettle? It's no different at all - until it too sprang a leak. It may have leaked before, but we never noticed in a field. Either way, we had the same dripping-hot-water-on-the-cat problem that we had before.

By this time, I was converted to stove-top kettles and started looking for a replacement. I found one I liked the look of and if they'd had it, or something similar, in the local cookshop, I would have bought it, but they didn't. Then I wrote a blog post on thinking about where products come from, how they're made, and whether anyone's exploited in the process. Hmm, new kettle... no idea about the supply chain... guess fairly high probability of exploitation. I paused.

I've long fancied an old copper kettle, but when I've enquired in junk shops, the owners have been leery of the idea I might actually use such an item for its intended purpose. Now I know that our ancestors did many things that we now know to be risky, and suffered the consequences, so I'd be willing to believe that copper is dangerous, but for the fact that all the water pipes in my house are made of copper. If this metal is known to be dangerous, why is it used to deliver drinking water?

A little investigation showed me lots of very expensive French copper cooking pans, but these were all "tinned", i.e. lined with another metal (probably, but not necessarily, tin). OK, so those manufacturers think it's worth keeping food separate from copper, but what about a kettle? Is boiling water more similar to hot food or to cold tap water? Is it the heat that's important? Actually no, it turns out to be the acidity in food that reacts with the copper, resulting in excess copper in the food. Well that's OK, then. Tap water is typically slightly alkaline, so boiling it in a kettle shouldn't cause leaching of excessive copper into the water.

Thus reassured, I set about looking for copper kettles. As well as some that were very expensive, I found this Portuguese manufacturer. I nearly bought one directly, but then wondered if I might be able to find an old kettle. After all, isn't it more eco to reuse an old item than to buy a new one? That was when I found this advert on Etsy (not sure how long that'll stay up, so here's a screenshot - click to see). That really does look very like the Portuguese ones. Being neither new nor antique, it was fairly cheap, too.

It was being sold as an ornament, but its similarity to the Portuguese ones made me take a chance on it being useable. I duly ordered it and, after some delay, received my lovely new copper kettle, and it really is pretty. Furthermore, it turns out to be tinned, so my research on cooking in copper is irrelevant. It's also shiny. The lack of tarnish, as well as the feel against my fingernail, told me that it was protected by a lacquer. Putting that over a flame would be a bad idea. However, the Portuguese site had instructions for how to deal with this: Boil in water with soda crystals dissolved in it (one tablespoon per two pints). So I did.


Ian said I'd misunderstood, Boiling the kettle

It took ages to get all that water to boil, but when it finally did I saw clouds appearing in the water...


Something's happening

... which, when poked with a spoon, turned into dollops and strings of gloopy lacquer.


There we are! Lovely gloop.

Once I was satisfied I'd got all the lacquer off, I washed the kettle thoroughly and boiled and discarded one kettleful of water. I now have a lovely, shiny, new(ish) copper kettle.


Shiny new kettle

Of course, it'll take some polishing to keep it shiny, but I don't mind the duller look of slightly tarnished copper, so that'll be fine in between times. There's no whistle, which we're a bit sorry to lose, so I'll just have to listen to the sound of the water as it boils, the way my mother taught me when I was little. It does pour beautifully, too.

Friday, 1 February 2013

Foraged Food Friday: Hairy Bittercress

Hairy bittercress is neither hairy nor particularly bitter. It's a prolific weed that grows all over my garden.


Hairy bittercress (Cardamine hirsuta) with sundry weeds

At this time of year it forms a small rosette of leaves, about an inch and a half to two inches across.


A closer view of two bittercress plants, plus one rose bay willow herb. That stuff gets everywhere.

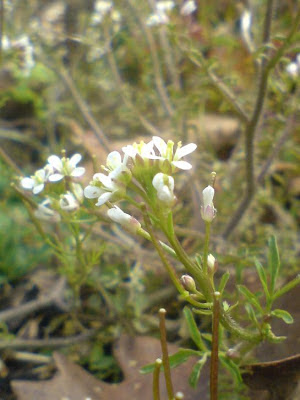
Later in the year it puts up stalks of pretty little white flowers, followed by seed pods that ping open when touched.


A bittercress flower, photographed in May last year

Since it's so abundant, I have to dig it up anyway to reclaim my vegetable beds and it's nice to be able to get a meal from my weeding. I pinch off the roots as I harvest it, so as to leave most of the mud in the garden, but it still needs washing and picking over very thoroughly. I then cut through the stalks close to the base of the plant so the rosette falls apart. It's quite fiddly to prepare but worth it at this time of year when I'm craving fresh greens.

Whilst I was waiting for the marmalade to cook the other day I made some mayonnaise, and had a tuna and bittercress salad for lunch.


Also harvesting this week:
Tiny ground elder leaves
Also drinking this week:
Blackberry wine

Foraged food challenge summary page here.